Fortifying the Zero Trust Framework with Okta Advanced Posture Checks
May 2026: This is an Early Access release
April 2026: Added Windows section
Introduction
In today’s increasingly complex and perilous digital landscape, the concept of Zero Trust has evolved from a security buzzword to a fundamental architectural principle.
Organizations are no longer able to implicitly trust any user or device, regardless of their location or network.
This paradigm shift demands a more granular and dynamic approach to access control, one that continuously validates the security posture of every device seeking to access protected resources.
Enter Okta Advanced Posture Checks: a powerful enhancement to the Okta Identity Cloud that empowers organizations to enforce stringent, customizable device security requirements, bolstering their Zero Trust framework and mitigating the risk of unauthorized access.
This blog post delves into the technical intricacies of Okta Advanced Posture Checks, exploring how it transcends traditional device assurance by enabling the creation of custom security checks tailored to an organization’s unique risk profile.
We’ll examine how this capability allows for the validation of a wide range of device attributes, from operating system configurations and patch levels to the presence of specific security software and adherence to bespoke compliance policies. Furthermore, we’ll provide a comprehensive overview of the implementation process, including best practices for defining custom checks, integrating with existing device management infrastructure, and crafting effective remediation strategies.
By equipping security teams with the tools to implement fine-grained control over device access, Okta Advanced Posture Checks represents a significant step forward in proactive security. It moves beyond simple “allow” or “deny” decisions, enabling a more nuanced approach that balances robust security with a seamless user experience.
Join us as we explore how Okta Advanced Posture Checks can help your organization strengthen its security posture, enforce compliance, and confidently navigate the challenges of modern identity and access management.
Prerequisites
Before diving into the intricacies of Okta Advanced Posture Checks, ensure the following prerequisites are in place:
- Okta Identity Engine: Advanced Posture Checks is a Early Access feature of the Okta Identity Engine.
- Okta Device Assurance: A strong understanding of Okta Device Assurance is essential, as Advanced Posture Checks builds upon its capabilities.
- macOS Devices: Verify that the devices you intend to evaluate with Advanced Posture Checks are on macOS version 14.4 or later.
End-users will need to have Okta Verify (version 9.39.0 or later) installed on their macOS devices. - Windows Devices: Verify that the devices you intend to evaluate with Advanced Posture Checks are on Windows 10 (22H2 or later).
End-users will need to have Okta Verify (6.7.0 or later) installed on their Windows devices. - Device Management: Advanced Posture Checks often integrates with device management solutions (MDM) to gather device context.
Ensure you have a compatible MDM solution in place and that it is properly integrated with Okta. - OSQuery: Familiarity with OSQuery is often necessary, as it is a powerful tool used to query device information for Advanced Posture Checks on macOS and Windows.
- Security Policies: Understanding your organization’s security policies and compliance requirements. Advanced Posture Checks is used to enforce these policies.
By ensuring these prerequisites are met, you’ll be well-equipped to leverage Okta Advanced Posture Checks to enforce a robust Zero Trust security strategy.
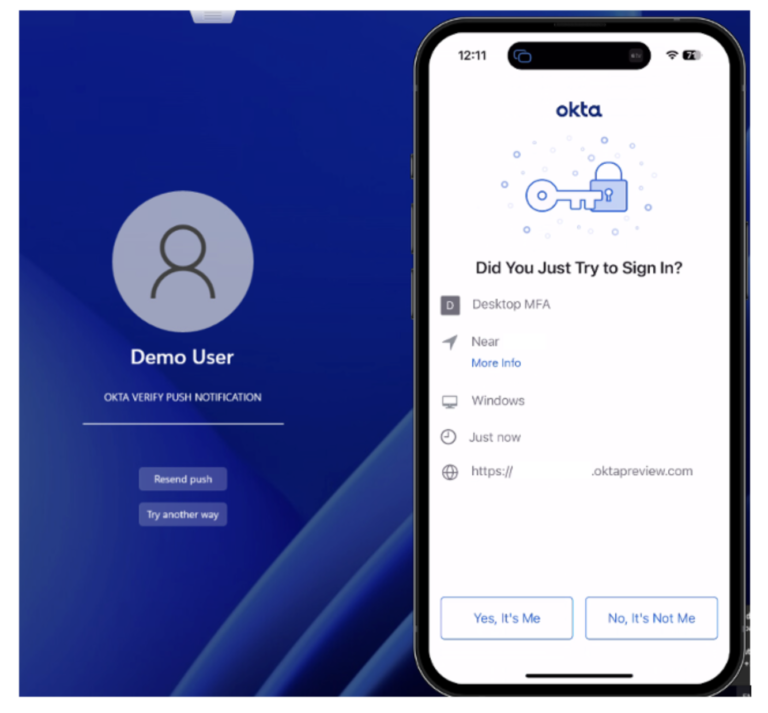
Seeing is Believing: Advanced Posture Checks in Action
Before we dive into the technical “how-to,” let’s look at the end result. Below are two demonstrations showing how Advanced Posture Checks behave in the real world. By leveraging platform-specific signals, Okta can ensure that only fully compliant devices gain access to your environment.
macOS: Verifying Firewall Status via OSQuery
In this walkthrough, we demonstrate how Okta Verify uses a custom OSQuery to inspect the macOS system state.
Windows: Verifying Firewall Status via OSQuery
This demo focuses on the Windows ecosystem, highlighting how Okta Verify assesses the local firewall state to determine device health.
Now that you’ve seen the power of custom posture checks, let’s break down how to build this in your own environment. Whether you are managing a fleet of MacBooks or Windows workstations, the setup follows a structured path
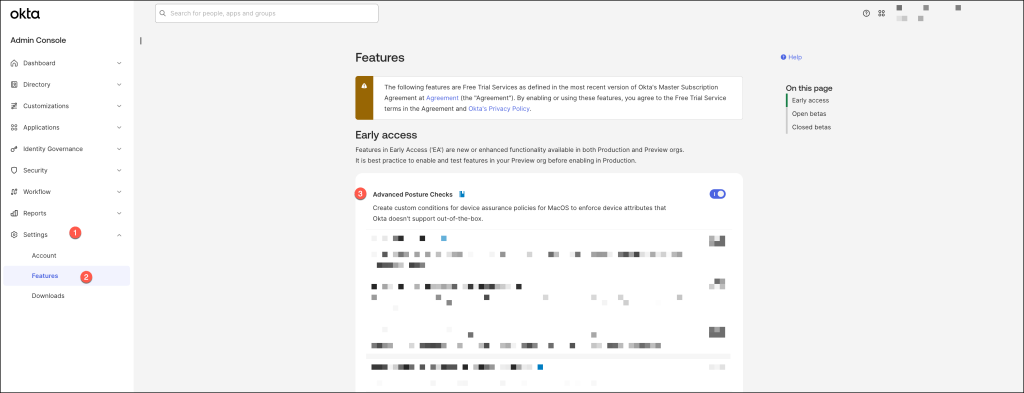
Enable Advanced Posture Checks in Okta
To enable this feature, proceed to the Settings section, then navigate to Features, and activate Advanced Posture Checks.”
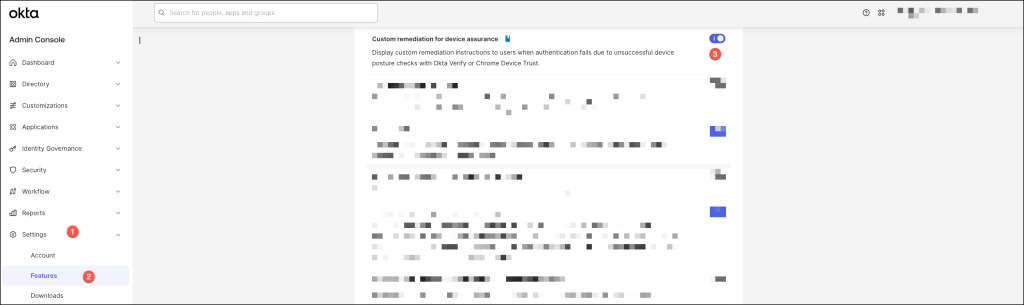
In order to utilize custom remediation messages for users failing to meet device assurance compliance, the following feature must also be enabled.
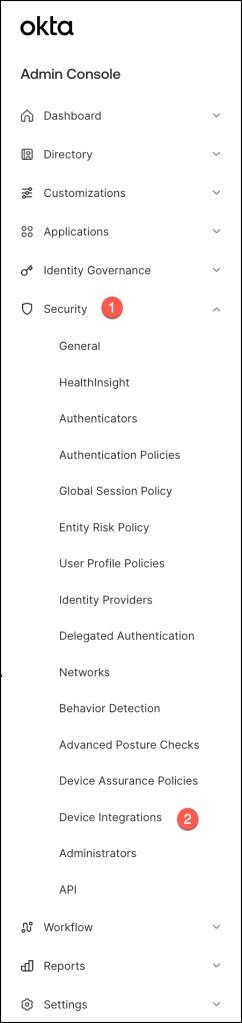
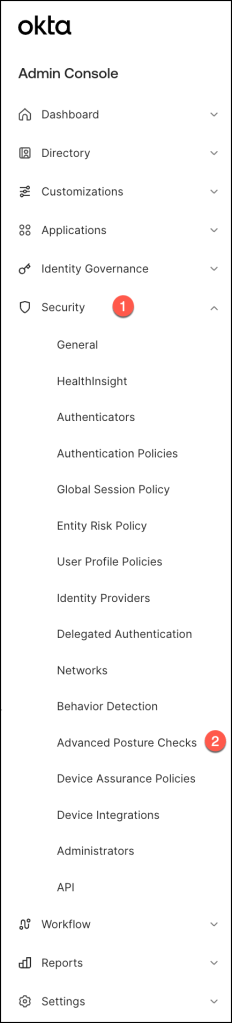
To access device integration settings, navigate to the Security section within the Okta Admin Console, and then selectDevice Integrations.
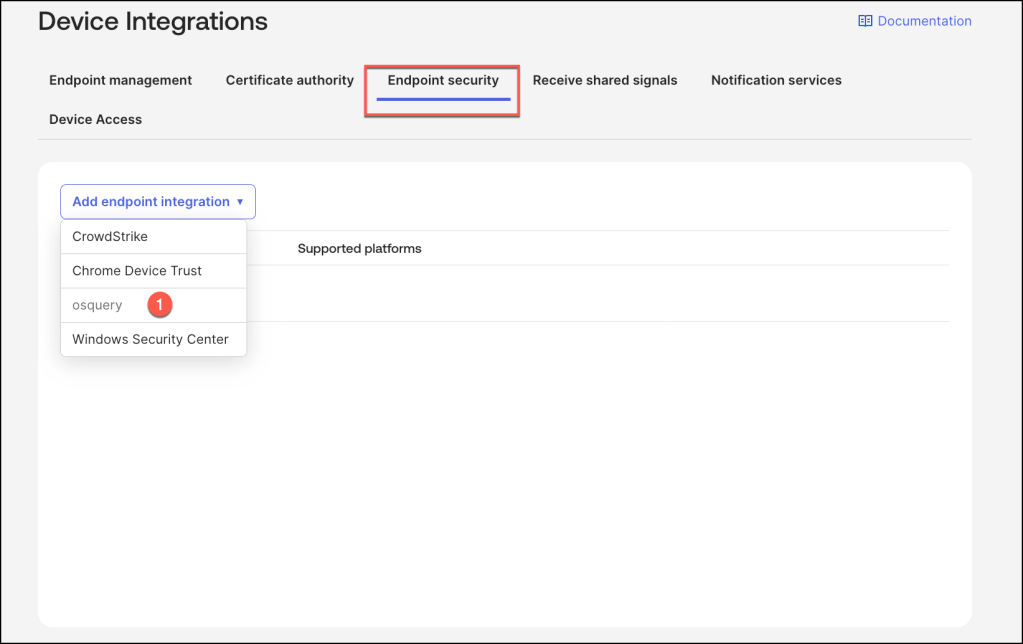
Establish the osquery integration within the Endpoint security tab by selecting ‘Add endpoint integration‘ and specifying ‘osquery‘
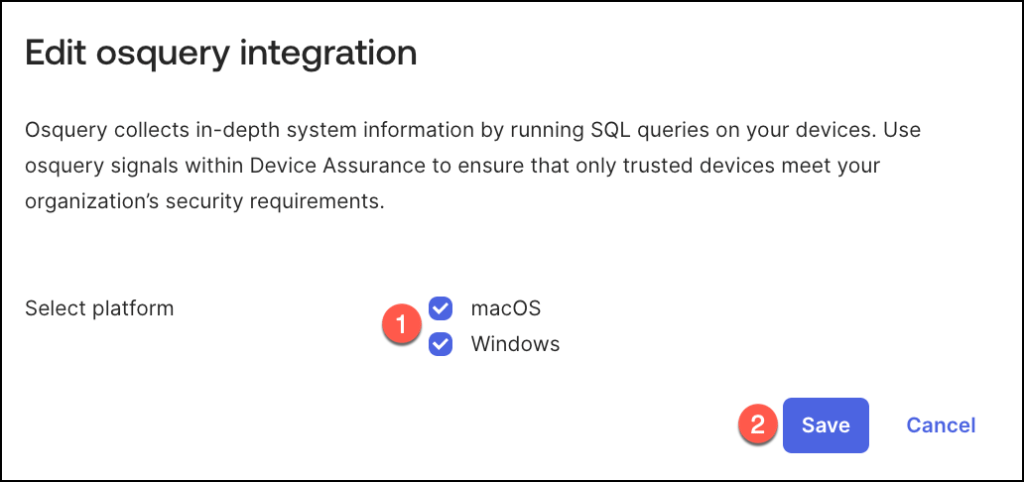
Choose the relevant platform and save the configuration.
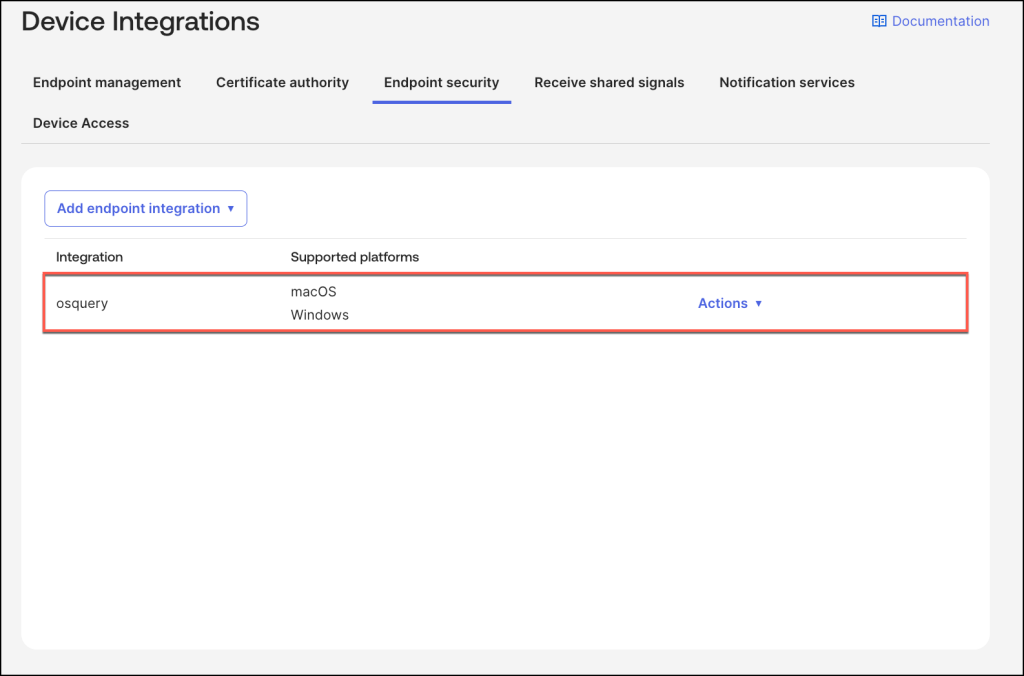
The device integration should be configured as illustrated below.
How to Configure Custom Device Checks
Standard posture checks cover the basics, but they don’t always capture the specific security requirements of your organization. By configuring Custom Device Checks, you can instruct Okta to look for unique identifiers—such as specific registry keys or property list values—to ensure a device is truly managed and secure.
Depending on your fleet, the setup process varies slightly between macOS and Windows to accommodate their different system architectures.
How to Configure Custom Device Checks for macOS
Enabling custom posture checks on macOS devices involves a multi-step process, primarily driven through your existing Mobile Device Management (MDM) infrastructure.
- MDM Configuration for Custom Checks: Initially, utilize your MDM solution to enable custom posture checks on the target macOS devices.
This prepares the devices to allow Okta Verify to gather the necessary data. - Okta Verify Deployment with Configuration: Deploy Okta Verify to macOS devices via your MDM, including a Property List (
.plist) file containing the required configuration properties. This configuration file instructs Okta Verify on how to handle custom checks. Refer to “Deploy Okta Verify to macOS devices” for detailed instructions. - Okta Verify Configuration Keys: Within the Property List file, the following keys must be appended to the Okta Verify configuration to enable and control custom OSQuery checks:
OktaVerify.EnableOSQueryCustomChecks: This key enables the use of custom OSQuery checks.OktaVerify.OSQueryAllowedDomains: This key specifies the domains from which OSQuery queries are permitted, enhancing security and preventing unauthorized data retrieval.
By following these steps, you can effectively configure macOS devices to support custom posture checks, allowing Okta Verify to enforce your organization’s specific security requirements.
The following template can be utilized to deploy the plist configuration. Ensure that the ‘YOUR_OKTA_URL’ value is appropriately modified to reflect your organization’s Okta tenant.
<?xml version="1.0" encoding="UTF-8"?>
<!DOCTYPE plist PUBLIC "-//Apple//DTD PLIST 1.0//EN" "http://www.apple.com/DTDs/PropertyList-1.0.dtd">
<plist version="1.0">
<dict>
	<key>PayloadContent</key>
	<array>
		<dict>
			<key>PayloadContent</key>
			<dict>
				<key>com.okta.mobile</key>
				<dict>
					<key>Forced</key>
					<array>
						<dict>
							<key>mcx_preference_settings</key>
							<dict>
								<key>OktaVerify.EnableOSQueryCustomChecks</key>
								<true/>
								<key>OktaVerify.OSQueryAllowedDomains</key>
								<string>YOUR_OKTA_URL</string>
							</dict>
						</dict>
					</array>
				</dict>
			</dict>
			<key>PayloadDisplayName</key>
			<string>Custom Settings</string>
			<key>PayloadIdentifier</key>
			<string>FC3CB8C0-9A8B-4AF6-A874-AE0944A49C63</string>
			<key>PayloadOrganization</key>
			<string>JAMF Software</string>
			<key>PayloadType</key>
			<string>com.apple.ManagedClient.preferences</string>
			<key>PayloadUUID</key>
			<string>FC3CB8C0-9A8B-4AF6-A874-AE0944A49C63</string>
			<key>PayloadVersion</key>
			<integer>1</integer>
		</dict>
		<dict>
			<key>PayloadContent</key>
			<dict>
				<key>com.okta.mobile.auth-service-extension</key>
				<dict>
					<key>Forced</key>
					<array>
						<dict>
							<key>mcx_preference_settings</key>
							<dict>
								<key>OktaVerify.EnableOSQueryCustomChecks</key>
								<true/>
								<key>OktaVerify.OSQueryAllowedDomains</key>
								<string>YOUR_OKTA_URL</string>
							</dict>
						</dict>
					</array>
				</dict>
			</dict>
			<key>PayloadDisplayName</key>
			<string>Custom Settings</string>
			<key>PayloadIdentifier</key>
			<string>CABBB7A4-5F01-44F6-87F1-441AFFE89287</string>
			<key>PayloadOrganization</key>
			<string>Your Organization</string>
			<key>PayloadType</key>
			<string>com.apple.ManagedClient.preferences</string>
			<key>PayloadUUID</key>
			<string>CABBB7A4-5F01-44F6-87F1-441AFFE89287</string>
			<key>PayloadVersion</key>
			<integer>1</integer>
		</dict>
	</array>
	<key>PayloadDescription</key>
	<string></string>
	<key>PayloadDisplayName</key>
	<string>Okta - APC</string>
	<key>PayloadEnabled</key>
	<true/>
	<key>PayloadIdentifier</key>
	<string>C9A6E106-A80B-4752-937E-1E56C770F10C</string>
	<key>PayloadOrganization</key>
	<string>Your Organization</string>
	<key>PayloadRemovalDisallowed</key>
	<true/>
	<key>PayloadScope</key>
	<string>System</string>
	<key>PayloadType</key>
	<string>Configuration</string>
	<key>PayloadUUID</key>
	<string>9B0434CC-DEB7-4B4D-A795-3F97931AF8F6</string>
	<key>PayloadVersion</key>
	<integer>1</integer>
</dict>
</plist>
How to Configure Custom Device Checks for Windows
Similar to macOS, enabling custom OSQuery checks on Windows requires coordination between your MDM and the Okta Verify agent.
The process ensures the agent is correctly provisioned to execute and report on custom security signals.
Deployment with Custom Flags:
To begin, you must configure your MDM to install Okta Verify with the custom check feature toggled on. This is done by setting the EnableOSQueryCustomChecks configuration value to
True during the deployment phase.
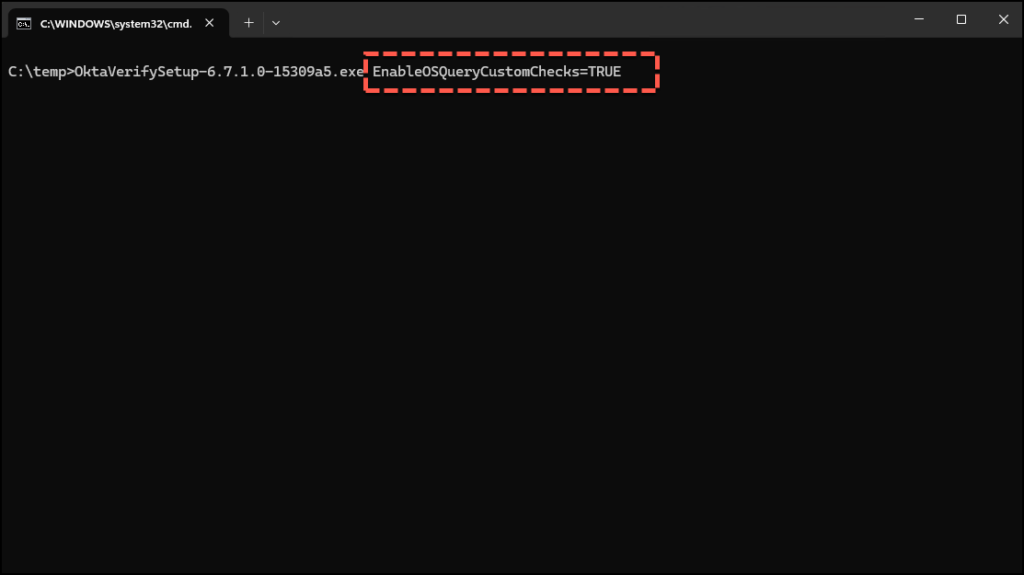
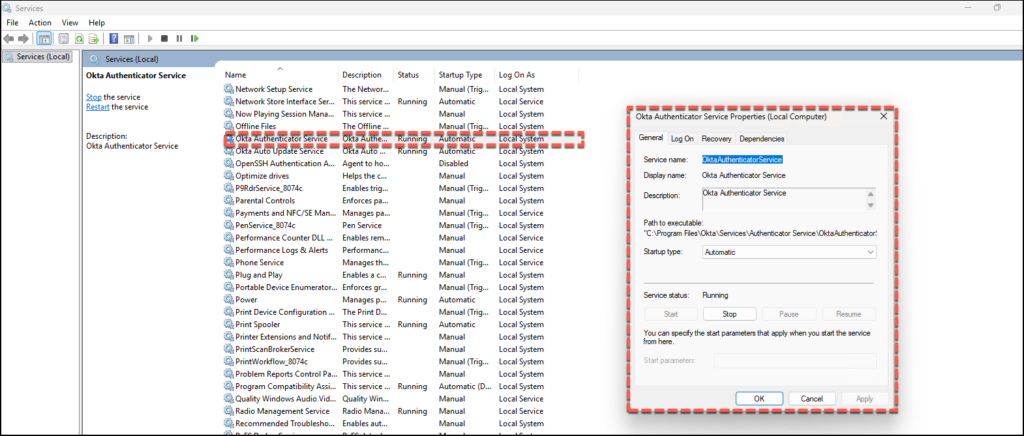
This will install the new Okta Authenticator Service and osqueryi.exe.
Manifest File Integration:
For Windows devices to process these requests, you must generate and install an osquery plugin manifest file.
This file acts as the bridge between Okta and the OSQuery engine.
Once generated, this integration plugin must be deployed to your fleet to allow Okta Verify to interpret and execute the specific queries you’ve designed.
Use the following PowerShell script to produce the manifest file:
$manifest = [ordered]@{
    name           = "com.okta.device.osquery"
    description    = "Okta provided integration collecting signals through osquery."
    type           = "com.okta.device.osquery"
    format         = "JSON"
    timeout        = 10000
    allowedDomains = @("myokta.okta.com", "myokta.example.com")
# Add your allowed domains here
}
$filePath = "$env:ProgramData\Okta\OktaVerify\Plugins\com.okta.device.osquery.json"
$content = $manifest | ConvertTo-Json
$utf8 = New-Object System.Text.UTF8Encoding($false)
[System.IO.File]::WriteAllText($filePath, $content, $utf8)
Optional: Adjusting Collection Timeouts
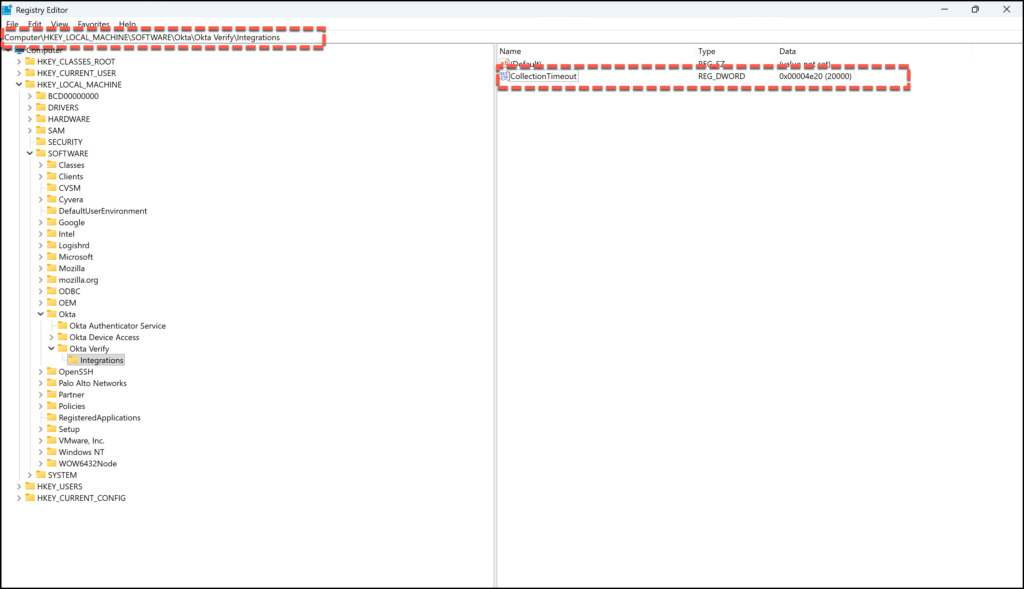
In environments with high latency or complex policy requirements, the default 5,000ms (5 seconds) window for signal collection may not be sufficient. You can manually extend this by creating a registry entry:
- Location:
HKLM\SOFTWARE\Okta\Okta Verify\Integrations - Value Name:
CollectionTimeout(DWORD 32-bit) - Recommended Value:
20000(Decimal) for a 20-second timeout window.
Create custom checks
The configuration of custom checks is accessed via the Security -> Advanced Posture Checks path within the Okta Admin Console.
Begin the custom check creation process by clicking ‘Add custom check’ on the
Custom checks tab.
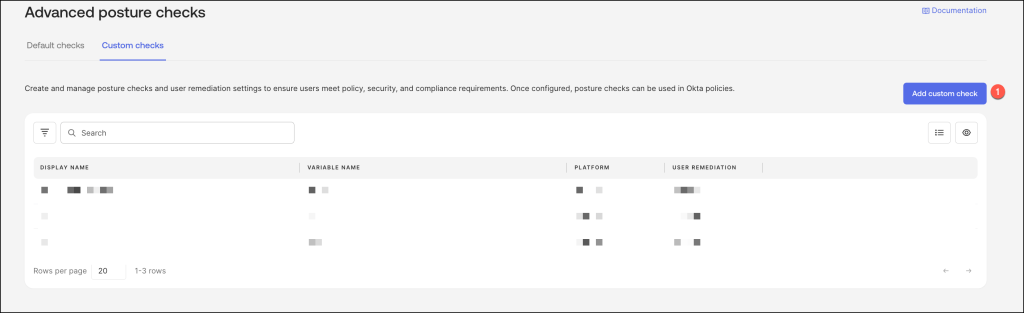
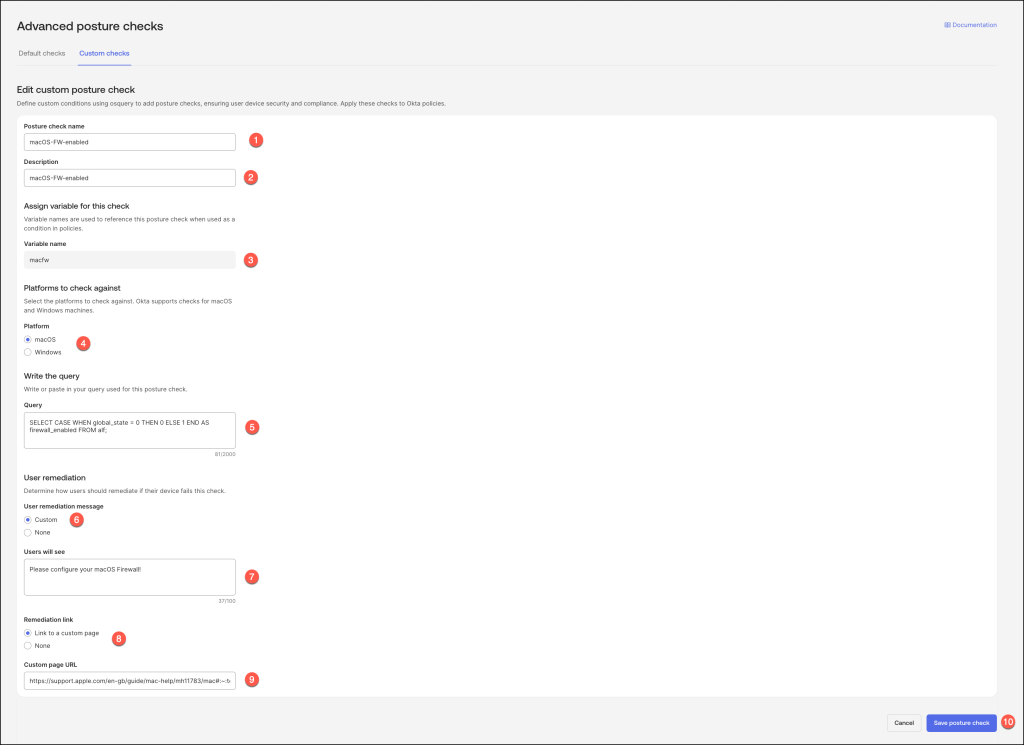
The following steps outline the procedure for configuring a posture check:
- Name: Provide a descriptive and unique name for the posture check.
- Description: Enter a detailed description of the check’s purpose and the conditions it evaluates.
- Variable Assignment: Assign a unique variable to this posture check. This variable will be used to reference the check when configuring device assurance policies.
- Select macOS or Windows
- SQL Query Definition: Construct a query using standard SQL syntax to define the logic of the posture check. Ensure the query terminates with a semicolon (;).
- Remediation Guidance: Optionally, to enhance the user experience, provide clear and concise remediation instructions that will be displayed in the browser if the device fails the posture evaluation.
- Text: Enter the remediation text.
- Remediation Link: Optionally, provide a custom URL link with more detailed remediation information.
- Remediation Link: Paste your custom URL.
- Save: Save the posture check configuration.
The following query provides an example of how to verify whether the macOS Firewall is enabled.
SELECT
CASE
WHEN global_state = 0 THEN 0
ELSE 1
END AS firewall_enabled
FROM
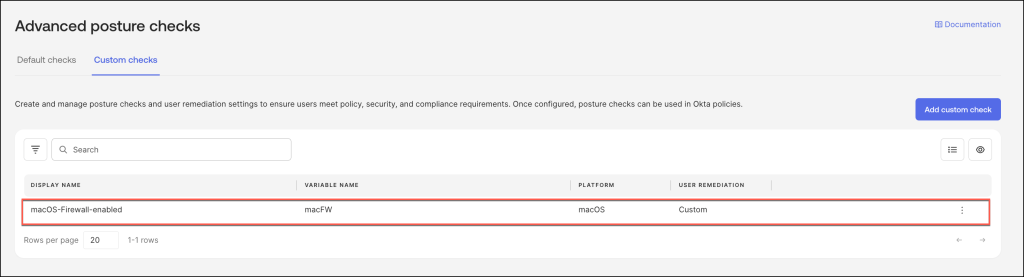
alf;The following query provides an example of how to verify whether the Windows Firewall is enabled.
SELECT firewall_status FROM (SELECT CASE WHEN firewall = 'Good' THEN 1 ELSE 0 END AS firewall_status FROM windows_security_center UNION ALL SELECT 0 AS firewall_status) ORDER BY firewall_status DESC LIMIT 1;The operation should yield the following results.
Add the custom check to a device assurance policy
Navigate to Security > Device Assurance Policies
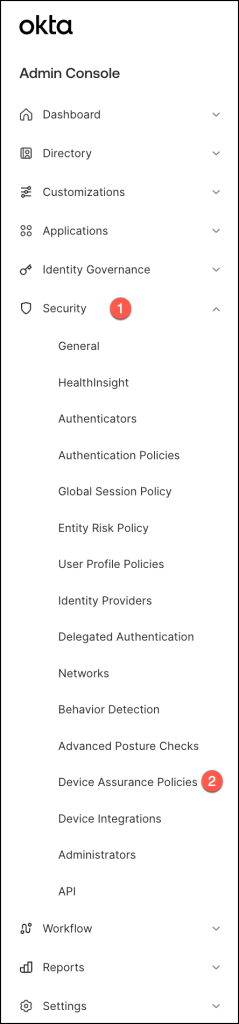
In the Device Assurance Policies click Add a policy.

The following procedure details the configuration of a device assurance policy:
- Policy Name: Specify a unique and descriptive name for the set of device attributes to be defined.
- Platform: Select the target device platform for which the device conditions will be established.
- Configure the device assurance conditions specific to the chosen platform.
- Custom Posture Check Selection: Within the ‘Custom posture check’ section, locate
- and select the desired posture checks from the dropdown menu.
- Posture Check Enforcement: Select ‘Enabled’ to incorporate the chosen checks into the policy.
- Save: Save the device assurance policy configuration.

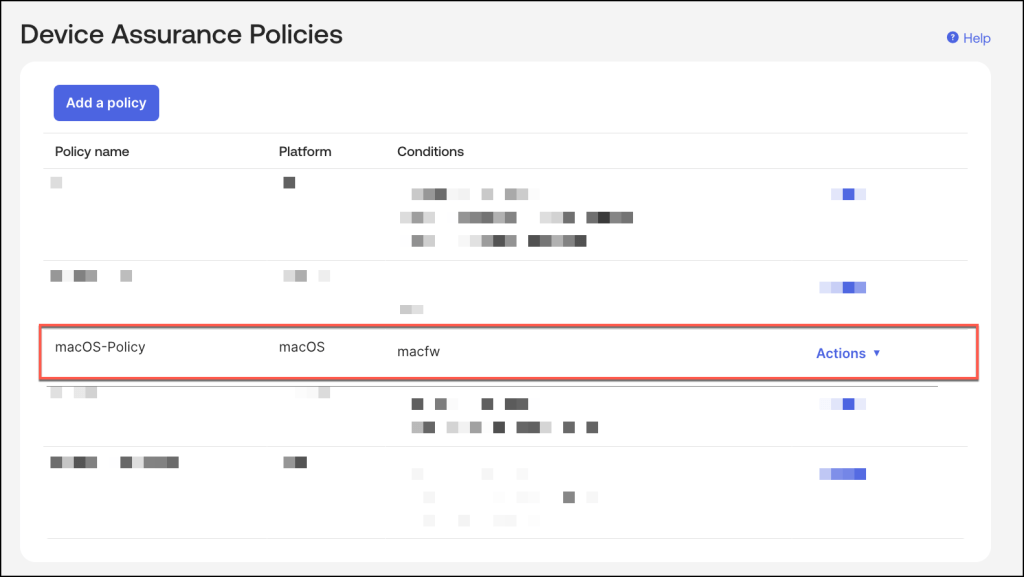
Validate the settings within the Device Assurance Policy.
Add the device assurance policy to an authentication policy
Platform-specific device assurance policies can be integrated into authentication policy rules to enforce stringent access controls.
By incorporating device checks into these rules, organizations can establish minimum security requirements for unmanaged devices seeking access to critical systems and applications. It’s important to note that when a policy rule is configured with multiple conditions, the satisfaction of any single condition will trigger the rule.
To ensure comprehensive device signal collection by Okta, it is imperative to configure a DENY action within the catch-all rule.
This configuration guarantees that all access attempts, including those that do not meet the specified device assurance criteria, result in the collection of relevant device information.
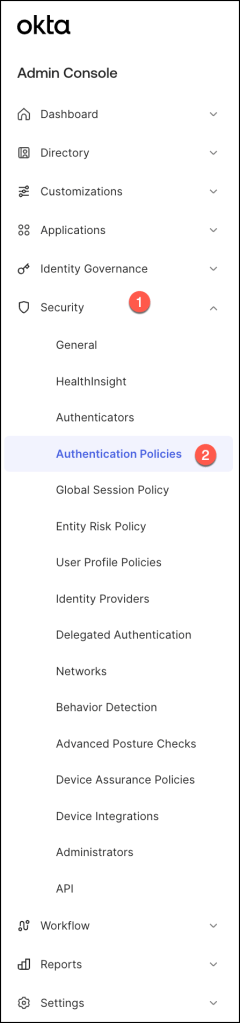
In the Admin Console, go to Security > Authentication Policies.
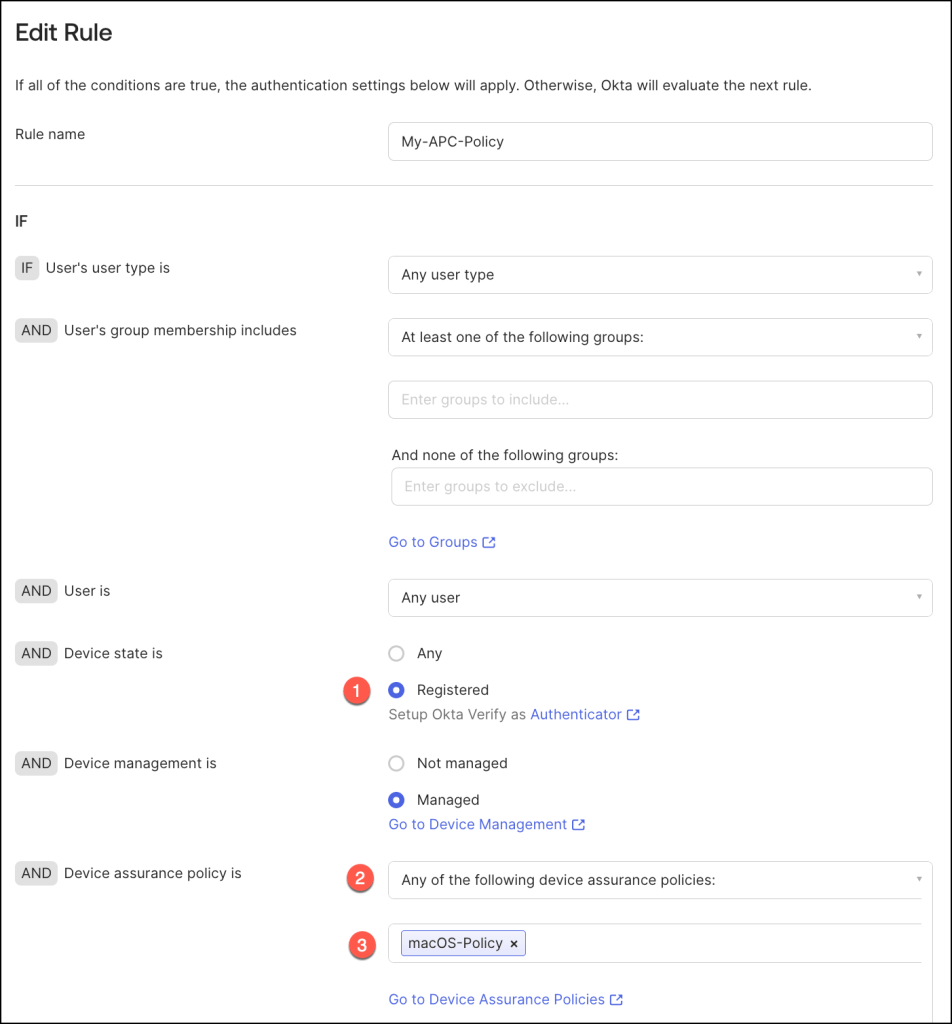
Select a policy and click Add Rule to add a new rule for device assurance.

- For AND Device state is, select Registered.
- For AND Device assurance policy is, select Any of the following Device Assurance conditions,
- and then select the device assurance policy you have previously created.
Logs
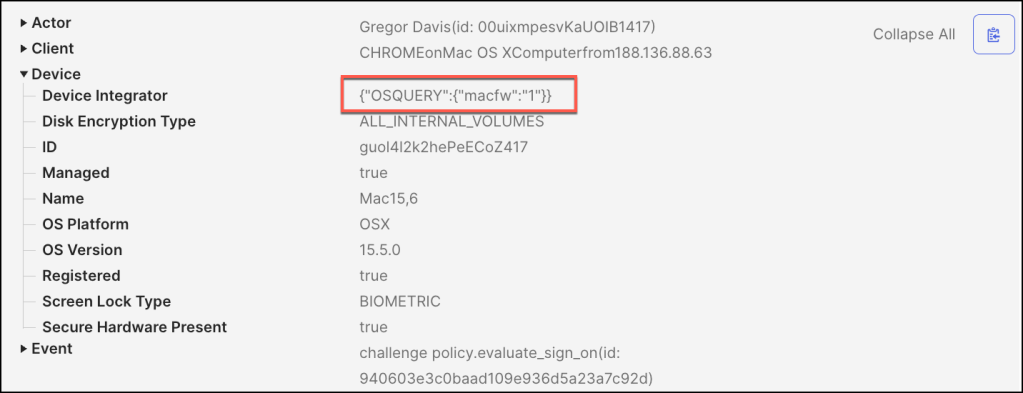
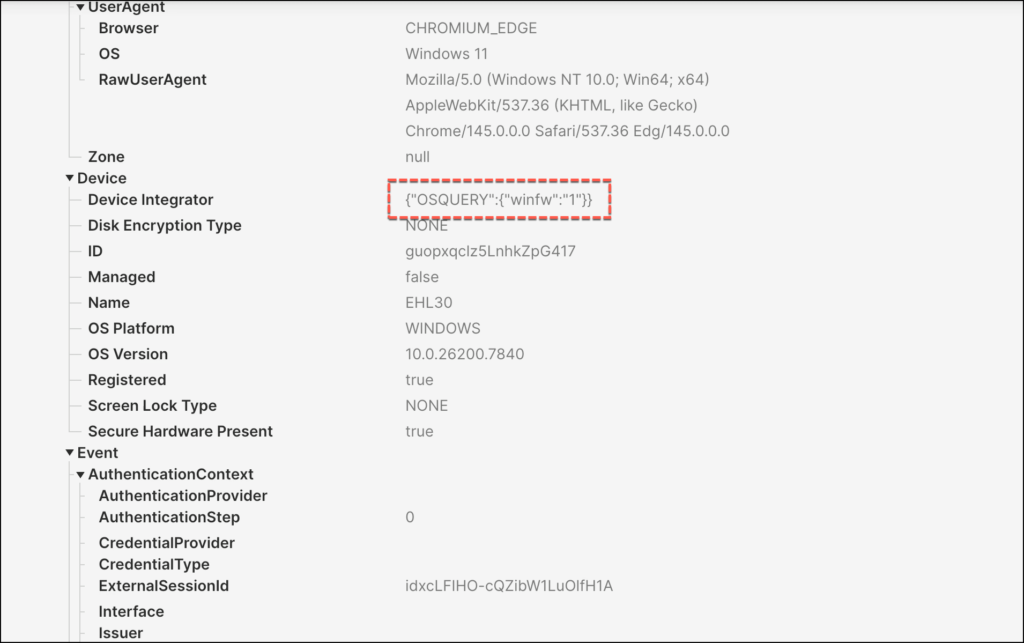
The device context for that authentication can be viewed in the Okta console by navigating to Reports > System Log.
The custom check should appear as a Device property.
Miscellaneous
Foundational osquery proficiency is required for effective utilization.
Consult the following resources for guidance on query development and modification, noting that AI assistants can provide supplementary support:
- Osquery Schema Version 5.14.1
- Instructional Blogs on osquery Query Authoring
- Sample Query Repository
Conclusion
As organizations navigate an increasingly complex threat landscape, the adoption of a robust Zero Trust security framework is no longer a matter of choice, but a strategic imperative. Okta Advanced Posture Checks provides a pivotal enhancement to this framework, empowering organizations to move beyond perimeter-based security and embrace a more granular, context-aware approach to access control.
By enabling the creation of custom, fine-grained device checks, Okta Advanced Posture Checks allows for the continuous validation of device security, ensuring that only compliant and healthy devices can access sensitive resources.
From a technical perspective, the ability to define custom checks using industry-standard SQL, integrate with existing MDM solutions, and leverage OSQuery for detailed macOS insights represents a significant leap forward in device security.
This granular control allows security teams to enforce policies tailored to their specific risk profiles, addressing vulnerabilities that traditional device assurance solutions might miss. Furthermore, the customizable remediation capabilities empower end-users to proactively address compliance issues, reducing the burden on IT support and improving overall security hygiene.
The business value of Okta Advanced Posture Checks is equally compelling.
By minimizing the attack surface and reducing the risk of data breaches, organizations can protect their valuable assets and maintain customer trust. This translates to increased operational efficiency, reduced security costs, and improved compliance with industry regulations such as GDPR, HIPAA, and PCI DSS. Moreover, by fostering a culture of security awareness and empowering users to take ownership of their device compliance, Okta Advanced Posture Checks contributes to a stronger overall security posture. In conclusion, Okta Advanced Posture Checks is not merely a technical solution, but a strategic enabler for organizations seeking to establish a resilient Zero Trust architecture, mitigate risk, and thrive in the face of ever-evolving cyber threats.