Enhancing Security with Okta Identity Threat Protection and Omnissa
Introduction
In today’s rapidly evolving threat landscape, maintaining robust security while ensuring seamless access is a critical challenge for organizations.
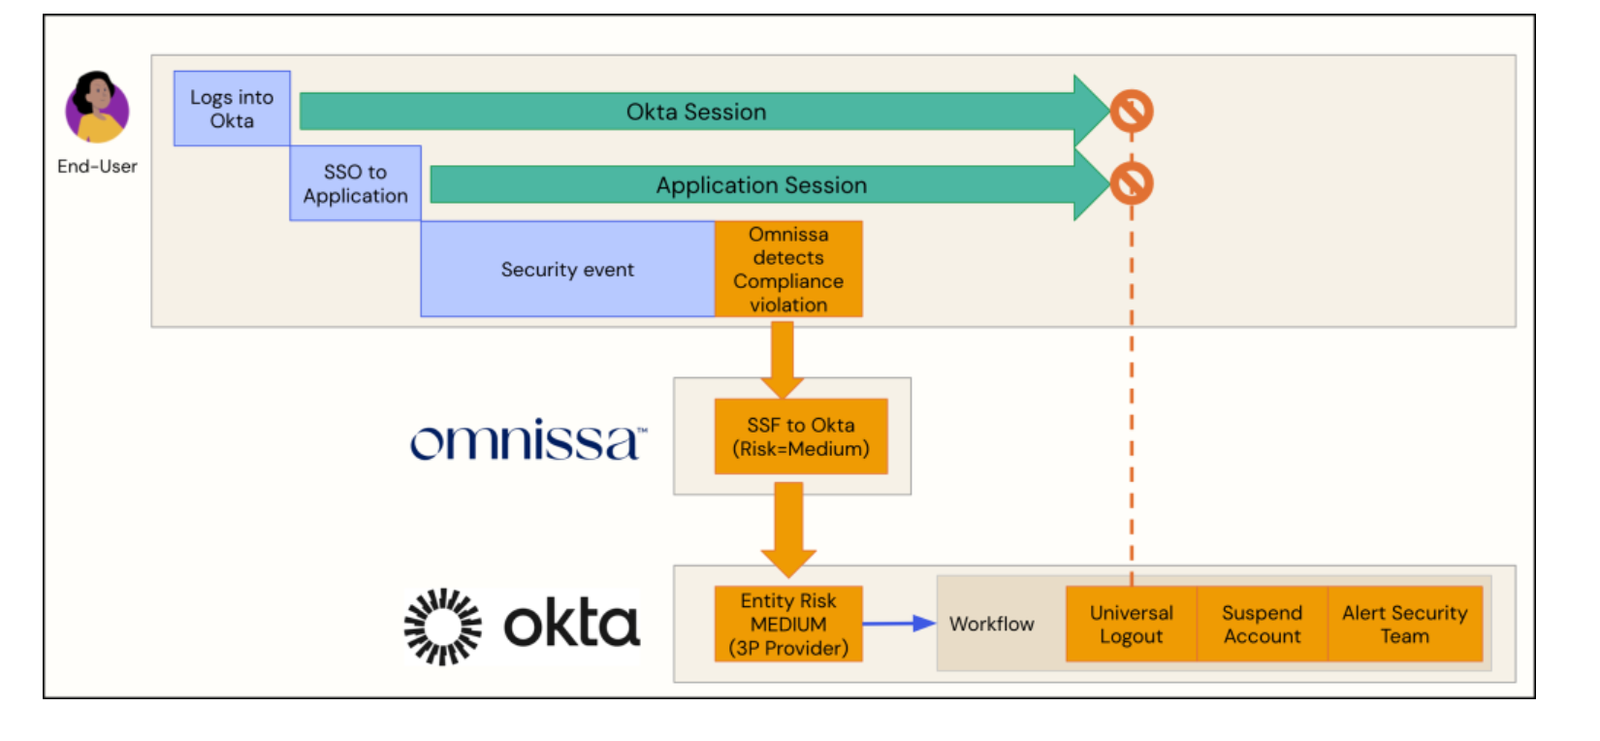
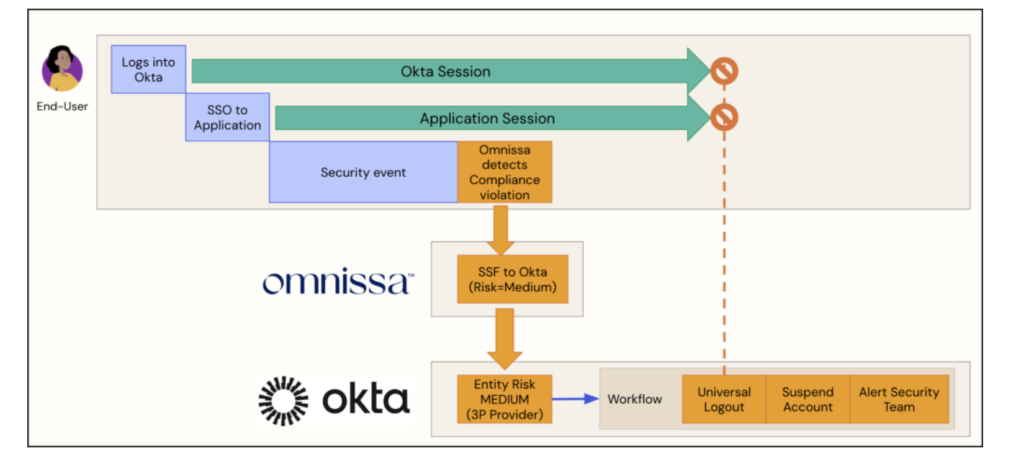
Continuous Access Evaluation (CAE), powered by Security Signal Sharing between Okta Identity Threat Protection (ITP) and Omnissa, introduces a revolutionary approach to adaptive threat response.
By leveraging real-time data sharing and integration, this collaboration enhances security decision-making without compromising user experience.
At the core of this architecture is the Shared Signals Framework (SSF), an open standard that facilitates the exchange of security signals between participating systems.
This framework enables organizations to build interconnected ecosystems, where critical risk signals—such as anomalous login attempts, session hijacking, or malicious IP activity—are communicated instantly across platforms.
This post will explore how integrating Okta ITP with Omnissa maximizes security posture through CAE and SSF, offering insights into configuration, detection workflows, and real-world implementation strategies.
Prerequisites
To begin, let’s review the prerequisites required to successfully implement this configuration.
Okta
Before diving into the technical details of Okta Identity Threat Protection (ITP), ensure the following prerequisites are in place to maximize its effectiveness:
- Your organization must be operating on the Okta Identity Engine (OIE).
- The Identity Threat Protection SKU must be enabled in your OIE org.
- Define Entity Risk Policies that align with your security requirements.
These policies will be used to evaluate user risk and trigger appropriate responses based on threat levels. - Connect Okta to Omnissa as the Security Event Provider via the Shared Signals Framework (SSF).
This enables real-time threat signal sharing and continuous access evaluation. - Pre-configure Universal Logout for supported applications within Okta
- Pre-configure Okta Workflows to automate actions in response to detected risks. Examples include revoking access tokens, notifying administrators, or logging out users.
Omnissa
To effectively implement and explore the integration between Okta Identity Threat Protection (ITP) and Omnissa for security signal sharing, ensure the following prerequisites are in place:
- Omnissa Intelligence, more information can be found here
- Omnissa Access, more information can be found here
- Omnissa Workspace ONE UEM, more information can be found here
- Workspace ONE UEM Compliance Policies configured
- Device(s) enrolled in Workspace ONE UEM
Omnissa configuration
In this section, I will walk you through the necessary configuration steps on the Omnissa platform to ensure seamless integration with Okta Identity Threat Protection.
These steps are crucial for aligning Omnissa’s security features with Okta’s identity management tools, enabling a cohesive security posture for your organization.
Configure Security Events in Omnissa
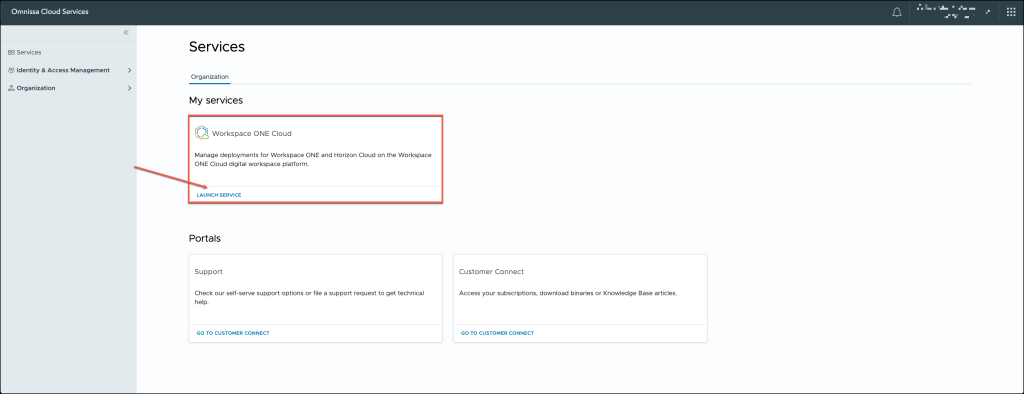
Log in to to your Omnissa Cloud Services portal.

After logging in with your credentials, navigate to the Cloud Services section within the platform.
From there, you can select and launch the specific Workspace ONE cloud service relevant to your organization’s needs.
Navigate to the Workspace menu, then select Security Events from the options. Once you’re on the Security Events page, click the GET STARTED button to begin the setup process.

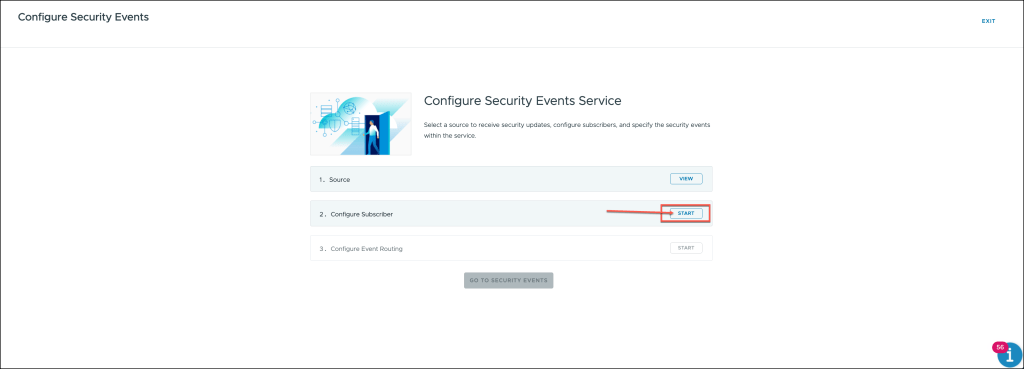
The configuration wizard for Security Events will now open. In the wizard, locate the Configure Subscriber section and click the START button to begin the setup process.
This will initiate the steps required to configure your subscriber settings for security event management.
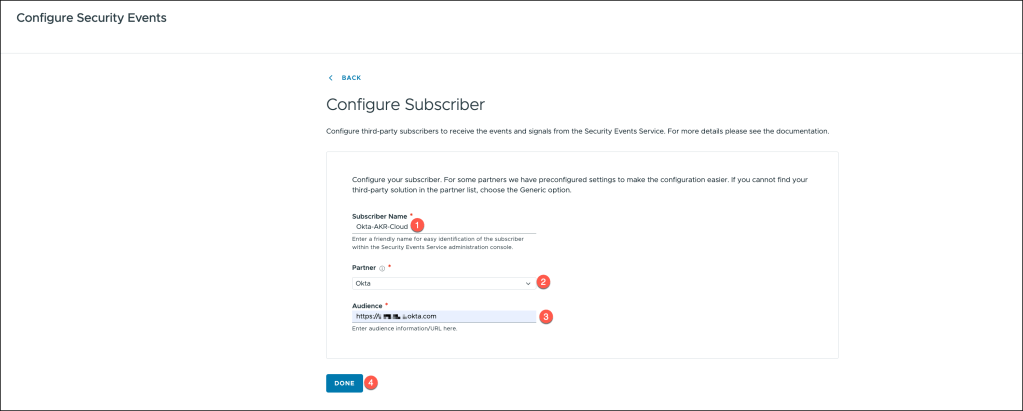
To configure the subscriber in the integration process, follow these steps:
- Enter the Subscriber Name: Begin by specifying a unique name for the subscriber, which will help you identify it within the system.
- Select Okta as the Partner: Choose Okta as the partner integration in the relevant dropdown or selection menu. This ensures that Okta is recognized as the identity provider in the setup.
- Enter the Okta URL as the Audience: In the designated field, input the Okta URL as the audience, which will establish the connection between Okta and the subscriber for secure data exchange.
- After entering the required information, click Done to complete the configuration.
This action will finalize the setup and integrate Okta as the identity partner.
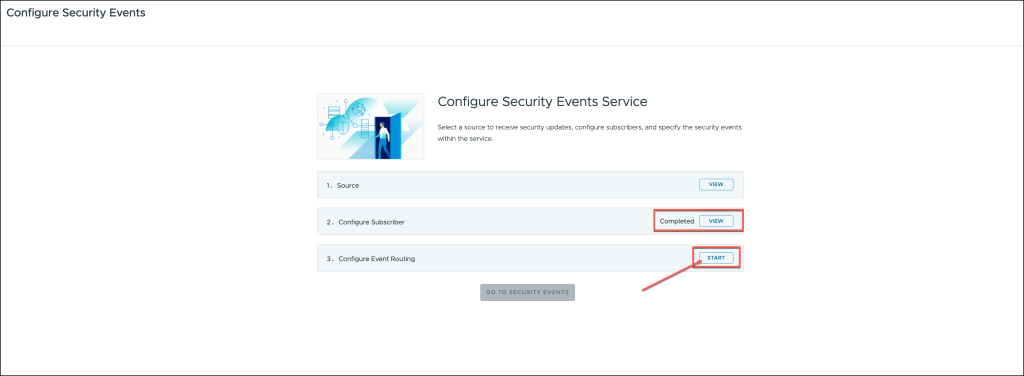
The Configure Subscriber setup has been successfully completed.
We can now proceed to the Event Routing configuration. To begin, click the START button in the Event Routing section to initiate the next phase of the configuration process.
This will allow you to define how security events are routed within your system.
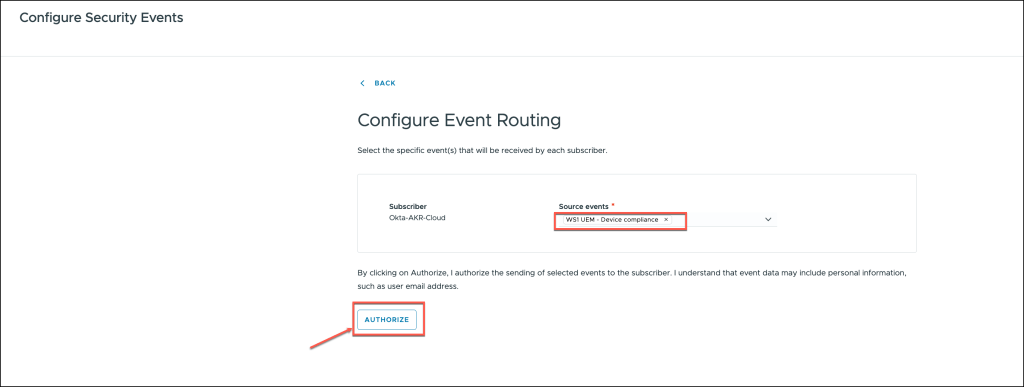
In the Event Routing configuration, select WS1 UEM – Device Compliance as the source of the events.
After selecting the appropriate source, click the AUTHORIZE button to grant the necessary permissions and enable the system to access and route the device compliance events accordingly.
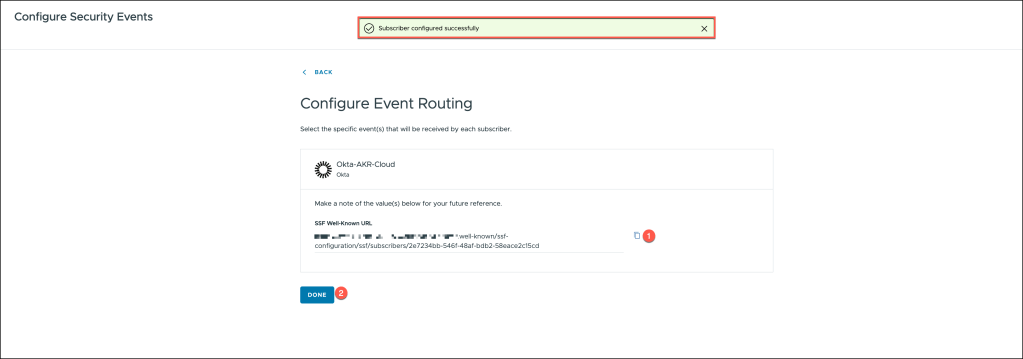
Copy the SSF Well-Known URL, as this is a critical component needed for the configuration within Okta. Ensure that you save this URL for future use in the Okta setup.
Once copied, click the DONE button to complete the current configuration step and proceed to the next phase.
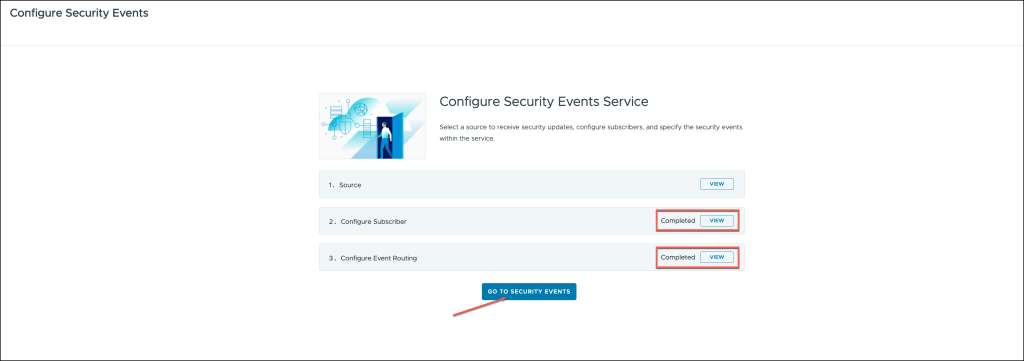
The configuration steps have been successfully completed.
At this point, your setup is finalized.
Once you’re back in the Security Events menu, you can verify and review the configuration of Active Streams, Sources, and Subscribers.
This step ensures that the event routing setup is functioning as expected and that all components are properly configured.
Active Streams: Check the status of the active data streams to confirm that security events are being transmitted in real time.
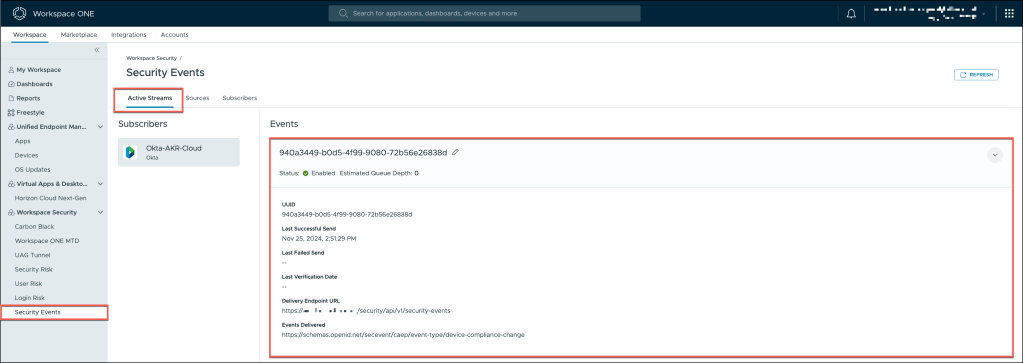
Sources: Review the list of sources from which security events are being collected to ensure they are correctly integrated and enabled.
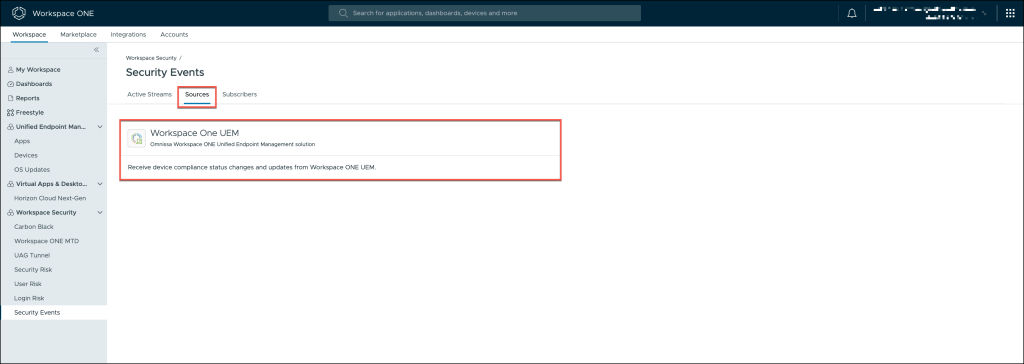
Subscribers: Verify that all subscribed systems, such as Okta and Omnissa, are correctly receiving the security events for processing.

Workspace ONE UEM Compliance policies
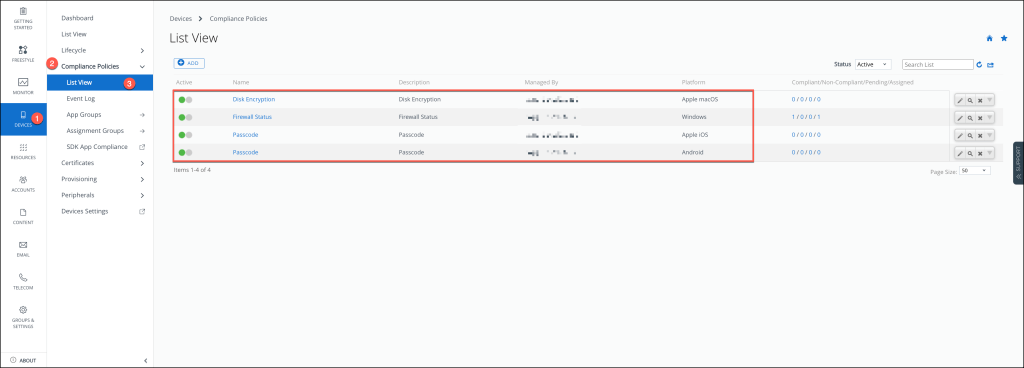
To effectively leverage Security Signal Sharing between Okta Identity Threat Protection and Omnissa, it is crucial to have compliance policies in place within Workspace ONE UEM. These policies serve as the foundation for enforcing security standards and ensuring that only compliant devices can interact with your identity and threat protection systems.
In my setup, I have configured the following Compliance Policies, which serve as examples to illustrate the process.
These policies are tailored to meet the specific security requirements of my environment. However, it’s important to note that the configurations I’ve used are just starting points, and your policies should be customized to address the unique security needs of your organization.
For more in-depth information and guidance on configuring Compliance Policies, including advanced use cases and best practices, please refer to the official documentation here.
Okta Identity Threat Protection Configuration
This section provides a walkthrough of the configuration process for Okta Identity Threat Protection (ITP), with a specific focus on setting up the Shared Signal Receiver and configuring the Entity Risk Policy. These steps are essential for enabling seamless integration of threat intelligence and for defining dynamic responses to identity-based risks within your organization’s security ecosystem.
Configure the shared signal receiver
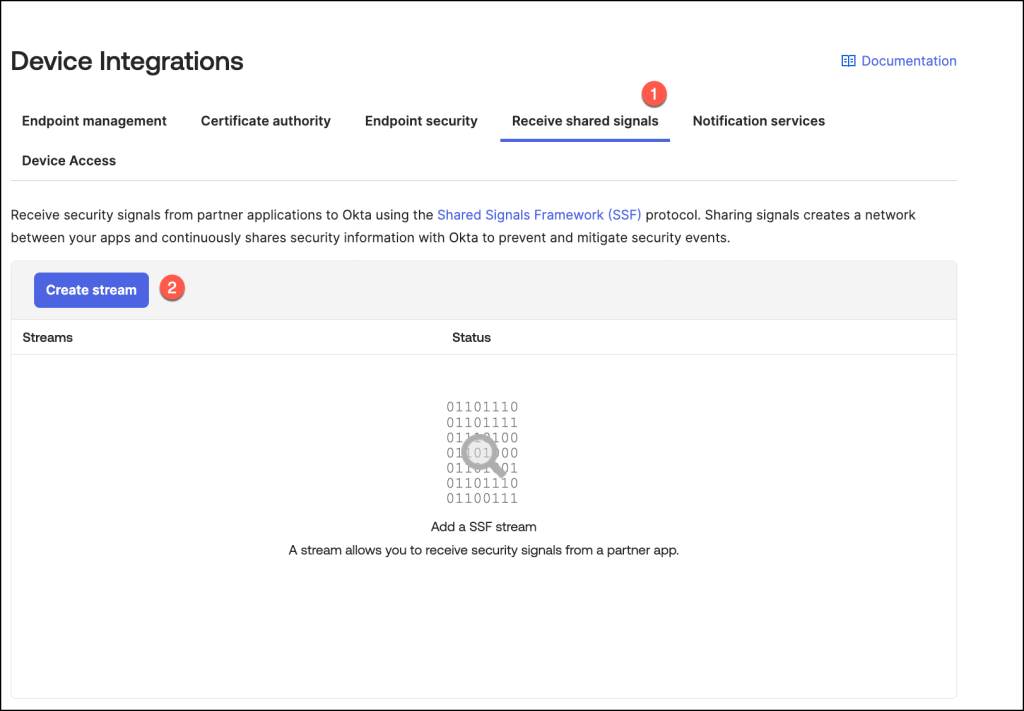
To access the necessary configuration settings in the Okta Admin Console, navigate to Security > Device Integrations.
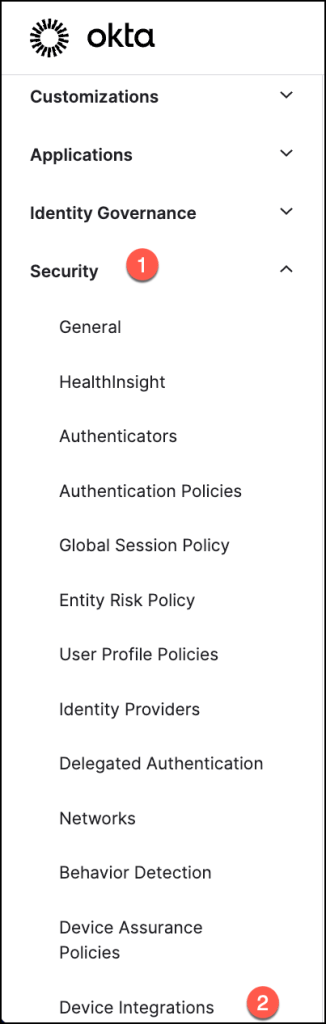
In the Receive Shared Signals tab, select Create Stream to begin setting up a new stream for shared threat intelligence.
This step initiates the process of integrating external security signals into your Okta environment for enhanced identity threat monitoring.
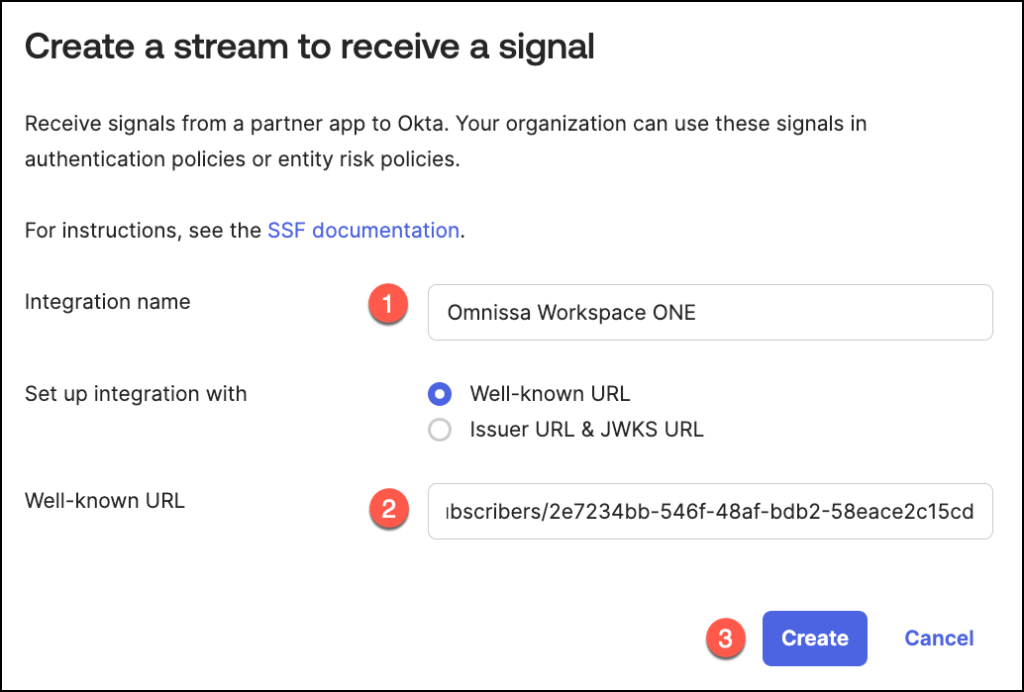
Provide a meaningful name for the integration in the Integration Name field, then paste the URL from the Omnissaconfiguration application into the Well-Known URL field.
Once all details are entered, click Create to finalize the setup.
This step establishes a secure connection for shared signal exchange between the systems.
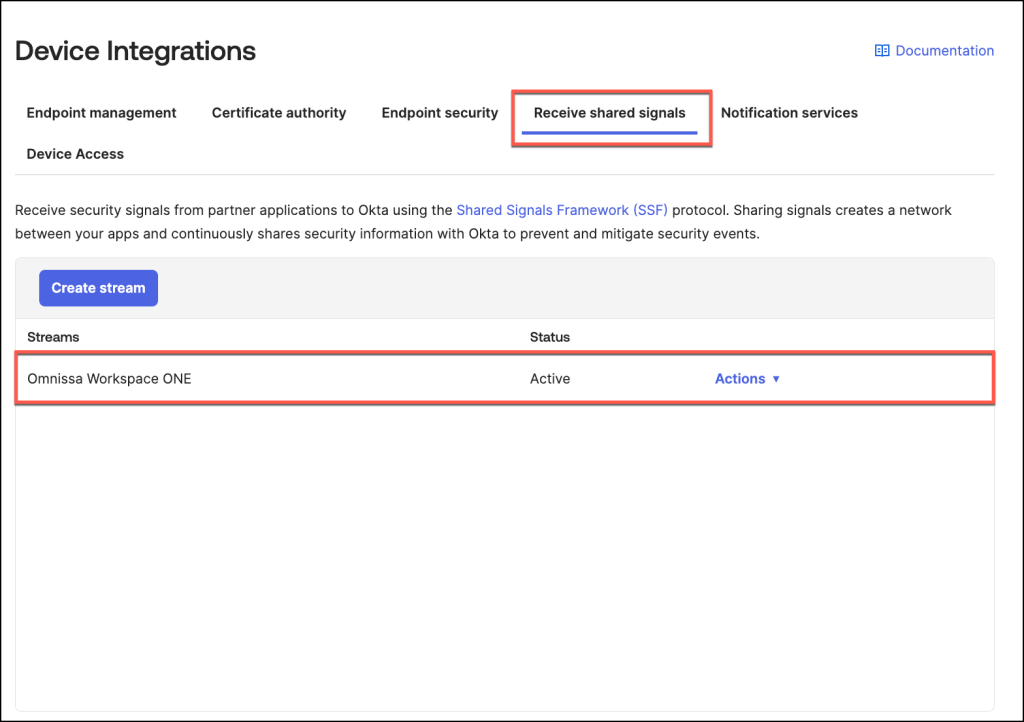
Upon successful creation, the stream is added to the Stream List in the Admin Console.
By default, its status is set to Active, indicating that the stream is ready to begin processing shared signals.
Entity Risk Policy
The Entity Risk Policy is a key feature introduced with Okta Identity Threat Protection (ITP), designed to proactively respond to identity-based threats. This policy dynamically evaluates and addresses risks whenever a user’s Entity Risk Level is updated, such as during a user.risk.change event.
Policy Structure and Evaluation
The Entity Risk Policy is comprised of one or more rules, each tailored to specific risk scenarios. These rules are evaluated sequentially, with the first matching rule determining the action taken.
The rules are defined based on:
- Group Membership: Specifies the user groups that the policy applies to. For example, policies might target high-risk users or specific organizational roles.
- Risk Detections: Identifies the specific triggers that evaluate user risk. Examples include signals from security providers or Okta’s internal risk analysis tools.
- New Risk Level: Indicates the updated risk level of the user (e.g., Low, Medium, High) that activates the rule.
Actions Based on Matching Rules
Once a rule matches, the corresponding action is executed.
The Entity Risk Policy supports multiple response options:
- Trigger Universal Logout:
Logs the user out from both Okta and all supported applications. This immediate action mitigates risks associated with compromised accounts. - Trigger Delegated Workflow:
Initiates a pre-configured Okta Workflow, enabling custom automation.
For instance, this can notify administrators, reset credentials, or perform additional security checks. - No Further Action:
Records the event in the System Log but takes no immediate action,
By leveraging the Entity Risk Policy, organizations can automate threat responses, minimize exposure, and maintain control over potential identity risks in real-time.
Add an entity risk policy rule for Universal Logout
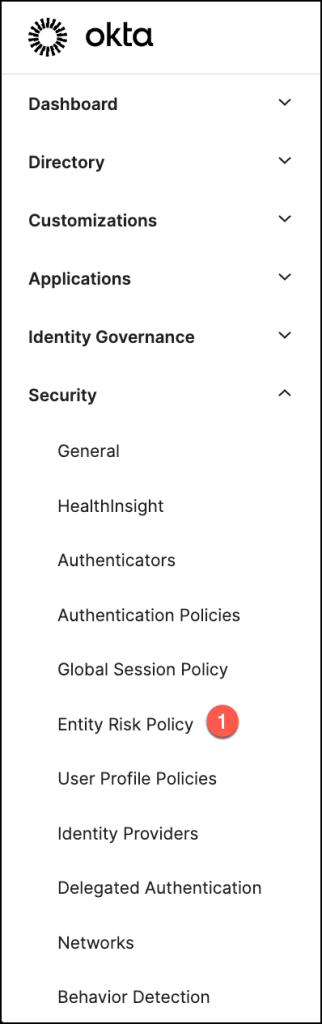
To begin, navigate to Security > Entity Risk Policy.
Select Add Rule to create a new rule within the Entity Risk Policy.
This action allows you to define custom configurations tailored to your organization’s risk management requirements.

To configure a rule, follow these steps:
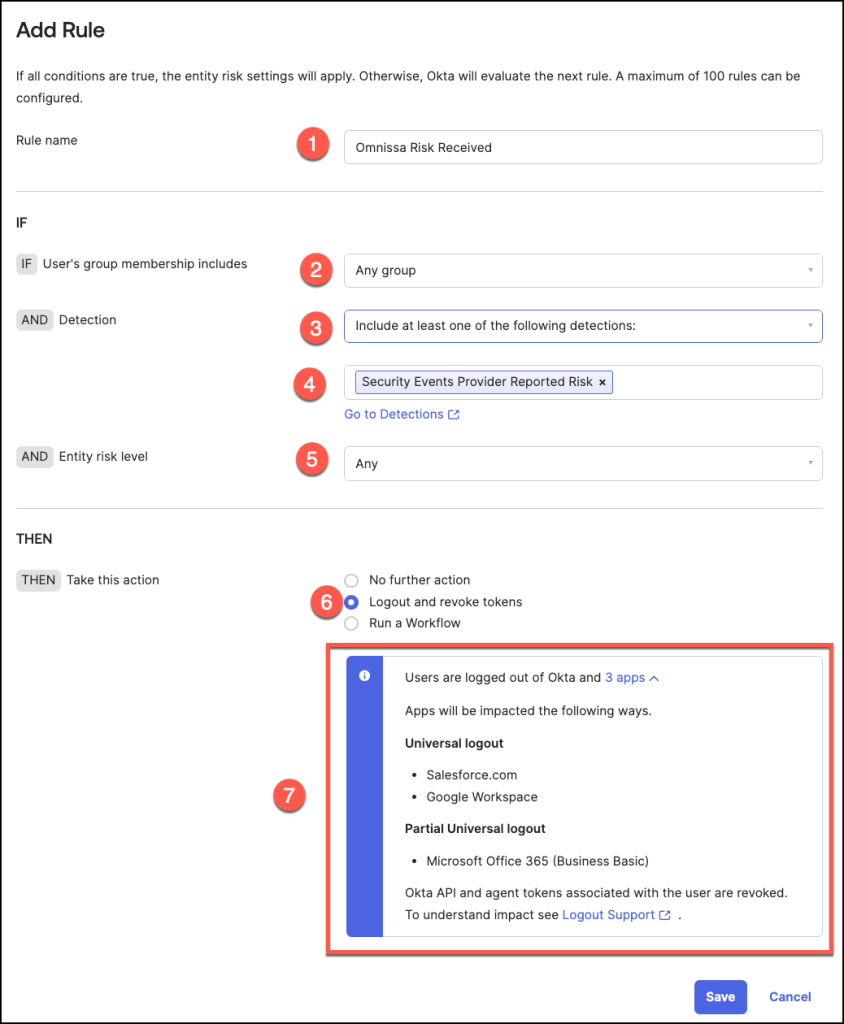
- Enter a Rule Name that reflects the purpose of the policy.
- Specify User Groups: Choose an option to define which user groups should be included or excluded from the rule. For instance, in my example, I selected Any Group to apply the rule universally.
- Set Detection Criteria: Choose Include at least one of the following detections and then select Security Events Provider Reported Risk as the detection type. This allows the system to trigger the rule based on security event risks.
- Define Entity Risk Level: Select Any for the Entity Risk Level to capture all risk levels.
- Select Any as the Entity risk level
- Select Action: Choose the desired action.
In this example, I selected Logout and Revoke Tokens. - In my configuration, Universal Logout applies to Salesforce and Google Workspace, and Partial Universal Logout to Microsoft Office 365.
For more details on Universal Logout and how to configure it, refer to the official documentation
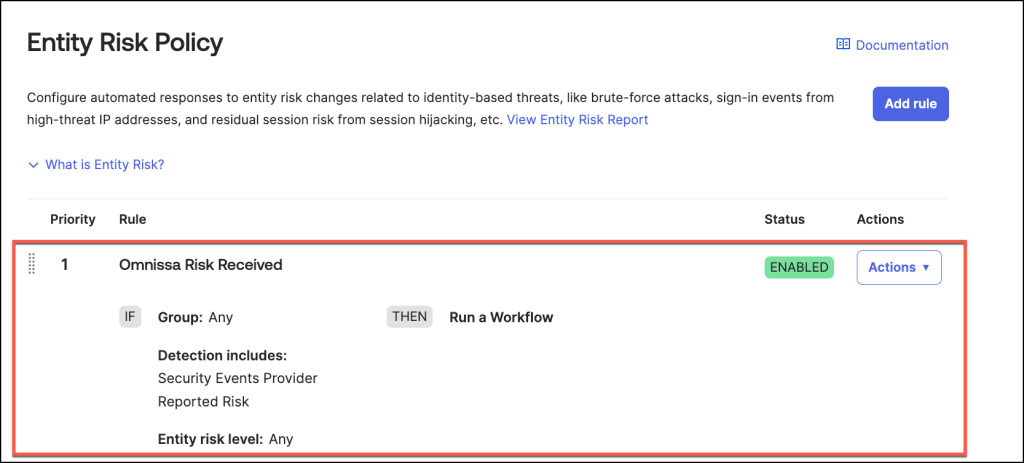
Once the Entity Risk Policy Rule is successfully configured, it will appear in the Entity Risk Policy section of the admin console.
By default, the rule’s status is set to Enabled, meaning it is active and ready to enforce the specified actions in response to detected identity risks.

Add an entity risk policy rule to run a Workflow
Let’s explore how a rule configuration can be configured to execute an Okta Workflow.
This setup allows to implement customized actions in response to specific identity risks or security events.
By integrating an Okta Workflow, you can automate complex remediation processes or trigger specific operational tasks seamlessly within your organization’s identity protection framework.
To set up a rule for executing an Okta Workflow, follow these steps:
- Enter a Rule Name that reflects the purpose of the policy.
- Specify User Groups: Choose an option to define which user groups should be included or excluded from the rule. For instance, in my example, I selected Any Group to apply the rule universally.
- Set Detection Criteria: Choose Include at least one of the following detections and then select Security Events Provider Reported Risk as the detection type. This allows the system to trigger the rule based on security event risks.
- Define Entity Risk Level: Select Any for the Entity Risk Level to capture all risk levels.
- Select Any as the Entity risk level
- Select Action: here Run a Workflow.
- To select a delegated workflow, click the dropdown menu or begin typing the name of the desired workflow, then select it from the list.
Note that you can only choose from the existing delegated flows available.
For more details on Workflows for Identity Threat Protection and how to configure them refer to the official documentation.

Once this Entity Risk Policy Rule is successfully configured, it will appear in the Entity Risk Policy section of the admin console.
Demos
Let’s explore the following demonstration scenarios to better understand how these configurations and workflows come to life in practice.
ITP Universal Logout – Omnissa Workspace ONE enrolled Device
Observability & Insights
Okta Identity Threat Protection (ITP) delivers a robust reporting and eventing framework designed to provide organizations a view of their identity threat landscape.
This framework enables security teams to gain a high-level overview of the organization’s overall identity risk and threat posture, offering insights into aggregated risk signals, user behavior patterns, and emerging threats.
When needed, administrators can dive deeper into the event data for granular threat investigations.
By leveraging detailed system logs and tailored reports, organizations can identify anomalies, trace the origins of risk events, and assess the effectiveness of security policies in real time.
This combination of comprehensive visibility and in-depth investigative tools empowers organizations to proactively mitigate risks and maintain a strong security posture across their identity infrastructure.
Review logs – Identity Threat Protection Universal Logout
Following the demonstration where Universal Logout was configured as the precise response to identity risks, the next step is to analyze the reporting tools and system logs to validate the effectiveness of this response.
- In this example, the user’s risk level is categorized as Low
- Accessing detailed insights is simple by navigating to the Risk tab
- The risk history table provides administrators with comprehensive visibility into a user’s historical risk data, offering a detailed view of all recorded risk events.
To access and review the System Logs associated with this specific detection type, simply click the View System Logbutton.
This action will direct you to a detailed log entry that provides in-depth information about the event, including timestamps, risk assessments, and any actions taken or recommended.

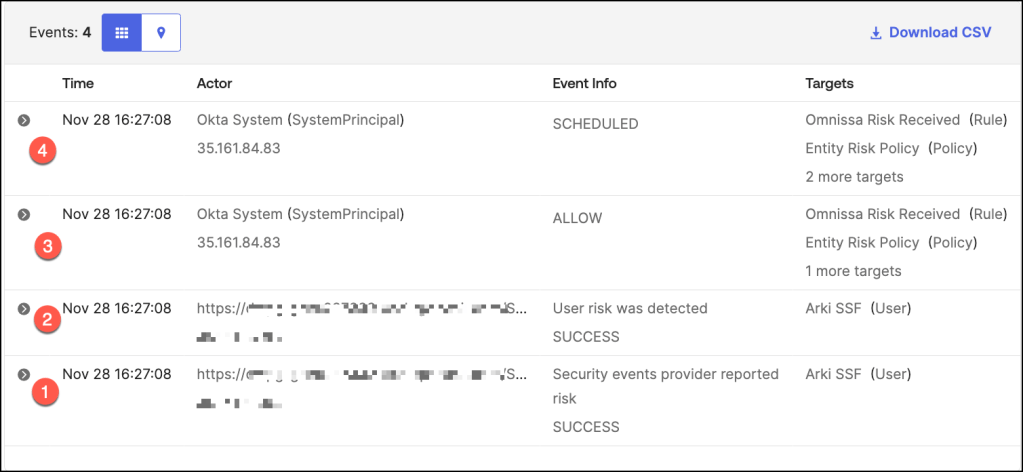
Let’s delve into the chronological sequence of events as captured in the system log. This examination provides a clear timeline of activities, helping administrators trace actions, understand triggers, and evaluate outcomes based on the configured policies.
- Risk signals are received from integrated security event provider Omnissa, indicating a device compliance change.
- Okta detects a risk associated with the user based on the received signals and assigns a corresponding risk level.
- The system evaluates the configured Entity Risk Policy against the user’s updated risk profile.
- As a result of the policy evaluation, Universal Logout is triggered to execute predefined actions.
Based on the policy evaluation, actions such as revoking tokens, forcing user logouts, or triggering workflows are implemented. - The policy enforces a logout from the Okta, ensuring immediate session termination to mitigate risk.
- Universal Logout, the user is logged out of all integrated and supported applications in our example Salesforce.
- Following policy execution, the system clears all active user sessions and resets the user’s risk profile.
ITP Workflows – Omnissa Workspace ONE enrolled Device
Review logs – Identity Threat Protection Workflows
After demonstrating the Run a Workflow action as the precise response to a detected threat, the next step is to explore the corresponding reporting tools and system logs.
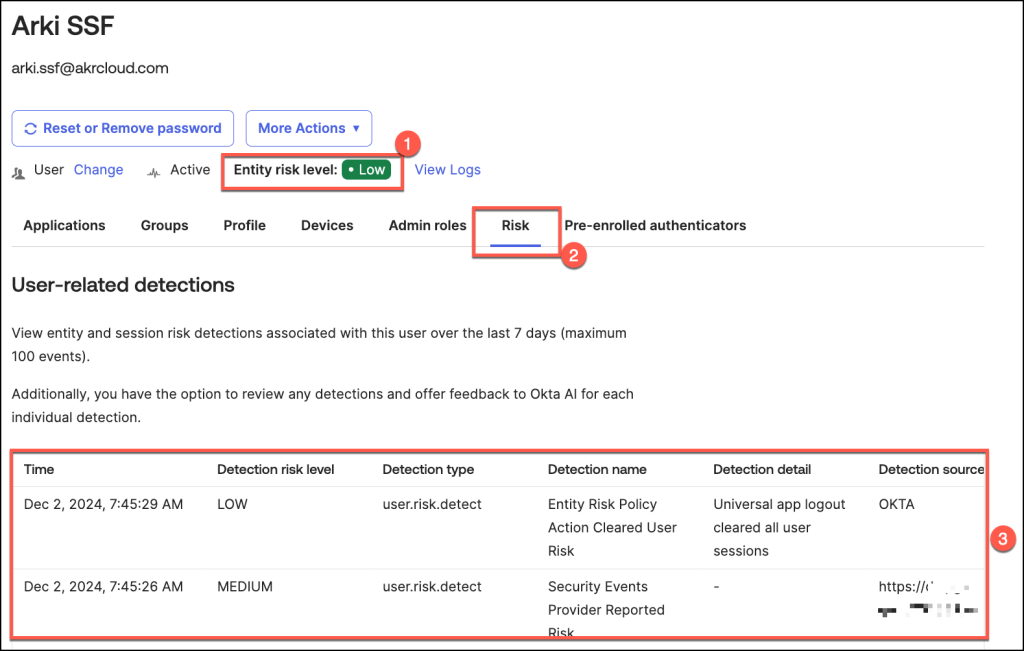
- In this example, the user’s risk level is categorized as Medium,
- Accessing detailed insights is simple by navigating to the Risk tab
- The risk history table provides administrators with comprehensive visibility into a user’s historical risk data, offering a detailed view of all recorded risk events.

To access and review the System Logs associated with this specific detection type, simply click the View System Logbutton.
This action will direct you to a detailed log entry that provides in-depth information about the event, including timestamps, risk assessments, and any actions taken or recommended.

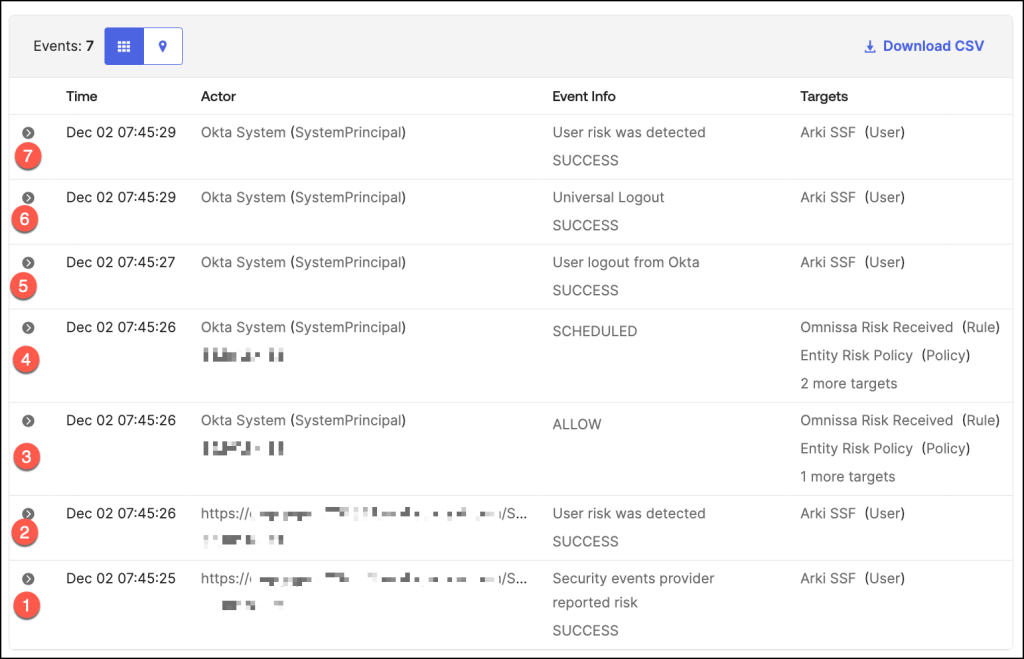
Let’s delve into the chronological sequence of events as captured in the system log. This examination provides a clear timeline of activities, helping administrators trace actions, understand triggers, and evaluate outcomes based on the configured policies.
- Risk signals are received from integrated security event provider Omnissa, indicating a device compliance change.
- Okta detects a risk associated with the user based on the received signals and assigns a corresponding risk level in this example to Medium.
- The system evaluates the configured Entity Risk Policy against the user’s updated risk profile.
- As a result of the policy evaluation, an Okta Workflow is triggered to execute predefined actions.
…
Omnissa events
In this section, we will delve into Security Event Monitoring for the integration of Security Signal Sharing between Okta Identity Threat Protection and Omnissa Access.
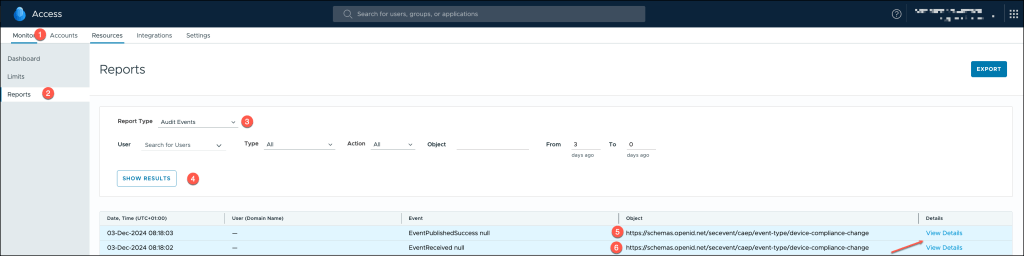
To access and review audit events in Omnissa Access, follow these steps:
- Log In: Sign in to your Omnissa Access Console using your administrator credentials. Ensure you have the appropriate permissions to access monitoring and reporting tools.
- Once logged in, go to the Monitor menu.
- Select Reports: From the available options, choose Reports to access detailed logs and activity data.
- View Audit Events: In the Reports section, select Audit Events to display a list of logged activities, including security signal exchanges, policy enforcement actions, and other relevant events.
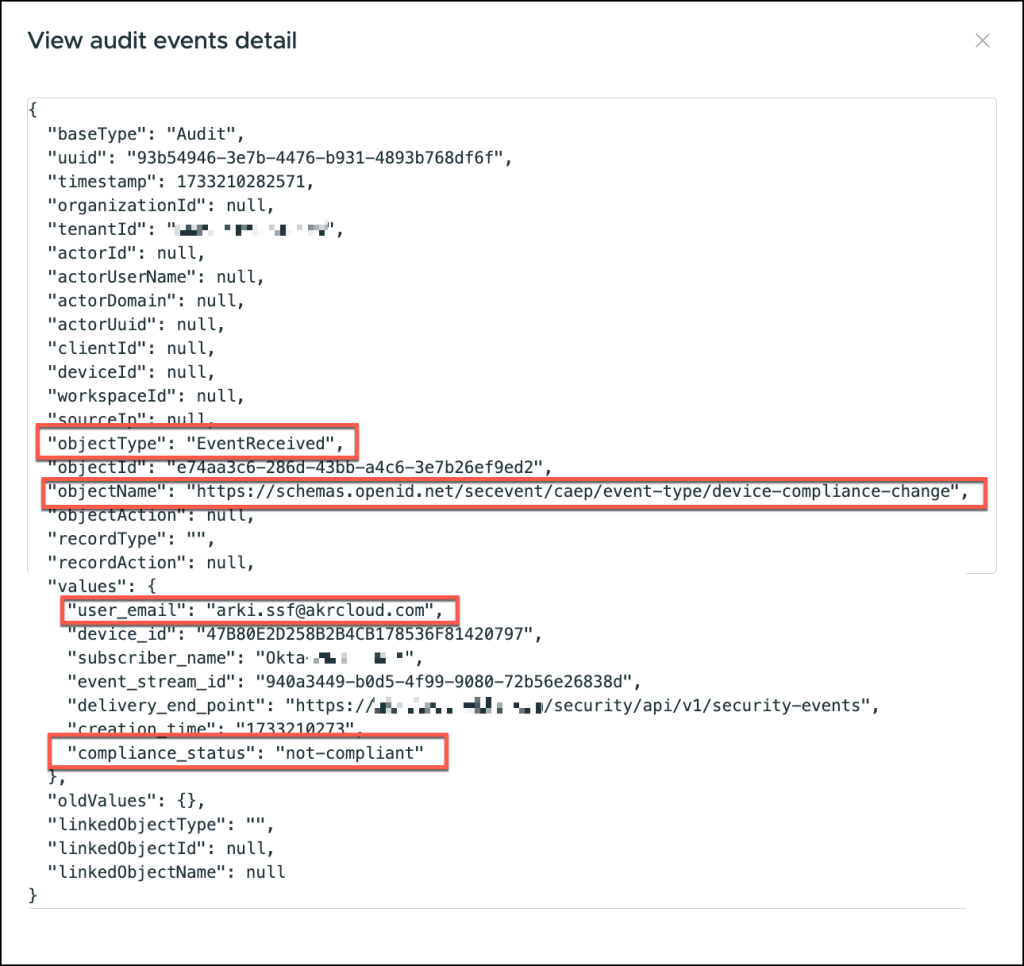
When analyzing logs in Omnissa Access, the following attributes play a vital role in understanding the context and outcomes of received security signals:
- Object Type: “EventReceived”
This attribute classifies the event as an incoming signal received by Omnissa Access. Events labeled as “EventReceived” typically originate from external sources, such as Okta Identity Threat Protection, and are processed for risk evaluation and compliance enforcement. - Object Name: https://schemas.openid.net/secevent/caep/..
The object name here references a schema defined by the OpenID Connect standard. Specifically, Continuous Access Evaluation Protocol (CAEP) is used to exchange security signals.
The URL indicates the schema used for evaluating continuous access scenarios, where real-time risk assessments are performed based on security events. - User Email
The user_email attribute identifies the individual linked to the event, often used to audit user actions or to troubleshoot issues. This value is crucial for mapping specific security signals to user identities. - Compliance Status
This status evaluates whether the received signal aligns with configured security policies. Possible values include:
Non-compliant: Indicates a breach or misalignment, potentially triggering enforcement actions such as session revocation or additional verification.
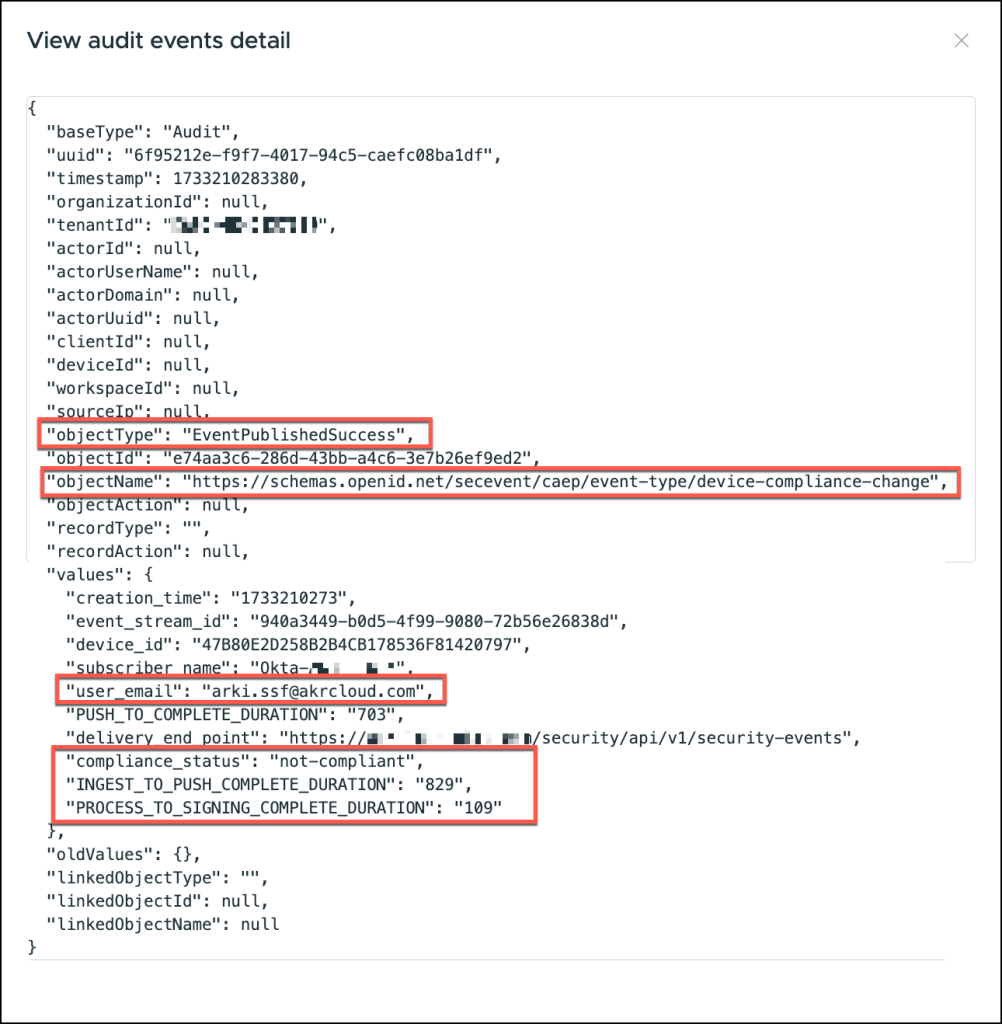
The second event contains:
- Object Type: “EventPublishedSuccess”
This attribute indicates that the security event has been successfully published to the destination system after processing. - PROCESS_TO_SIGNING_COMPLETE_DURATION
This metric tracks the time elapsed from the initiation of the event processing to the completion of signing. - INGEST_TO_PUSH_COMPLETE_DURATION
This attribute measures the time taken from the moment the event is ingested into the system to when it is successfully pushed to the target service.
Conclusion
In conclusion, Continuous Access Evaluation represents a significant advancement in identity security, enabling organizations to dynamically assess and mitigate identity-based risks in real time.
By leveraging Security Signal Sharing between Okta Identity Threat Protection and Omnissa, businesses can seamlessly integrate external threat intelligence to continuously monitor user sessions and enforce adaptive security policies.
This collaboration ensures that access is re-evaluated throughout the user’s session, minimizing potential exposure to emerging threats.
As organizations continue to embrace hybrid and cloud-based environments, the importance of continuous monitoring and adaptive security has never been greater.
By adopting these advanced capabilities, businesses can not only improve their security posture but also enhance the user experience by reducing unnecessary friction.