Desktop MFA Recovery for macOS

August 2024: This is an Early Access Feature
Introduction
In today’s security-focused environment, Multi-Factor Authentication (MFA) is crucial for protecting user accounts and data.
However, challenges arise when users lose access to their registered MFA device and cannot sign in to their machines.
This situation necessitates administrative intervention to restore user access securely and efficiently.
This blog post provides an overview, configuring Desktop MFA Recovery for macOS, enabling administrators to facilitate user access recovery in such scenarios.
When users cannot sign in to their computers due to the unavailability of their registered MFA device, they face a critical access barrier.
Without a way to verify their identity, they are locked out of their system, and their only recourse is to seek assistance from an IT administrator.
The role of the administrator in this context is to provide a secure and temporary solution for the user to regain access.
To help users regain access to their computers, IT administrators can issue a time-limited device recovery PIN.
This PIN serves as a temporary bypass to MFA requirements, allowing the user to access the machine.
Here’s how the process works:
- PIN Time Limitation: The recovery PIN is time-sensitive and must be used within
2 minutes of issuance.
If the user does not enter the correct PIN within this window, the PIN expires, and a new one must be generated. - User Requests Assistance: The user contacts an IT administrator to report the inability to access their machine.
- Admin Console Configuration: Before administrators can generate a recovery PIN, Desktop MFA Recovery must be configured in the Admin Console.
This involves enabling specific security settings that authorize PIN generation and management. - Generating the Recovery PIN: Once Desktop MFA Recovery is configured, administrators with the appropriate permissions can generate a recovery PIN.
After regaining access to their computer, users should promptly recover their enrolled Desktop MFA factors.
This ensures that their accounts remain secure and minimizes the likelihood of future access issues.
Prerequisites
To successfully configure Desktop MFA Recovery with Okta, ensure the following prerequisites are met:
- Device Access Setup: Before configuring Desktop MFA Recovery, make sure that Device Access SCEP (Simple Certificate Enrollment Protocol) certificates are properly set up.
- Deploy Okta Verify: Ensure that Okta Verify version 9.23 or later is installed on all macOS endpoints to enable MFA functionality.
- Admin Permissions: Confirm that Okta administrators have the necessary permissions to generate or view recovery PINs.
The required roles include:
– Super Admin
– Help Desk Admin
– Org Admin - For custom admin roles, the
OKTA_DEVICES_MANAGEpermission must be granted.
These steps are essential for a seamless setup and management of Desktop MFA Recovery within your Okta environment.
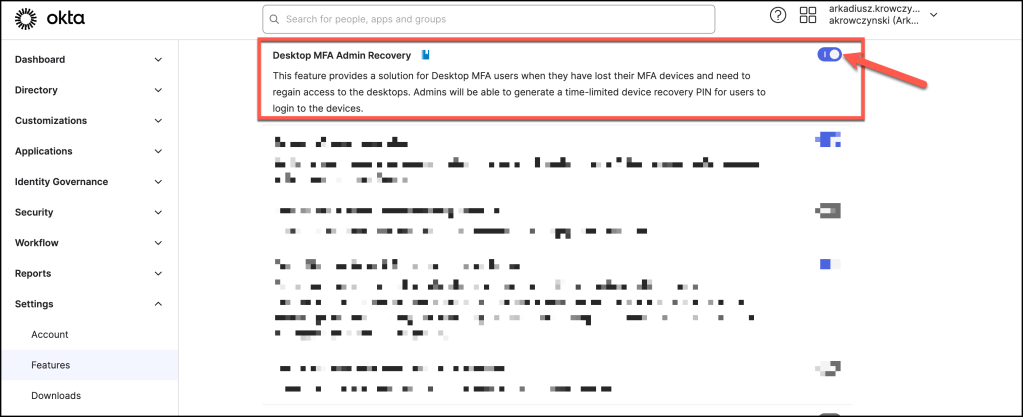
Enable Device Recovery
Desktop MFA Recovery must be enabled in the Okta Admin Console.
Go to Settings > Features.
Locate Desktop MFA Admin Recovery, and click the toggle to enable the feature.
Go to Security > General and scroll to the Okta Device Access section.
Click Edit.
Using the dropdown menu, select Enabled
Click Save.

Configure Device Recovery
Once Device Recovery is activated within your organization, the next step is to deploy the configuration to your devices using your Mobile Device Management (MDM) solution.
Ensure that you apply the following settings in your Desktop MFA MDM profile for proper configuration:
| Value name | Description | Default value |
| DeviceRecoveryPINDuration | How long the device recovery PINs are valid for after activation, Value is in minutes, with a maximum of 5 days (7200). | 60 (minutes) |
In the next section, we’ll explore sample configurations using popular Mobile Device Management (MDM) vendors, including Omnissa Workspace ONE, Jamf Pro, Kandji, and Microsoft Intune.
These examples will guide you in setting up Desktop MFA Recovery on macOS devices through each platform.
Please tailor the following values to match your specific environment and configuration requirements.
- YOUR_OKTA_URL
- YOUR_CLIENT_ID
- YOUR_CLIENT_SECRET
- YOUR_ADMIN_EMAIL
Omnissa Workspace ONE UEM
Set up or modify the Custom Settings profile for Okta Device Access Desktop MFA within your Omnissa Workspace ONE UEM console.
Ensure that the profile is correctly configured to support Desktop MFA functionality.
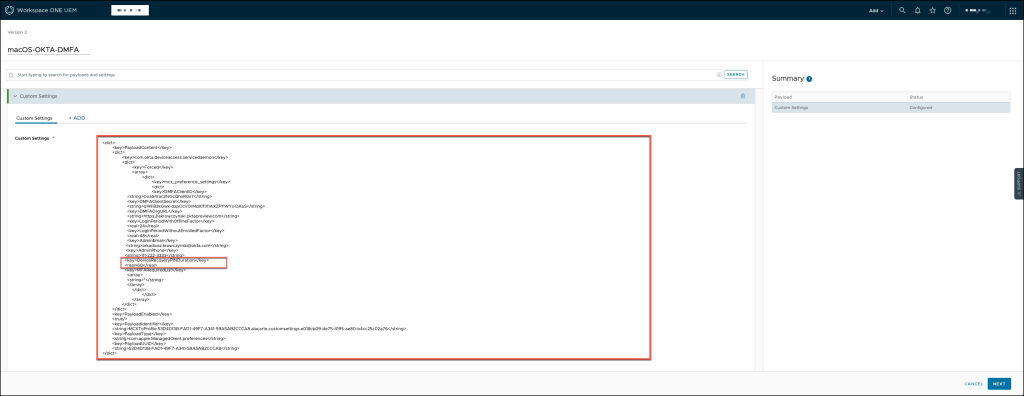
You can use the template below to ensure accurate configuration
<dict>
	<key>PayloadContent</key>
	<dict>
		<key>com.okta.deviceaccess.servicedaemon</key>
		<dict>
			<key>Forced</key>
			<array>
				<dict>
					<key>mcx_preference_settings</key>
					<dict>
					<key>DMFAClientID</key>
                    <string>YOUR_CLIENT_ID</string>
                    <key>DMFAClientSecret</key>
                    <string>YOUR_CLIENT_SECRET</string>
                    <key>DMFAOrgURL</key>
                    <string>https://YOUR_OKTA_URL</string>
                    <key>LoginPeriodWithOfflineFactor</key>
                    <real>168</real>
                    <key>LoginPeriodWithoutEnrolledFactor</key>
                    <real>48</real>
                    <key>AdminEmail</key>
                   <string>YOUR_ADMIN_EMAIL</string>
                   <key>AdminPhone</key>
                  <string>111-222-3333</string>
                  <key>DeviceRecoveryPINDuration</key>
                  <real>60</real>
                  <key>MFARequiredList</key>
                    <array>
                    <string>*</string>
                    </array>
	                </dict>
				</dict>
			</array>
		</dict>
	</dict>
	<key>PayloadEnabled</key>
	<true/>
	<key>PayloadIdentifier</key>
	<string>MCXToProfile.53D4D13B-FAD1-49F7-A341-59A5AB2CCCA8.alacarte.customsettings.e018cb09-de75-4195-ae80-b4cc25c02a76</string>
	<key>PayloadType</key>
	<string>com.apple.ManagedClient.preferences</string>
	<key>PayloadUUID</key>
	<string>53D4D13B-FAD1-49F7-A341-59A5AB2CCCA8</string>
</dict>
Jamf Pro
In a Jamf Pro environment, set up or modify the Configuration Profile to implement Okta Device Access Desktop MFA. Make sure the profile is properly configured to support the Desktop MFA setup effectively.
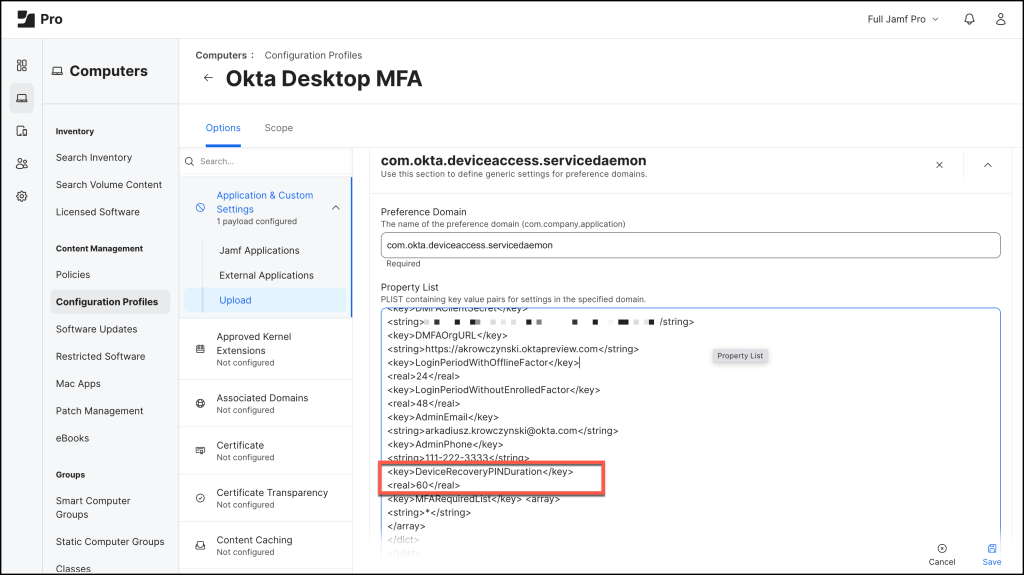
Preference Domain
com.okta.deviceaccess.servicedaemonProperty List
<?xml version="1.0" encoding="UTF-8"?>
<!DOCTYPE plist PUBLIC "-//Apple//DTD PLIST 1.0//EN" "http://www.apple.com/DTDs/PropertyList-1.0.dtd">
<plist version="1.0">
<dict>
<key>DMFAClientID</key>
<string>YOUR_CLIENT_ID</string>
<key>DMFAClientSecret</key>
<string>YOUR_CLIENT_SECRET</string>
<key>DMFAOrgURL</key>
<string>https://your-okta-URL</string>
<key>LoginPeriodWithOfflineFactor</key>
<real>24</real>
<key>LoginPeriodWithoutEnrolledFactor</key>
<real>48</real>
<key>AdminEmail</key>
<string>YOUR_ADMIN_EMAIL</string>
<key>AdminPhone</key>
<string>111-222-3333</string>
<key>DeviceRecoveryPINDuration</key>
<real>60</real>
<key>MFARequiredList</key> <array>
<string>*</string>
</array>
</dict>
</plist>
Kandji
If you’re using Kandji, either create a new Library setting or update an existing one to configure Okta Device Access Desktop MFA. Ensure that the settings align with the required configuration for optimal functionality.
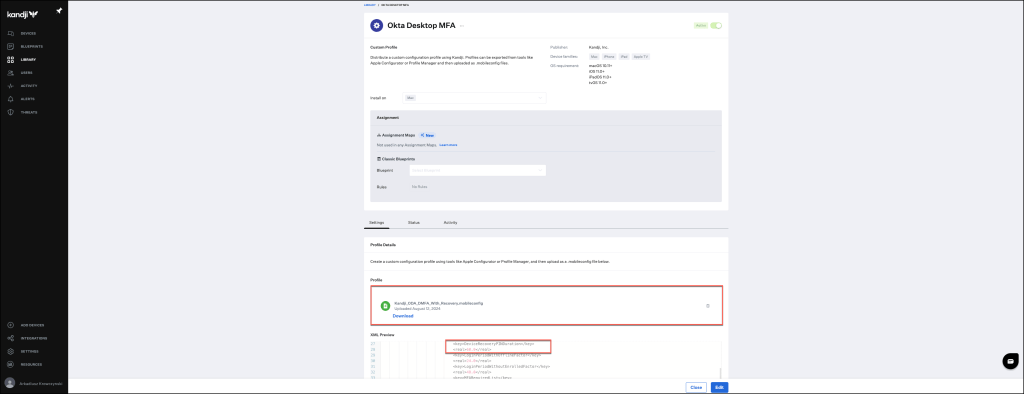
You can use the template below to ensure accurate configuration.
<?xml version="1.0" encoding="UTF-8"?>
<!DOCTYPE plist PUBLIC "-//Apple//DTD PLIST 1.0//EN" "http://www.apple.com/DTDs/PropertyList-1.0.dtd">
<plist version="1">
    <dict>
        <key>PayloadUUID</key>
        <string>2F0FC0DC-953A-4247-A4E6-F64A0A3FA2DB</string>
        <key>PayloadType</key>
        <string>Configuration</string>
        <key>PayloadOrganization</key>
        <string>beste</string>
        <key>PayloadIdentifier</key>
        <string>2F0FC0DC-953A-4247-A4E6-F64A0A3FA2DB</string>
        <key>PayloadDisplayName</key>
        <string>Kandji DMFA Payload</string>
        <key>PayloadDescription</key>
        <string/>
        <key>PayloadVersion</key>
        <integer>1</integer>
        <key>PayloadEnabled</key>
        <true/>
        <key>PayloadRemovalDisallowed</key>
        <true/>
        <key>PayloadScope</key>
        <string>System</string>
        <key>PayloadContent</key>
        <array>
            <dict>
                <key>PayloadDisplayName</key>
                <string>Custom Settings</string>
                <key>PayloadIdentifier</key>
                <string>3472DF62-D492-4211-9D59-748B2107CDE9</string>
                <key>PayloadOrganization</key>
                <string>Kandji Software</string>
                <key>PayloadType</key>
                <string>com.apple.ManagedClient.preferences</string>
                <key>PayloadUUID</key>
                <string>3472DF62-D492-4211-9D59-748B2107CDE9</string>
                <key>PayloadVersion</key>
                <integer>1</integer>
                <key>PayloadContent</key>
                <dict>
                    <key>com.okta.deviceaccess.servicedaemon</key>
                    <dict>
                        <key>Forced</key>
                        <array>
                            <dict>
                                <key>mcx_preference_settings</key>
                                <dict>
                                    <key>DMFAClientID</key>
                                    <string>YOUR_CLIENT_ID</string>
                                    <key>DMFAClientSecret</key>
                                    <string>YOUR_CLIENT_SECRET</string>
                                    <key>DMFAOrgURL</key>
                                    <string>https://YOUR_OKTA_URL</string>
                                    <key>LoginPeriodWithOfflineFactor</key>
                                    <real>24.0</real>
                                    <key>LoginPeriodWithoutEnrolledFactor</key>
                                    <real>48.0</real>
                                     <key>AdminEmail</key>
                                     <string>YOUR_ADMIN_EMAIL</string>
                                     <key>AdminPhone</key>
                                     <string>111-222-3333</string>
                                     <key>DeviceRecoveryPINDuration</key>
                                     <real>60</real>
                                    <key>MFARequiredList</key>
                                    <array>
                                        <string>*</string>
                                    </array>
                                </dict>
                            </dict>
                        </array>
                    </dict>
                </dict>
            </dict>
        </array>
    </dict>
</plist>
Microsoft Intune
If Microsoft Intune is your chosen management tool, either create or update the Configuration profile to set up Okta Device Access Desktop MFA. Ensure the profile is correctly configured to meet your organization’s MFA requirements.

You can use the template below to ensure accurate configuration
<?xml version="1.0" encoding="UTF-8"?>
<!DOCTYPE plist PUBLIC "-//Apple//DTD PLIST 1.0//EN" "http://www.apple.com/DTDs/PropertyList-1.0.dtd">
<plist version="1">
<dict>
<key>PayloadUUID</key>
<string>2F0FC0DC-953A-4247-A4E6-F64A0A3FA2DB</string>
<key>PayloadType</key>
<string>Configuration</string>
<key>PayloadOrganization</key>
<string>beste</string>
<key>PayloadIdentifier</key>
<string>2F0FC0DC-953A-4247-A4E6-F64A0A3FA2DB</string>
<key>PayloadDisplayName</key>
<string>Microsoft Intune DMFA/string>
<key>PayloadDescription</key>
<string/>
<key>PayloadVersion</key>
<integer>1</integer>
<key>PayloadEnabled</key>
<true/>
<key>PayloadRemovalDisallowed</key>
<true/>
<key>PayloadScope</key>
<string>System</string>
<key>PayloadContent</key>
<array>
<dict>
<key>PayloadDisplayName</key>
<string>Custom Settings</string>
<key>PayloadIdentifier</key>
<string>3472DF62-D492-4211-9D59-748B2107CDE9</string>
<key>PayloadOrganization</key>
<string>Kandju Software</string>
<key>PayloadType</key>
<string>com.apple.ManagedClient.preferences</string>
<key>PayloadUUID</key>
<string>3472DF62-D492-4211-9D59-748B2107CDE9</string>
<key>PayloadVersion</key>
<integer>1</integer>
<key>PayloadContent</key>
<dict>
<key>com.okta.deviceaccess.servicedaemon</key>
<dict>
<key>Forced</key>
<array>
<dict>
<key>mcx_preference_settings</key>
<dict>
<key>DMFAClientID</key>
<string>YOUR_CLIENT_ID</string>
<key>DMFAClientSecret</key>
<string>YOUR_CLIENT_SECRET</string>
<key>DMFAOrgURL</key>
<string>https://YOUR_OKTA_URL</string>
<key>LoginPeriodWithOfflineFactor</key>
<real>24.0</real>
<key>LoginPeriodWithoutEnrolledFactor</key>
<real>48.0</real>
<key>AdminEmail</key>
<string>YOUR_ADMIN_EMAIL</string>
<key>AdminPhone</key>
<string>111-222-3333</string>
<key>DeviceRecoveryPINDuration</key>
<real>60</real>
<key>MFARequiredList</key>
<array>
<string>*</string>
</array>
</dict>
</dict>
</array>
</dict>
</dict>
</dict>
</array>
</dict>
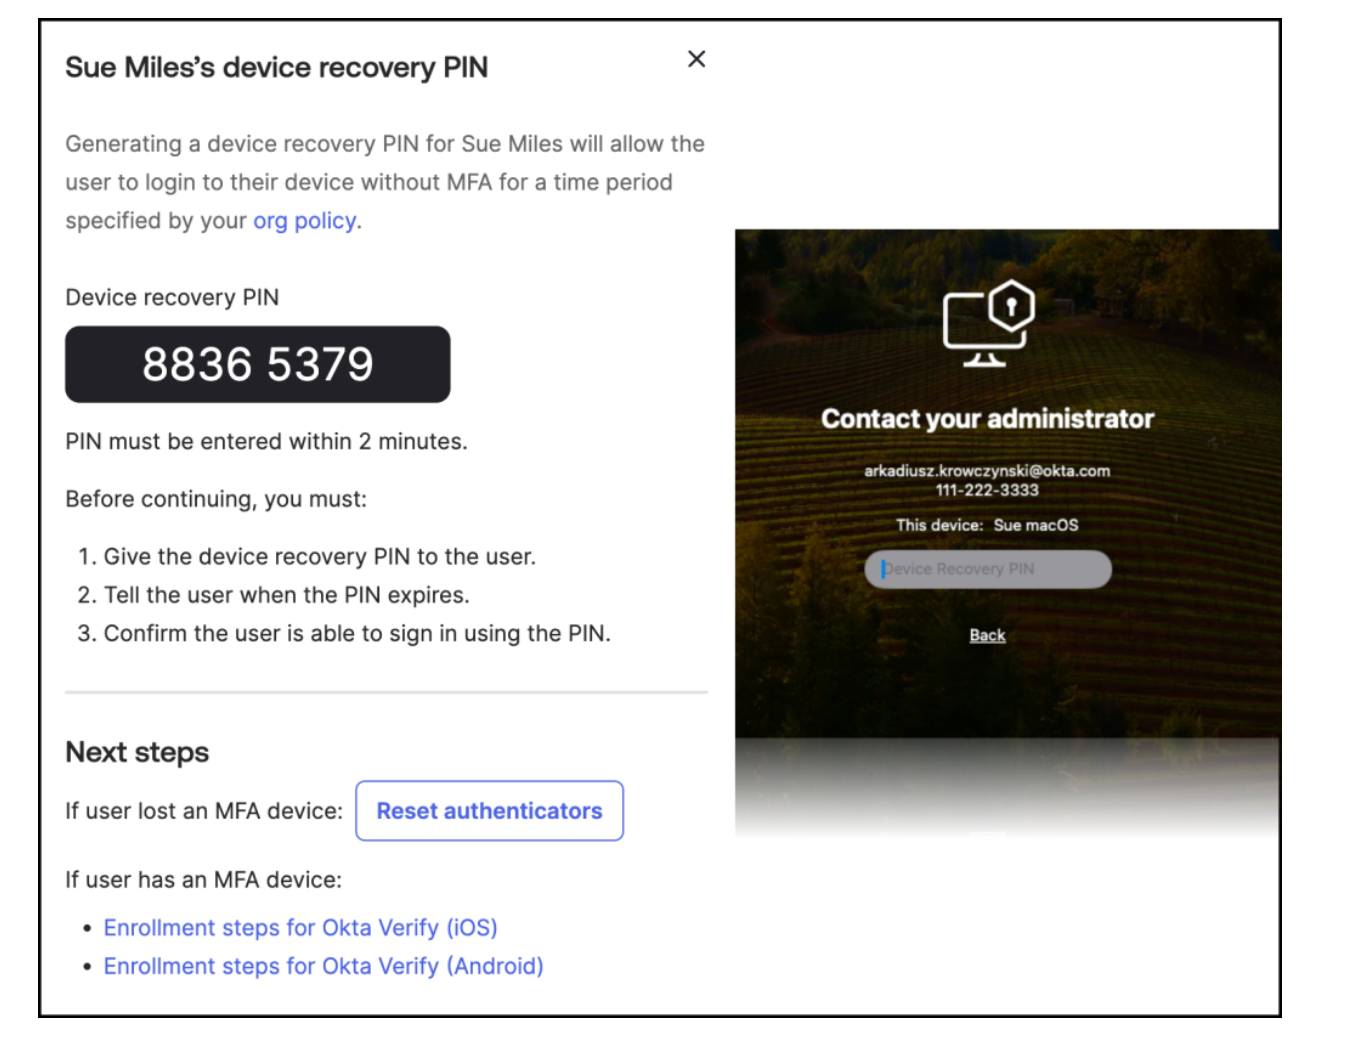
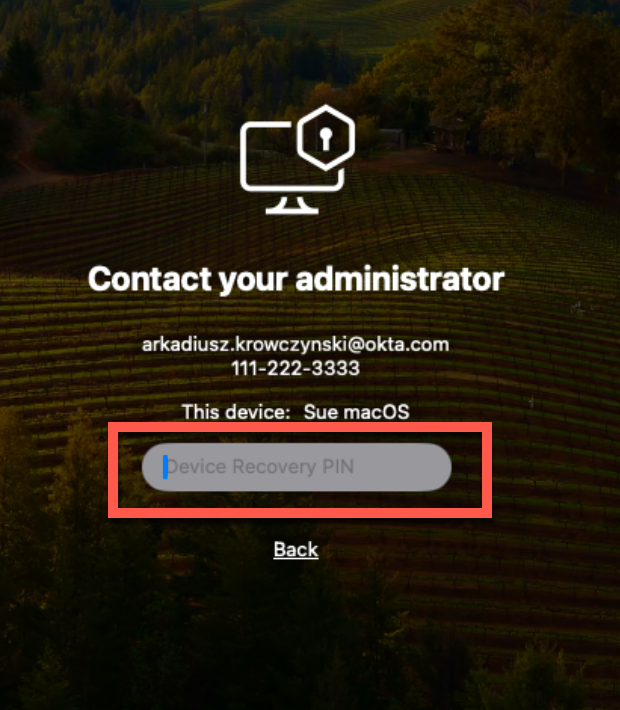
</plist>Request a Device Recovery PIN
Reach out to your IT administrator for assistance.
Be prepared to provide your computer’s name, model, and serial number.
This information will be necessary to verify both your identity and the associated device with the IT team.

Once your identity has been verified by your IT administrator, they will provide you with a recovery PIN. Note that this PIN is only valid for a brief period of two minutes. If you don’t use it within this time frame, you will need to request a new PIN.
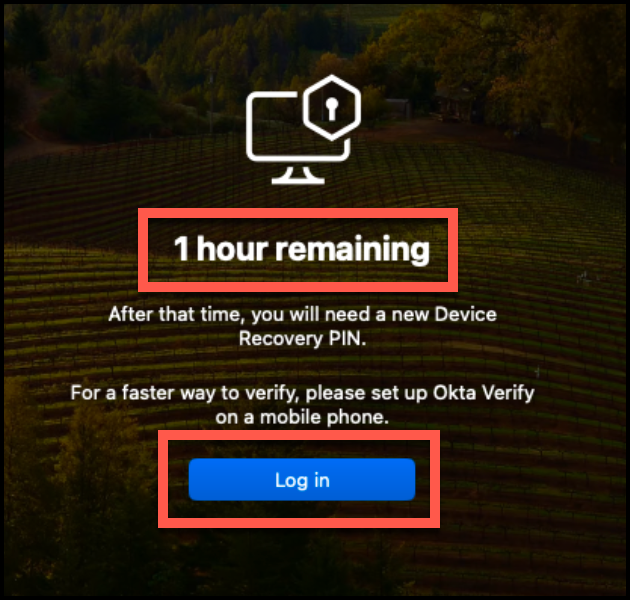
Enter the provided PIN to gain access to your computer. The PIN will grant you access for the duration specified by your IT administrator.
Be sure to confirm with them the exact time limit for the PIN’s validity.
If your recovery PIN expires, you will need to reach out to the IT department to request a new one. A new PIN will be issued, resetting the DeviceRecoveryPINDuration timer and allowing you to attempt access once more.
Demo Request a Device Recovery PIN
Explore the demo below to see how to request a Device Recovery PIN. This demonstration will walk you through each step of the process, ensuring you understand how to manage user access efficiently and securely.
Create Device Recovery PIN
When users are unable to use their MFA device to verify their identity, they must contact an IT administrator to receive a Device Recovery PIN, which grants temporary access to their machine. This temporary access enables users to register a new mobile device or YubiKey for future identity verification.
By following these steps, IT administrators can securely manage device access recovery and ensure that only authorized users regain access to their machines.
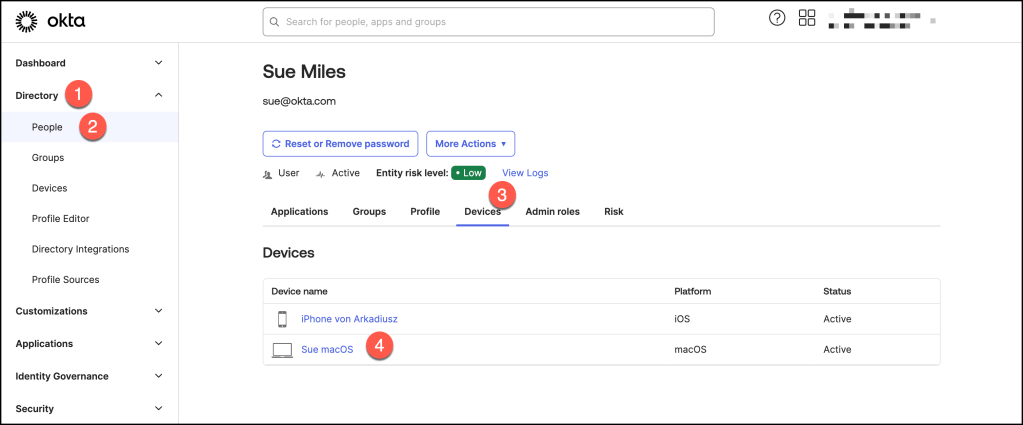
- In the Admin Console, go to Directory > Devices. You can also access the user’s computer information from Directory > People > User > Devices.
- Locate the user’s computer using the serial number or the user’s name, and click on the device to open detailed information.
In the Device Recovery column, click View Recovery PIN.
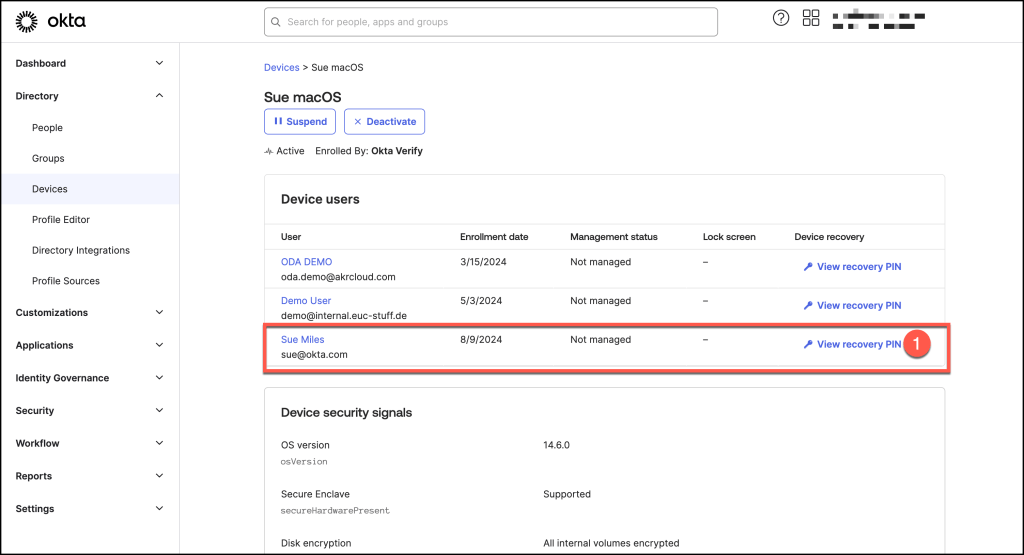
When generating a device recovery PIN, it’s important to understand the security implications involved. Here’s how to proceed:
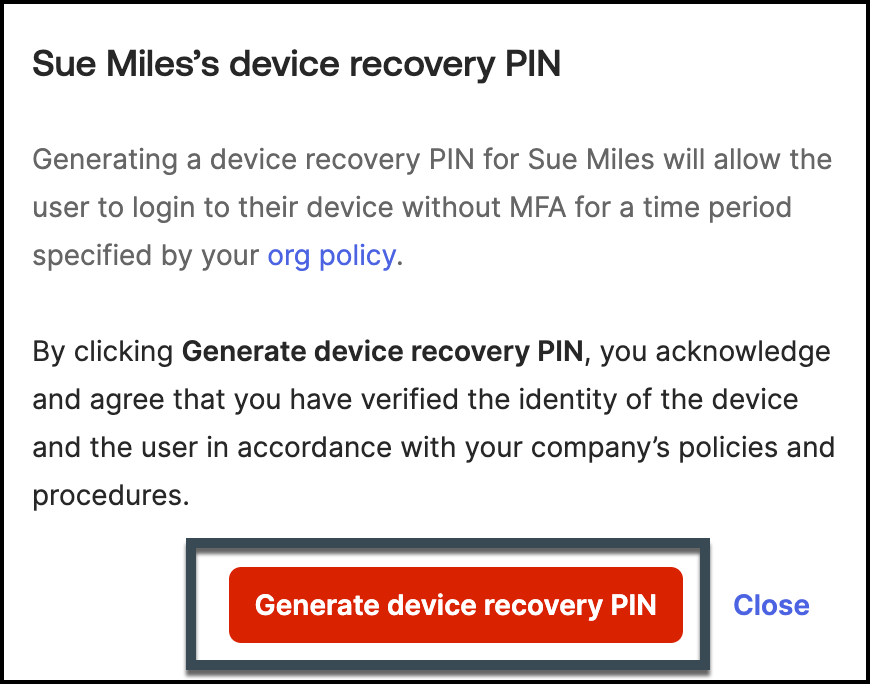
- A message will appear displaying the user’s name along with a warning that outlines the security implications of generating a device recovery PIN.
- Review the Warning: Carefully review the warning message to ensure you understand the potential impacts of issuing a recovery PIN.
- Generate the PIN: After confirming the details, click on “Generate Device Recovery PIN.” Remember, the generated PIN will be valid for only 2 minutes.
When assisting users with a device recovery PIN, follow these steps to ensure a smooth and secure process:
- Share the PIN: Provide the generated PIN to the user and confirm that they can sign in to their computer using it. Ensure they understand that the PIN is valid only for the specified duration configured in the
DeviceRecoveryPINDurationsetting. - Optional: Reset Authenticators: If the user has lost their MFA device, click “Reset Authenticators” to update the user’s authenticator settings. This will allow the user to re-enroll their MFA devices.
- Register a New MFA Device: Encourage the user to register a new MFA device before the PIN expires. If the PIN expires and they haven’t registered a new device, they will need to contact the IT department to receive a new device recovery PIN, restarting the
DeviceRecoveryPINDurationtimer.
By following these steps, you ensure that users regain access to their systems and maintain secure MFA configurations.
Demo Create Device Recovery PIN
Check out the following demo to see the process in action.
This demonstration will guide you through the steps of creating a device recovery PIN and highlight best practices for managing user access securely.
Demo Desktop MFA Admin Recovery
Dive into the complete demonstration of Desktop MFA Admin Recovery.
This demo will cover the entire process, from initiating a recovery request to successfully restoring user access, providing a clear and detailed overview of the admin recovery workflow.
Conclusion
ConfiguringDesktop MFA Recovery for macOS is a vital process for ensuring users can regain access to their machines securely and efficiently. By following the outlined steps and best practices, administrators can manage access recovery while maintaining the organization’s security posture. Implementing these strategies helps minimize the impact of lost MFA devices and ensures business continuity.