
Desktop Password Sync meets Platform SSO 2.0 and Workspace ONE

Introduction
Support for Platform SSO 2.0 is available for macOS computers using Sonoma (14.0) and later.
Platform SSO 2.0 allows Desktop Password Sync to be used directly from the
macOS login window.
In this blog, I will briefly describe the configuration steps required to use Okta Device Access with Platform SSO 2.0 with Workspace ONE UEM as your MDM solution.
Prerequisites
Before you start ensure that you meet these requirements:
- Your Okta Identity Engine org is available.
- Okta Desktop Password Sync with Workspace ONE UEM is configured, all configuration steps are describe in the following blog post.
- Your computers are running macOS Sonoma (14.0) or later, so you can implement Platform SSO 2.0.
- Okta Verify 9.39 deployed to your macOS devices
- You have Workspace ONE UEM environment ready with the necessary permissions
Set up Device Access SCEP certificates
Device Access SCEP certificates are required to use Desktop Password Sync on devices running macOS Sonoma (14.0) and later.
These certificates deploy with your Workspace ONE UEM environment, and are used to grant access to specific API endpoints and to identify the device making the calls.
Configure Okta as a CA for Device Access
In this blog I am covering how to configure Okta as a CA with static SCEP challenge using Workspace ONE.
In the Okta Admin console, open Security –> Device Integrations

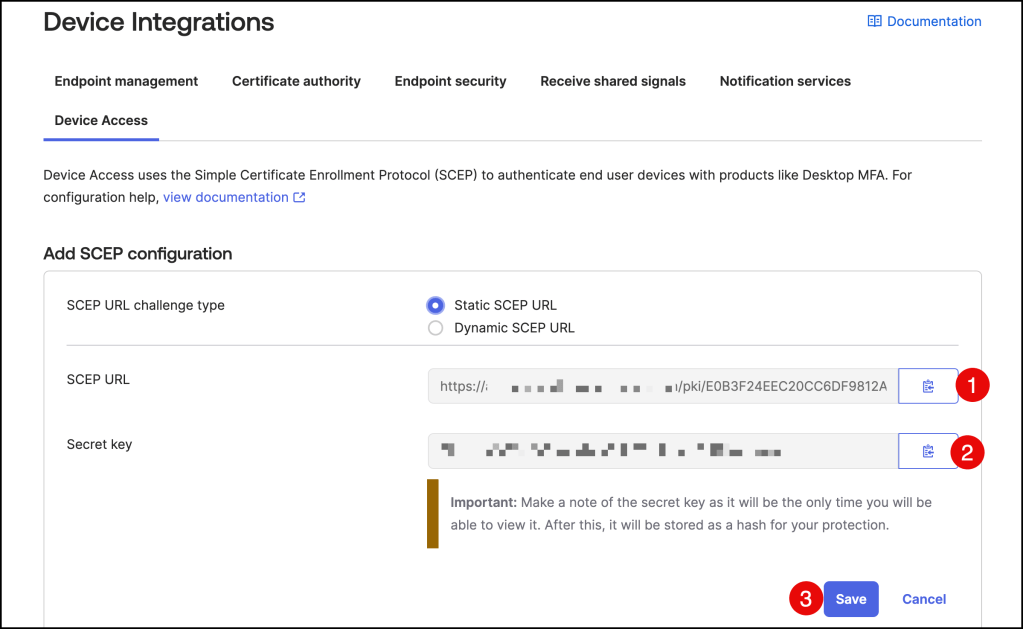
Click the Device Access tab and click on the Add SCEP configuration.

Select Static SCEP URL as the SCEP challenge type and click Generate.
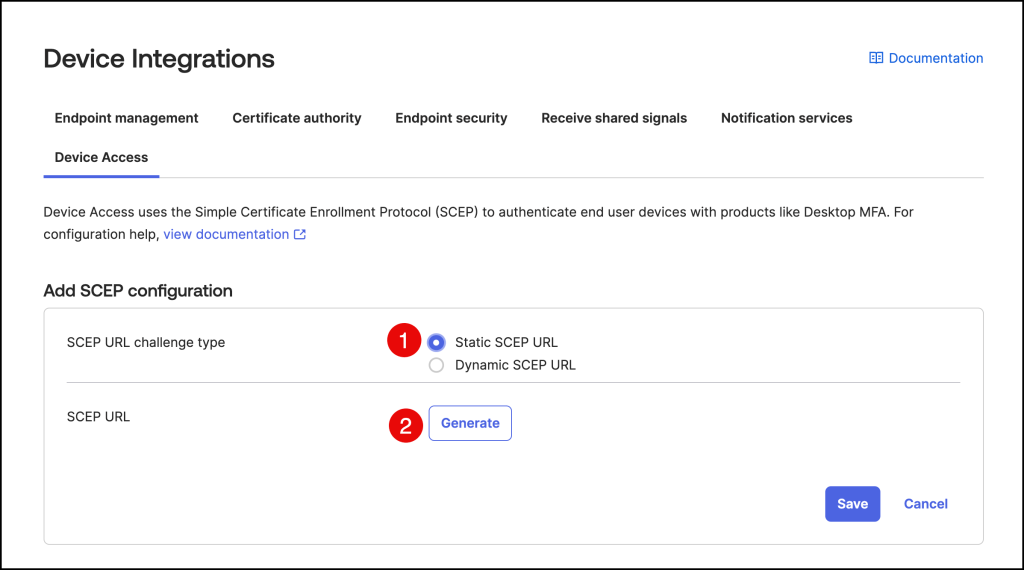
Copy and save the Okta SCEP URL and the Secret key as you will paste these in the Workspace ONE configuration.
Press Save to finish the configuration.
You should see the new Device Access SCEP configuration.

Download the x509 certificate from Okta
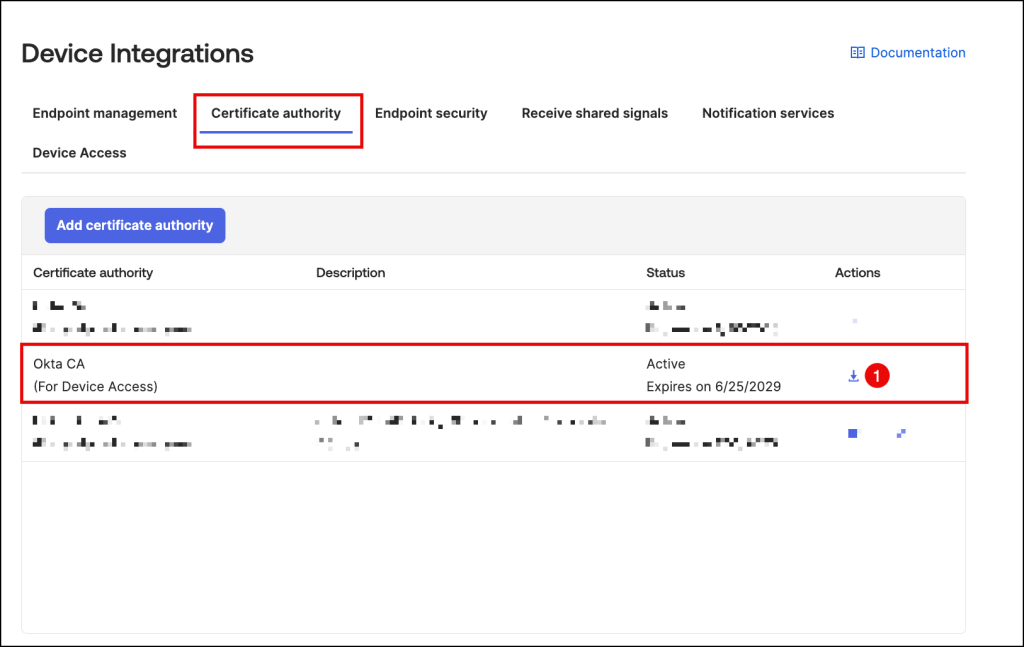
Navigate to the Certificate authority tab .
For the Okta CA (For Device Access) certificate authority, click the Download x509 certificate icon in the Actions column.
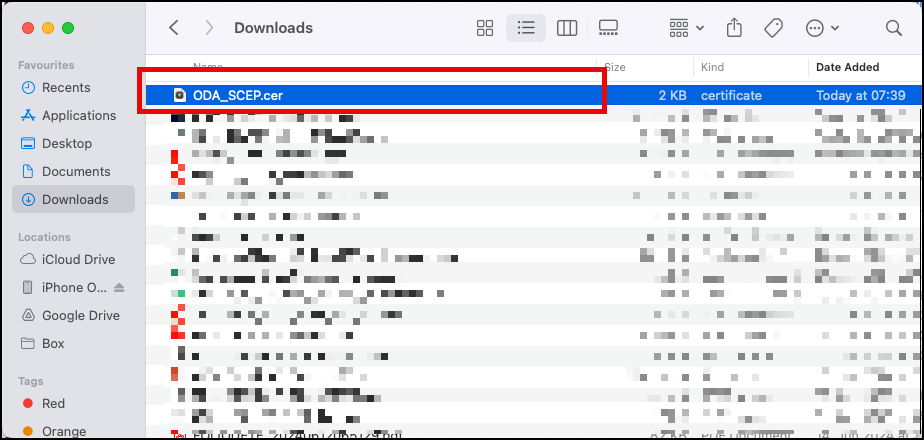
Rename the downloaded file, so that it includes a .cer extension.
Workspace ONE SCEP configuration
In the next steps, we will configure the Okta CA as a certificate authority in
Workspace ONE UEM so we can deploy certificate profiles.
Create a Certificate Authority
If not already, log in to Workspace ONE as an administrator.

Navigate to GROUPS & SETTINGS –> All Settings
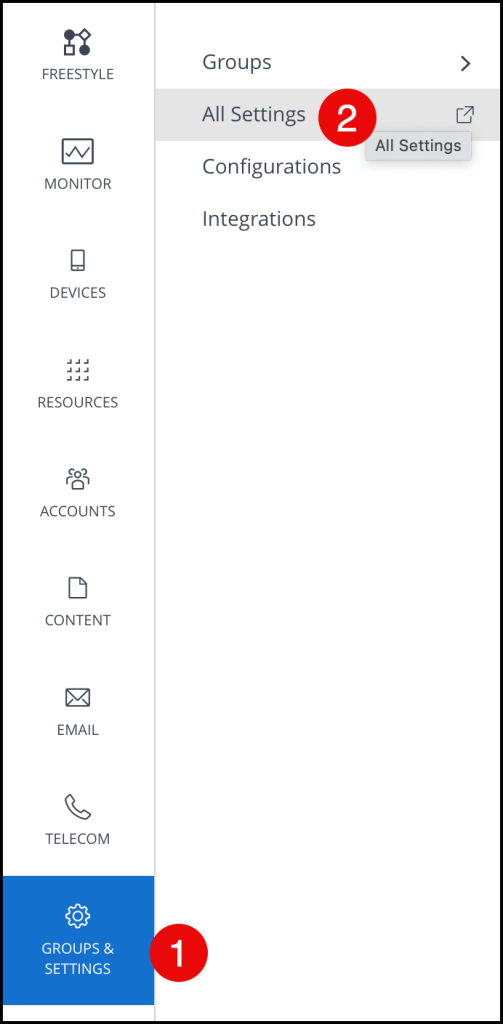
Now navigate to System –> Enterprise Integration –> Certificate Authorities
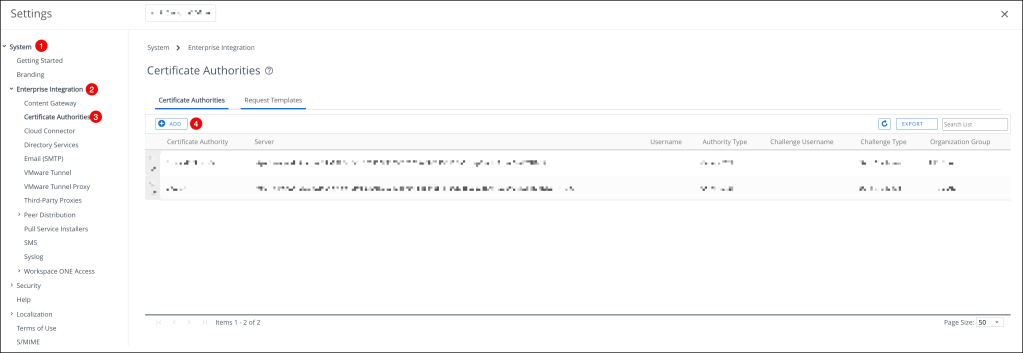
On the Certificate Authorities page, press ADD and enter the following:
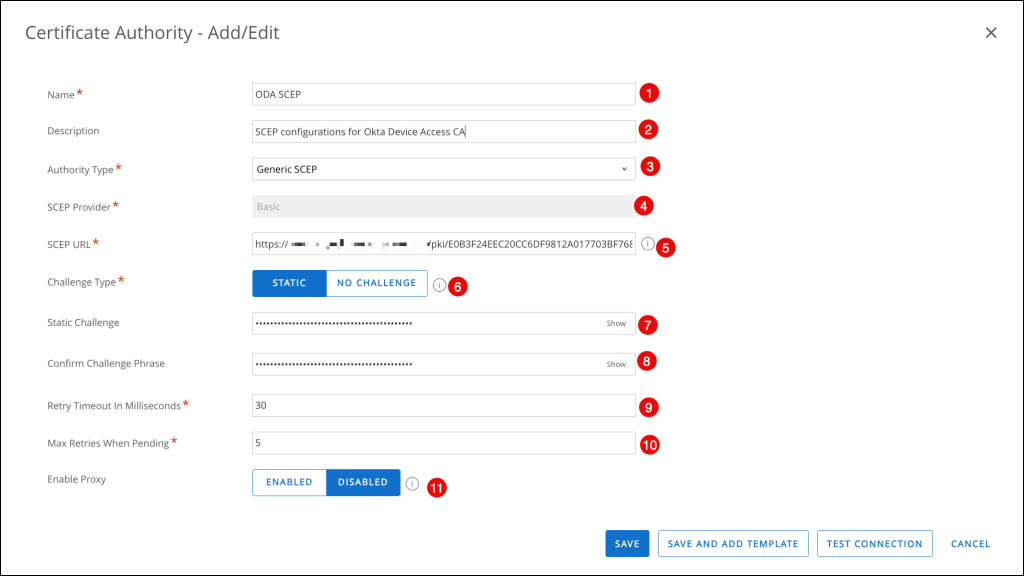
- Name: Enter a name for the CA.
- Description: Optional. Enter a description for the CA
- Authority type: Select Generic SCEP
- SCEP Provider: Basic is entered automatically and can’t be changed.
- SCEP URL: Copy and paste the SCEP URL you generated in
- Challenge Type: Click STATIC
- Static Challenge: Copy and paste the Secret Key you generated in
- Confirm Challenge Phrase: Copy and paste the Secret Key you generated in
- Retry Timeout: Accept the default value of 30
- Max Retries When Pending: Accept the default value of 5, or specify a different number of retries the system allows while the authority is pending
- Enable Proxy: Accept the default value of DISABLED or select ENABLED if appropriate for your environment. If you select Enabled, Workspace ONE UEM acts as a proxy between the device and the SCEP endpoint defined in the CA configuration
Click TEST CONNECTION.
If you select SAVE before TEST CONNECTION, the error Test is unsuccessful appears.
After the Test is successful this message appears, now click SAVE AND ADD TEMPLATE
to continue.

Add a Certificate Template
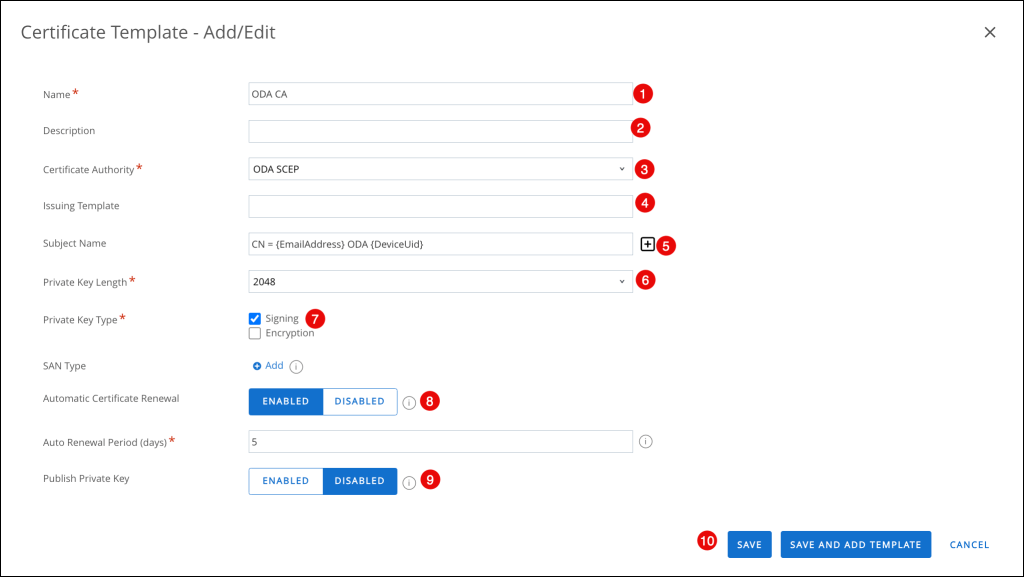
In the Certificate Template – Add/Edit enter the following
- Name: Enter a name for the template
- Description: Optional. Enter a description for the template
- Certificate Authority: Select the CA you created in
- Issuing Template: Leave blank or configure as appropriate for your implementation
- Subject Name: Enter a subject name. For example,
CN = {EmailAddress} ODA {DeviceUid} - Private Key Length: Select 2048
- Private Key Type: Select Signing
- Automatic Certificate Renewal: Click ENABLED
- Publish Private Key: Click DISABLED
- Click SAVE
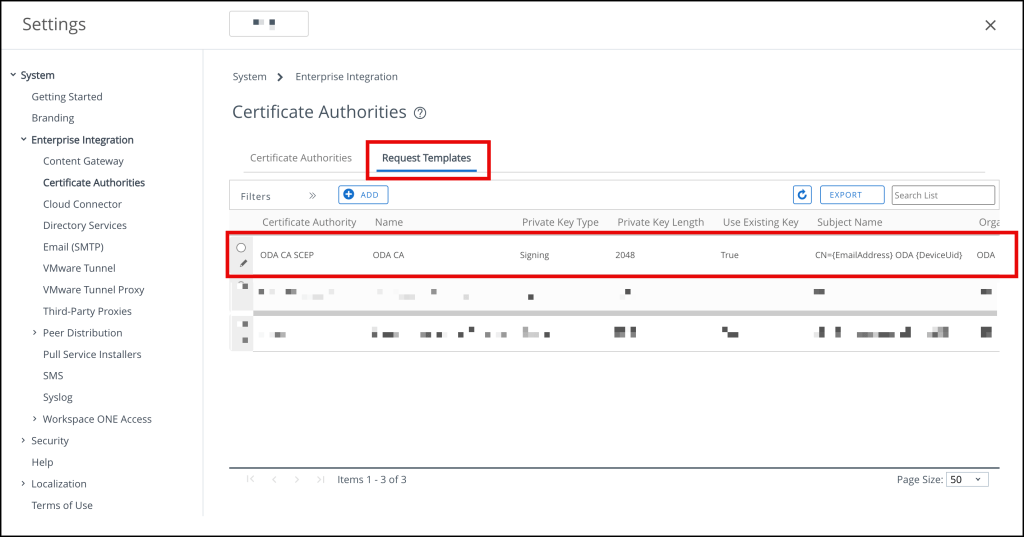
We should now see the newly created Certificate Authority
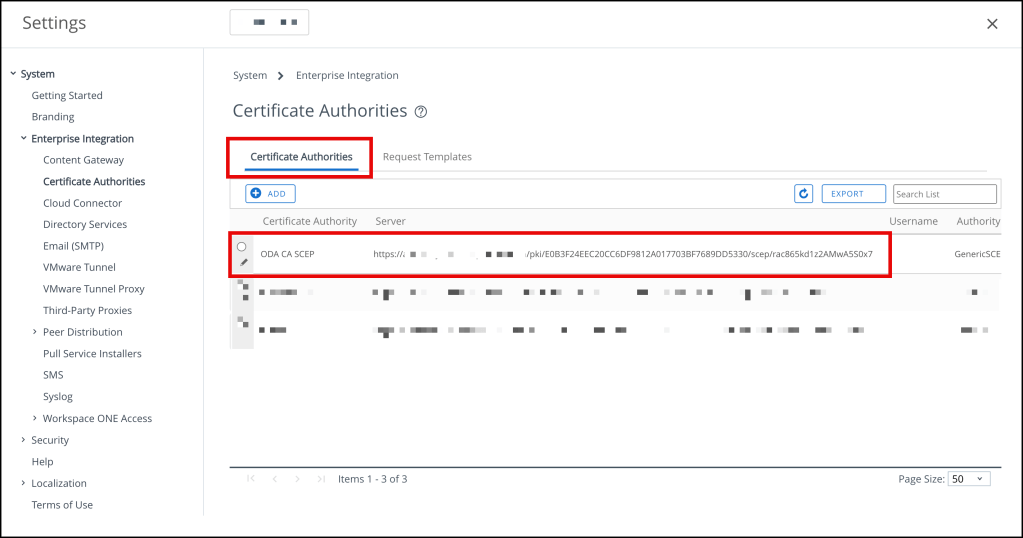
and the Request Template
Create a device profile to deploy the Okta CA
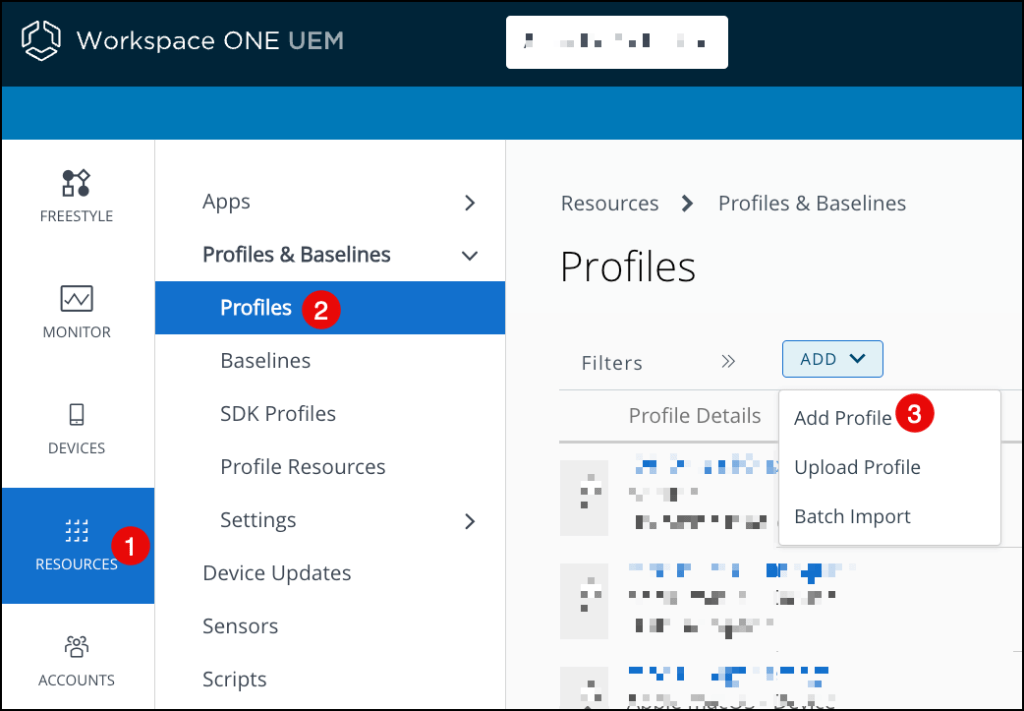
In Workspace ONE, click RESOURCES (left ribbon bar)
Click Profiles & Baselines Profiles
Click ADD, and then select Add Profile
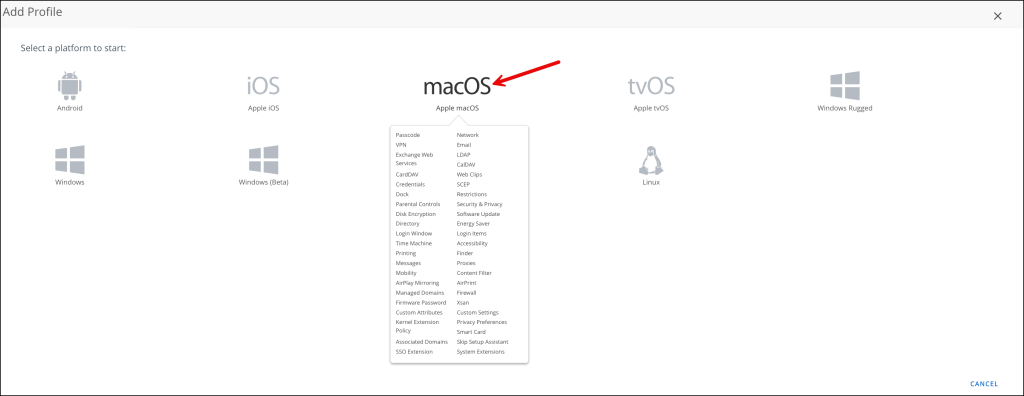
Select macOS
Select Device Profile

On the Profile page, enter the following
- Name: Enter a name for the device profile
- Click Credentials in the left pane
- Click ADD
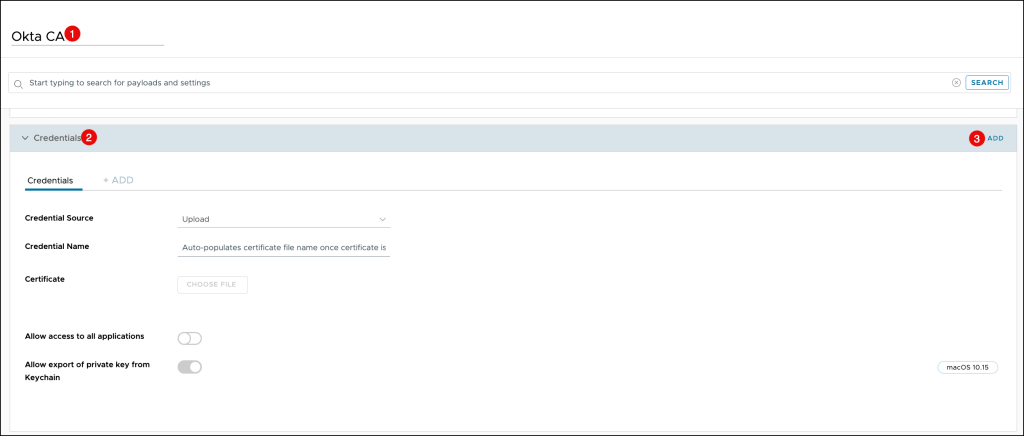
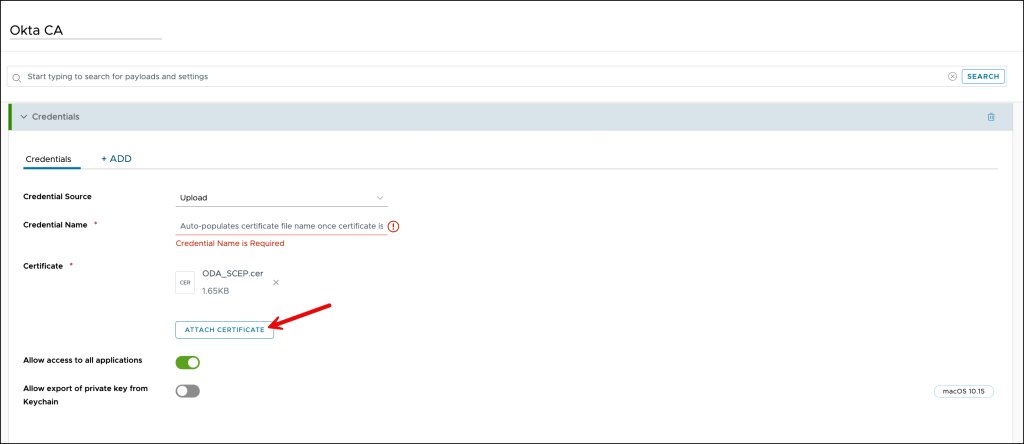
On the Credentials page, enter the following:
- Credential Source: Select Upload
- Certificate: Click CHOOSE FILE and browse to the certificate you downloaded from the Okta Admin Console

Press ATTACH CERTIFICATE
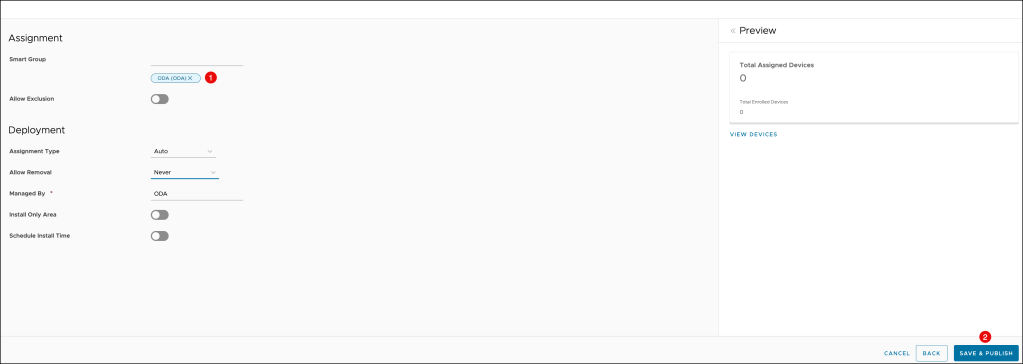
Review the settings and press Next

Click Save & Publish
Create a user profile to deploy the Okta CA-issued client certificate
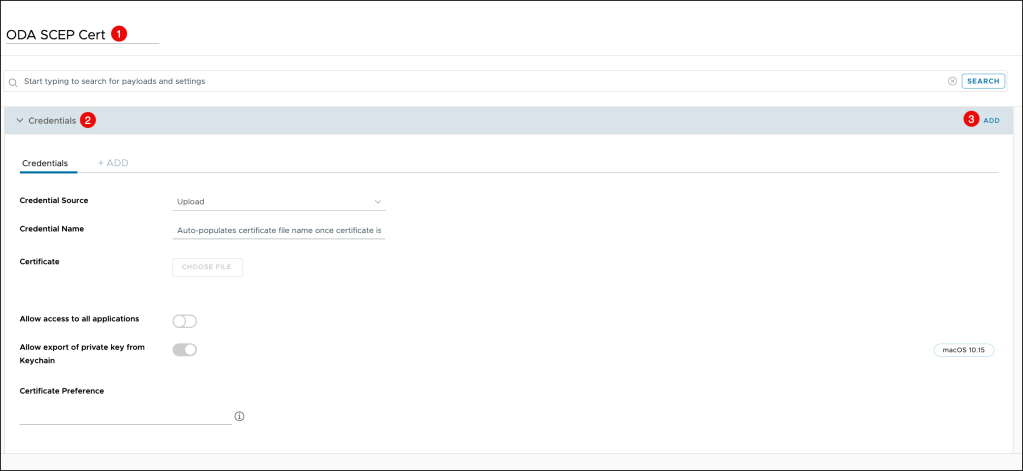
Create another Profile, select now Device Profile

On the Profile page, enter the following
- Name: Enter a name for the device profile
- Click Credentials in the left pane
- Click ADD
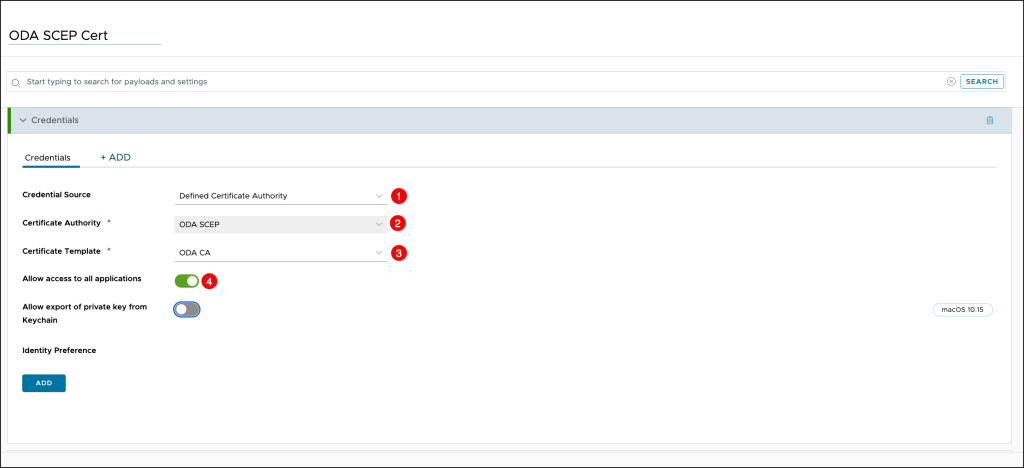
On the Credentials page, enter the following:
- Credential Source: Select Defined Certificate Authority
- Certificate Authority: Select the same Certificate Authority that you configured in the previous step
- Certificate Authority: Select the same Certificate Authority that you configured in the previous step
- Certificate Template: Select the same Certificate Template that you configured in the previous step
- Enable the Allow access to all applications
Click Save & Publish
Verify the certificate on the macOS device
Open Keychain Access on your device

to verify that a client certificate and associated private key exists.

Workspace ONE Profiles configuration
Using Platform Single Sign-On 2.0 with Okta Desktop Password Sync requires you to make some configuration changes to your existing device management profiles.
- com.okta.mobile-auth-service-extension profile
- single sign-on extension profile
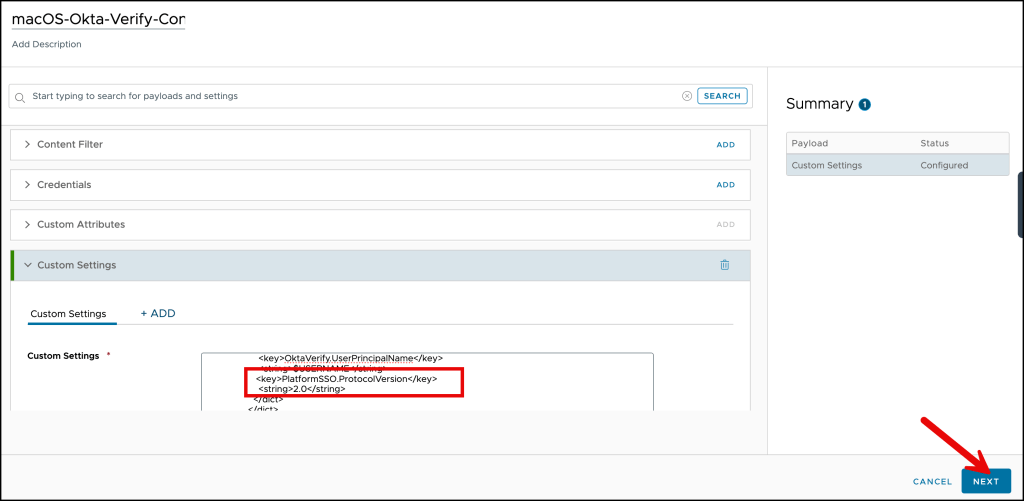
Update your device management profile
Navigate to your profile in your Workspace ONE UEM environment, edit it and add the following:
<key>PlatformSSO.ProtocolVersion</key>
<string>2.0</string>
You can use this template, but please change it to your Okta URL and your Client ID.
<dict>
<!-- replace customerorg.okta.com with your tenant -->
<key>OktaVerify.OrgUrl</key>
<string>https://customerorg.okta.com</string>
<!-- replace YOUR_CLIENT_ID with your Desktop Password Sync App Client ID -->
<key>OktaVerify.PasswordSyncClientID</key>
<string>YOUR_CLIENT_ID</string>
<!-- optional keys-->
<key>OktaVerify.UserPrincipalName</key>
<string>{EnrollmentUser}</string>
<key>PlatformSSO.ProtocolVersion</key>
<string>2.0</string>
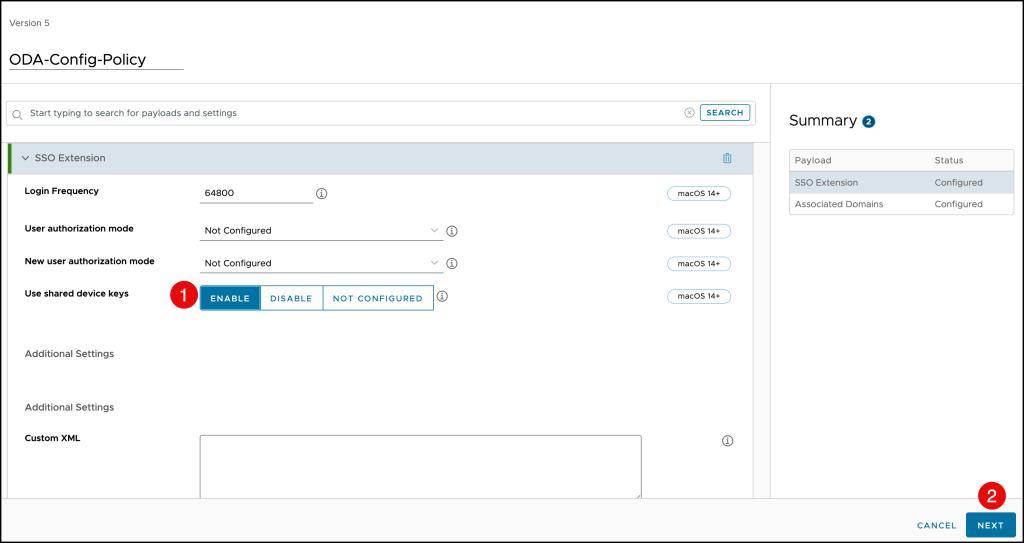
</dict>Update your single sign-on extension profile
The next step is to update your existing single sign-on extension profile and set the
Use shared device keys setting to ENABLE.
Press NEXT to continue
Click Save & Publish

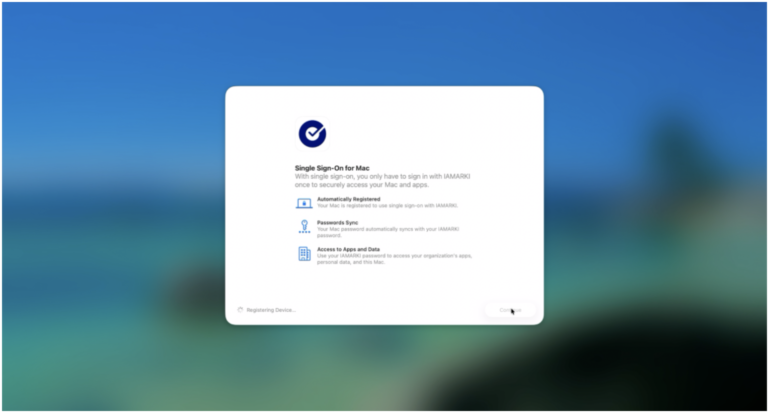
After Shared Device Keys has been enabled, users receive a notification asking them to update their registration.
This will take the user through the Desktop Password Sync registration process to sync their Okta password to their macOS account.
Let’s take a look at this in this demo
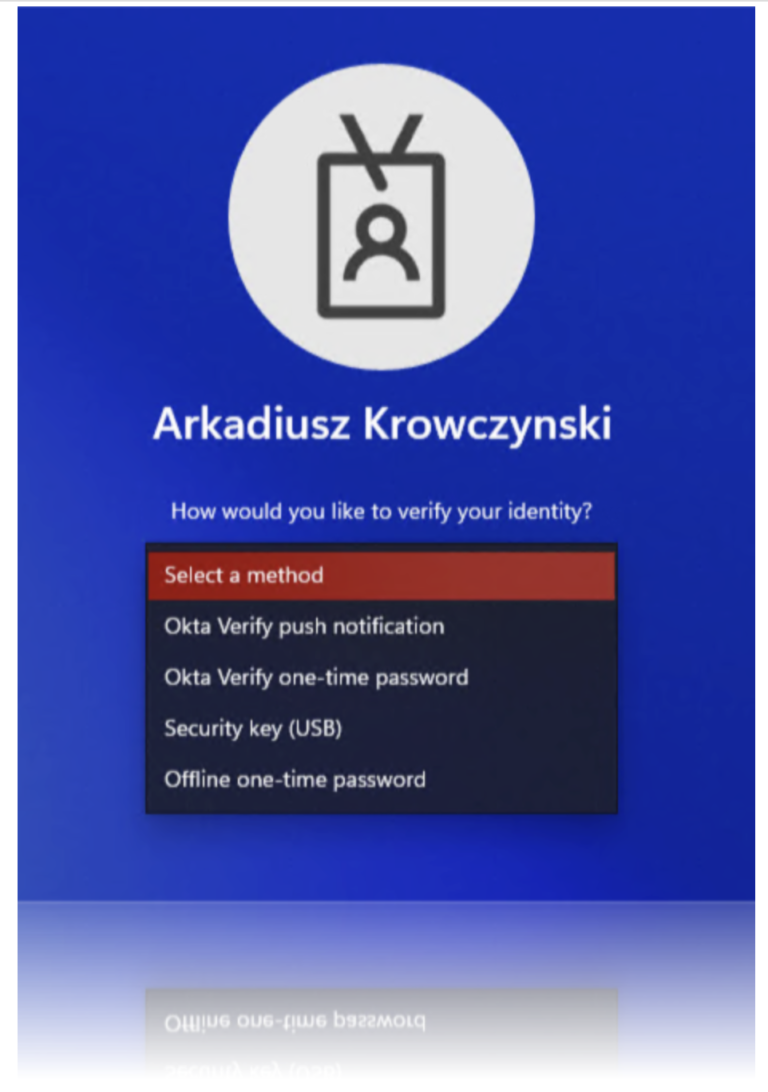
Demo Password Sync on macOS lock screen
This demo shows the Password Sync functionality on macOS lock screen on a
Workspace ONE UEM enrolled device.
Demo Password Sync on macOS login screen
This demo shows the Password Sync functionality on macOS login screen on a Workspace ONE UEM enrolled device.
Workspace ONE custom profiles
You can also use custom profiles to configure Desktop Password Sync in your Workspace ONE UEM environment.
Below you will find sample profiles that can be used, but please remember to adjust the Okta Org Url and Client ID.
Okta Verify Custom Profile
Create a Custom Settings Profile in your Workspace ONE UEM environment and add the following Custom Settings
Custom Settings 1
<dict>
	<key>PayloadContent</key>
	<dict>
		<key>com.okta.mobile.auth-service-extension</key>
		<dict>
			<key>Forced</key>
			<array>
				<dict>
					<key>mcx_preference_settings</key>
					<dict>
						<key>OktaVerify.OrgUrl</key>
						<string>https://replace-with-your-org-URL</string>
						<key>OktaVerify.PasswordSyncClientID</key>
						<string>replace-with-your-client-ID</string>
						<key>OktaVerify.UserPrincipalName</key>
						<string>{EnrollmentUser}</string>
                                               <key>PlatformSSO.ProtocolVersion</key>
                                               <string>2.0</string>
					</dict>
				</dict>
			</array>
		</dict>
	</dict>
	<key>PayloadDisplayName</key>
	<string>Custom Settings</string>
	<key>PayloadIdentifier</key>
	<string>com.okta.mobile.auth-service-extension.9AF5F7BA-0A1D-4784-B29D-C13DC753E52E</string>
	<key>PayloadOrganization</key>
	<string>COMPANY</string>
	<key>PayloadType</key>
	<string>com.apple.ManagedClient.preferences</string>
	<key>PayloadUUID</key>
	<string>9AF5F7BA-0A1D-4784-B29D-C13DC753E52E</string>
	<key>PayloadVersion</key>
	<integer>1</integer>
</dict>
Custom Settings 2
<dict>
	<key>PayloadContent</key>
	<dict>
		<key>com.okta.mobile</key>
		<dict>
			<key>Forced</key>
			<array>
				<dict>
					<key>mcx_preference_settings</key>
					<dict>
						<key>OktaVerify.OrgUrl</key>
						<string>https://replace-with-your-org-URL</string>
						<key>OktaVerify.PasswordSyncClientID</key>
						<string>replace-with-your-client-ID</string>
						<key>OktaVerify.UserPrincipalName</key>
						<string>{EnrollmentUser}</string>
					</dict>
				</dict>
			</array>
		</dict>
	</dict>
	<key>PayloadDisplayName</key>
	<string>Custom Settings</string>
	<key>PayloadIdentifier</key>
	<string>com.okta.mobile.A4124D4A-9953-4473-B05D-5F09287E921C</string>
	<key>PayloadOrganization</key>
	<string>COMPANY</string>
	<key>PayloadType</key>
	<string>com.apple.ManagedClient.preferences</string>
	<key>PayloadUUID</key>
	<string>A4124D4A-9953-4473-B05D-5F09287E921C</string>
	<key>PayloadVersion</key>
	<integer>1</integer>
</dict>
Desktop Password Sync Custom Profile
Create a Custom Settings Profile for your Desktop Password Sync configuration in your Workspace ONE UEM environment and add the following Custom Settings.
Custom Settings 1
<dict>
	<key>Configuration</key>
	<array>
		<dict>
			<key>ApplicationIdentifier</key>
			<string>B7F62B65BN.com.okta.mobile.auth-service-extension</string>
			<key>AssociatedDomains</key>
			<array>
				<string>authsrv:replace-with-your-org-URL</string>
			</array>
			<key>EnableDirectDownloads</key>
			<false/>
		</dict>
	</array>
	<key>PayloadDescription</key>
	<string>AssociatedDomainsSettings</string>
	<key>PayloadDisplayName</key>
	<string>Associated Domains</string>
	<key>PayloadIdentifier</key>
	<string>8982333b-9109-4801-8e6e-20d01b185b44.Associated Domains</string>
	<key>PayloadOrganization</key>
	<string></string>
	<key>PayloadType</key>
	<string>com.apple.associated-domains</string>
	<key>PayloadUUID</key>
	<string>f83d11de-b23a-4e87-a871-5d212332ae77</string>
	<key>PayloadVersion</key>
	<integer>1</integer>
</dict>
Custom Settings 2
<dict>
	<key>Configuration</key>
	<array>
		<dict>
			<key>ApplicationIdentifier</key>
			<string>B7F62B65BN.com.okta.mobile.auth-service-extension</string>
			<key>AssociatedDomains</key>
			<array>
				<string>authsrv:replace-with-your-org-URL</string>
			</array>
			<key>EnableDirectDownloads</key>
			<false/>
		</dict>
        <dict>
			<key>ApplicationIdentifier</key>
			<string>B7F62B65BN.com.okta.mobile</string>
			<key>AssociatedDomains</key>
			<array>
				<string>authsrv:replace-with-your-org-URL</string>
			</array>
			<key>EnableDirectDownloads</key>
			<false/>
		</dict>
	</array>
	<key>PayloadDescription</key>
	<string>AssociatedDomainsSettings</string>
	<key>PayloadDisplayName</key>
	<string>Associated Domains</string>
	<key>PayloadIdentifier</key>
	<string>8982333b-9109-4801-8e6e-20d01b185b44.Associated Domains</string>
	<key>PayloadOrganization</key>
	<string></string>
	<key>PayloadType</key>
	<string>com.apple.associated-domains</string>
	<key>PayloadUUID</key>
	<string>f83d11de-b23a-4e87-a871-5d212332ae77</string>
	<key>PayloadVersion</key>
	<integer>1</integer>
</dict>