“Enhancing Zero Trust with Okta Identity Threat Protection and Jamf Security: Continuous Access Evaluation Through Shared Security Signals”
Introduction
In today’s rapidly evolving threat landscape, identity is the new security perimeter. Organizations face sophisticated cyber threats that target user credentials, exploit access gaps, and challenge traditional security measures.
To stay ahead, IT and security teams need a proactive, intelligent approach to identity protection—one that not only detects threats but also responds in real time.
The integration between Okta Identity Threat Protection and Jamf Security Cloud via the Share Signals Frameworkdelivers a powerful, adaptive security solution that enhances device posture assessments and strengthens identity-based threat detection.
By sharing security intelligence between platforms, organizations can enforce dynamic, risk-aware authentication policies that help prevent breaches before they happen.
In this blog, I’ll explore:
How Okta and Jamf Security Cloud work together to enhance identity security
The benefits of real-time risk-based authentication leveraging device posture and behavioral analytics
How the Share Signals Framework improves security posture by enabling continuous risk evaluation
A step-by-step guide to integrating and configuring Okta Identity Threat Protection with Jamf Security Cloud
With this integration, businesses can move beyond static authentication policies and embrace a more adaptive, intelligent, and secure approach to identity protection. Let’s dive in!
Prerequisites: Setting the Foundation for Okta Identity Threat Protection and Jamf Security Cloud Integration
Before integrating Okta Identity Threat Protection with Jamf Security Cloud using the Share Signals Framework, ensure that your environment meets the following technical and security requirements. Proper configuration will enable seamless communication between the two platforms, enhancing identity security with real-time threat intelligence and risk-based authentication.
Okta Requirements
- Okta Identity Engine (OIE) deployed
- Okta Identity Threat Protection enabled in your Okta tenant
- Admin access to the Okta Admin Console
- Entity Risk policies configured in Okta
Jamf Security Cloud Requirements
- Jamf Pro configured for device management and policy enforcement
- Active Jamf Security Cloud Subscription with access to threat intelligence and device risk scoring
- Admin access to Jamf Security Cloud for integration setup
- Jamf Protect deployed on macOS/iOS devices for security posture assessment
Additional Considerations
- Shared Signals Framework (SSF) enabled on both Okta and Jamf Security Cloud
- Defined Security Policies – Ensure Okta policies are set to respond dynamically to risk signals from Jamf Security Cloud
- Accurate User and Device Mapping – Maintain a clear identity-to-device association for enhanced risk-based decision-making
By meeting these prerequisites, you lay the groundwork for a robust, real-time security integration that leverages identity intelligence and device risk signals to fortify authentication, prevent threats, and reduce security blind spots.
Demos
Let’s explore the following demonstration scenarios to better understand how these configurations and workflows come to life in practice.
Demo – Jamf Trust Activation with Okta
In this demonstration, we walk through the seamless activation of Jamf Trust with Okta, watch the demo to see the step-by-step process in action.
Demo – Identity Threat Protection with Jamf and Universal Logout – macOS
This demo showcases the powerful integration between Okta Identity Threat Protection (ITP) and Jamf Security Cloud using the Shared Signals Framework.
Watch how a detected threat on a macOS device, triggers Okta Universal Logout, ensuring a precise and automated security response to mitigate risks in real-time.
Demo – Identity Threat Protection with Jamf and Universal Logout – Mobile devices
This last demo showcases the powerful integration between Okta Identity Threat Protection (ITP) and Jamf Security Cloud using the Shared Signals Framework.
Watch how a detected threat on a mobile device, triggers Okta Universal Logout, ensuring a precise and automated security response to mitigate risks in real-time.
Now, let’s dive into the implementation process and walk through the steps required to achieve this seamless integration.
This guide will provide a, step-by-step approach to configuring and deploying this powerful solution, ensuring you maximize its security benefits and operational efficiency.
Authorizing Jamf Trust in Your Okta Organization
Create a Jamf SSO app in Okta
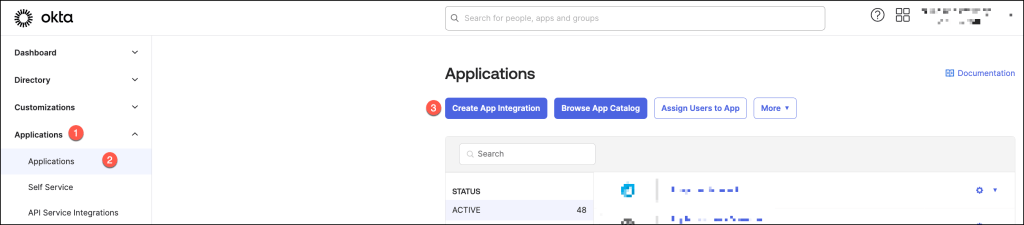
Log in to your Okta admin console, navigate to Applications > Applications and click
Create App Integration.
Select OIDC – OpenID Connect for your sign-in method, select Native Application for your application type and click Next.

On the New Native App Integration page that appears, configure the page as follows
- App integration name:
- For Grant type, select Refresh Token.
By default, Use persistent token will also be selected after you click Save below. - In the Sign-in redirect URIs fields, enter the required URls based on the platforms in the following table
- In the Sign-out redirect URIs fields, enter the required URls based on the platforms in the following table
- In the Controlled Access section, select Skip group assignment for now.
- Click Save

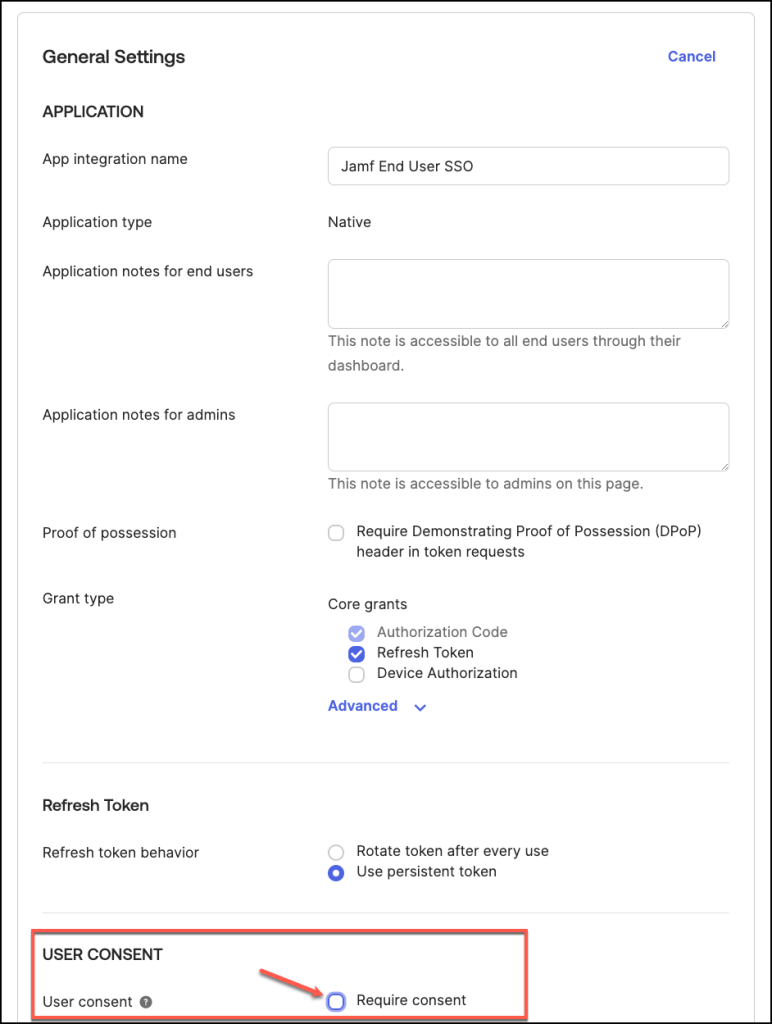
In the General Settings section, click Edit.
And deselect Require consent in the User consent section.
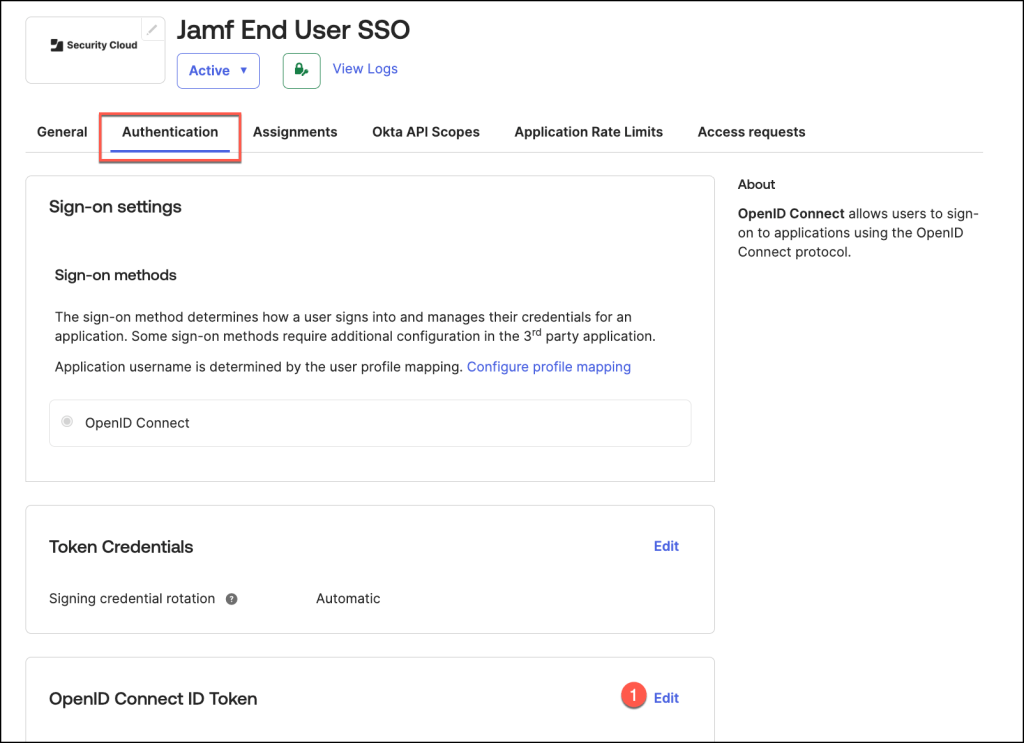
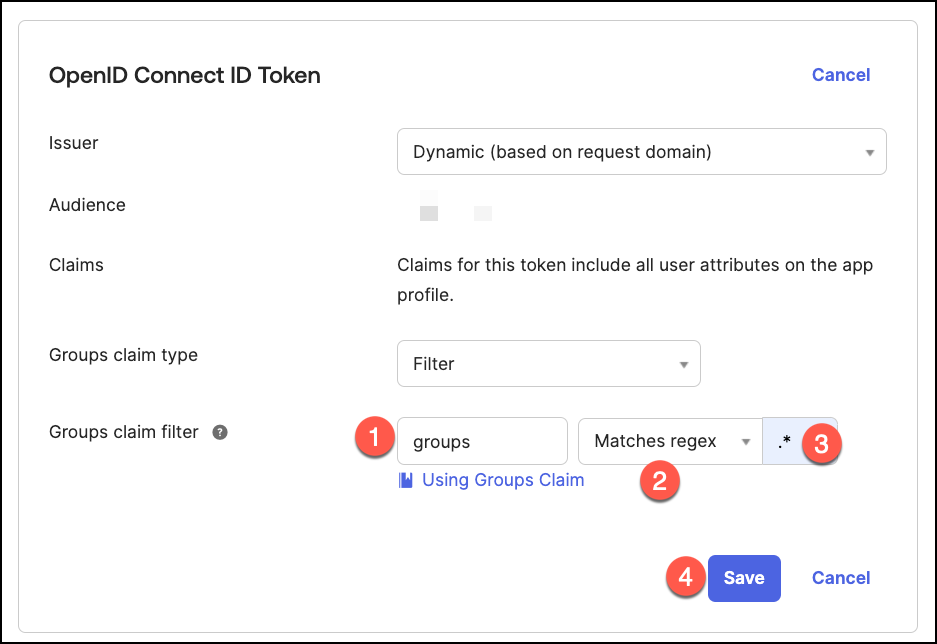
On the Authentication tab, find the OpenID Connect ID Token section, and click Edit.
- For Groups claim filter
- Change to “Matches regex”
- Enter
.*in the value field - Click Save
On the Assignments tab, define the users and groups that are permitted to activate
Jamf Security Cloud using their Okta credentials.

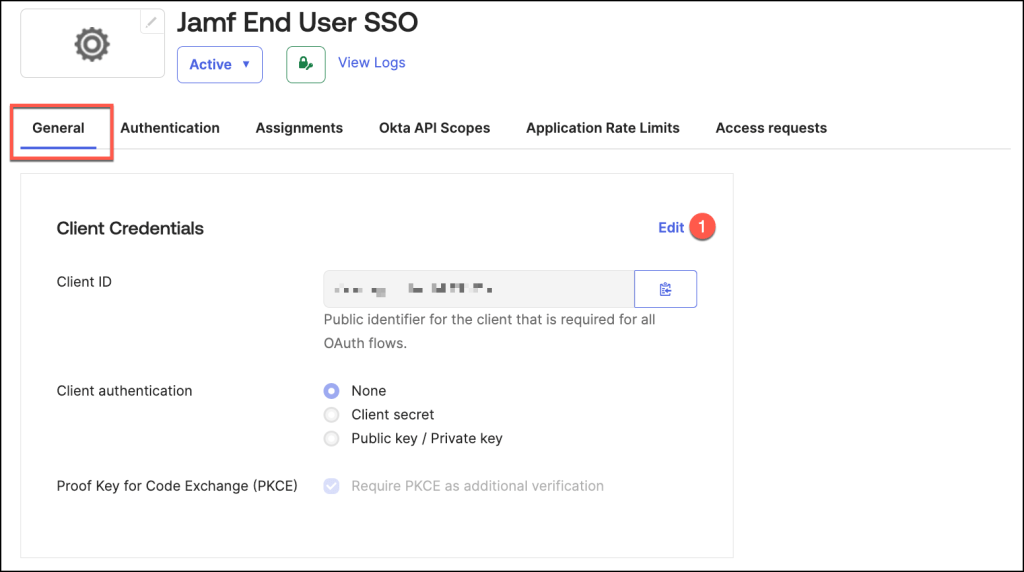
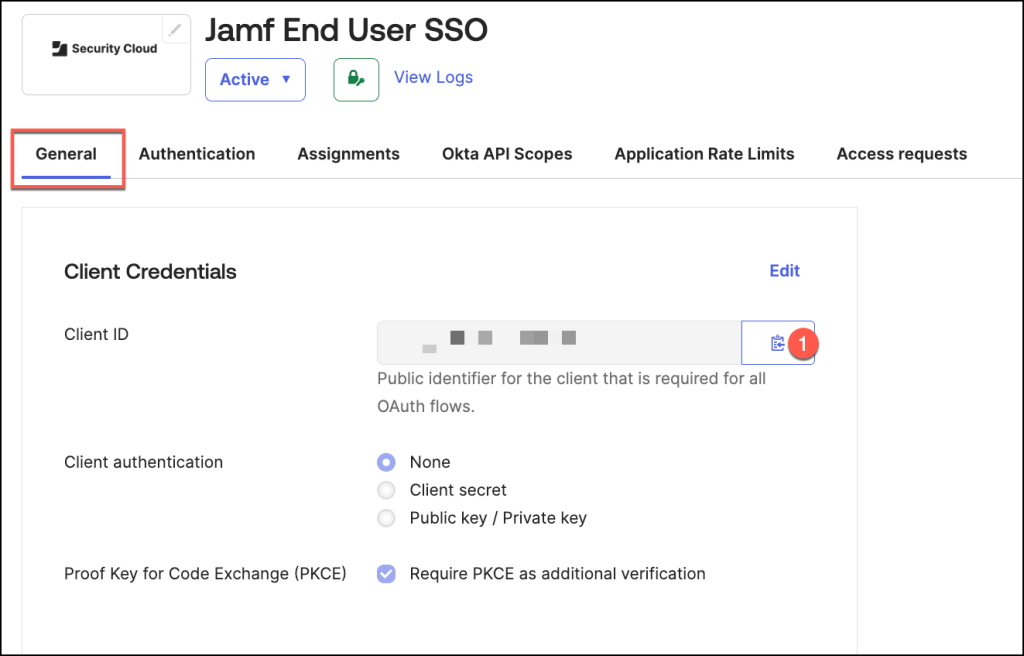
Return to the General tab, and click the Copy to Clipboard icon corresponding to the
Client ID.
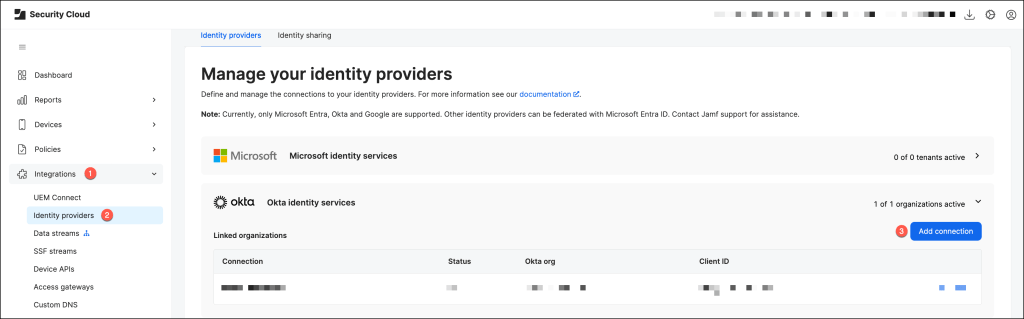
Create an Okta IdP connection in Jamf Security Cloud
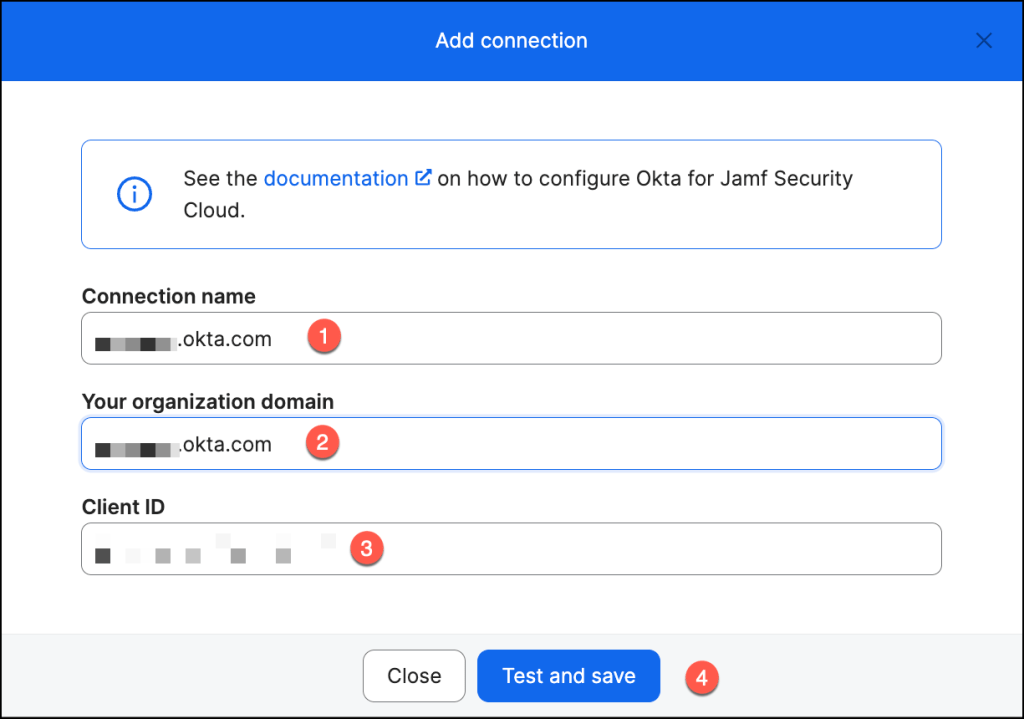
Sign in to Jamf Security Cloud, then navigate to Integrations > Identity providers and under Okta, click Add connection.
- Enter a Connection name.
- Provide the full hostname of your Okta Organization Domain
- Paste the Client ID, copied from the Okta console in a previous step, into the Client ID field.
- Click Test and Save.
Okta authentication is now configured.
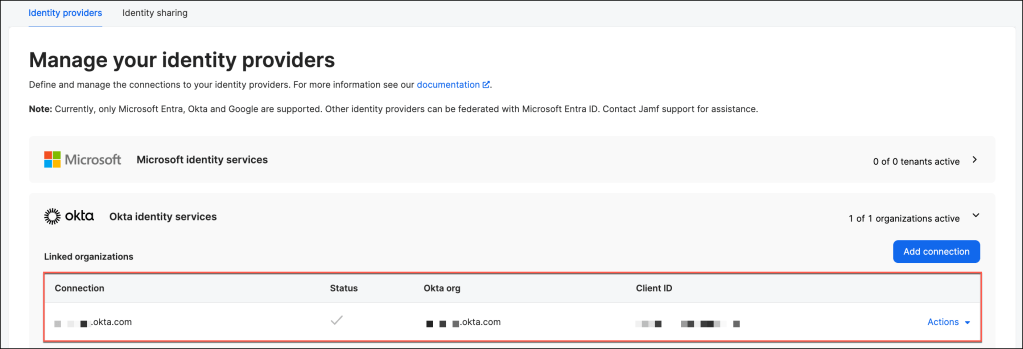
The integration is now fully enabled and can be utilized by selecting “Okta” as the Identity Provider under the Authenticated by Identity Provider setting within the Associated User section of all configured Activation Profiles.
Configuring UEM Connect for Jamf Pro
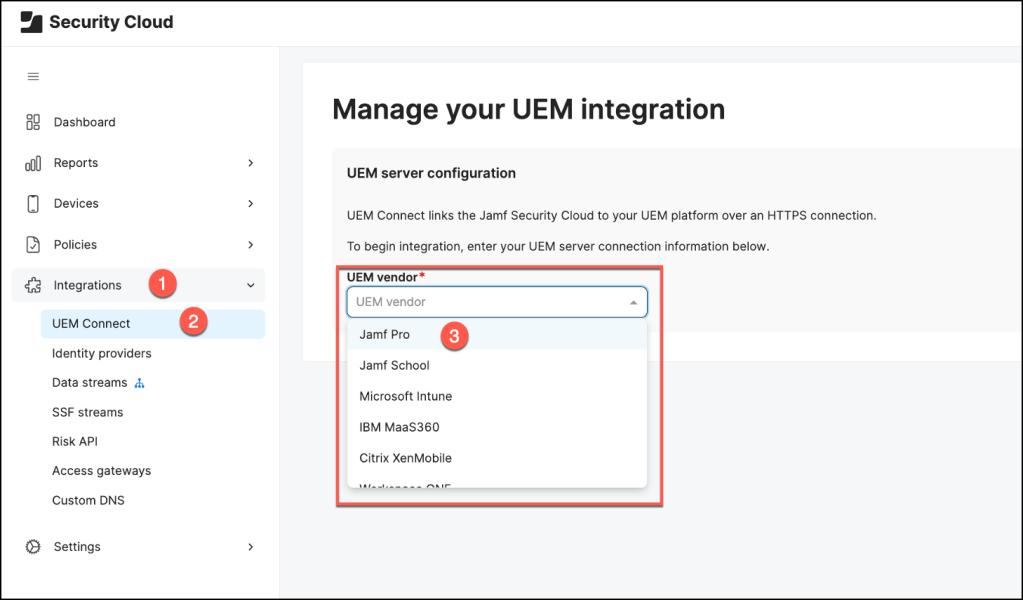
UEM Connect is a service designed to synchronize device inventory and group structures between your Safe Internet portal and a compatible UEM or MDM solution. By leveraging existing device group configurations within your organization’s UEM or MDM platform, this integration streamlines the deployment of Safe Internet security capabilities, ensuring a more efficient and scalable rollout across managed devices.
Navigate to Integrations > UEM Connect, click Configure and choose the Jamf Pro platform.
Add your UEM Server URL, which can be copied from the Jamf Pro web app and select an Authentication method:
- If you selected “Username and password”, enter the username and password of your Jamf Pro user account in the API Username and API Password fields.
- If you selected “OAuth authentication”, enter your Jamf Pro Client ID and Client secret.
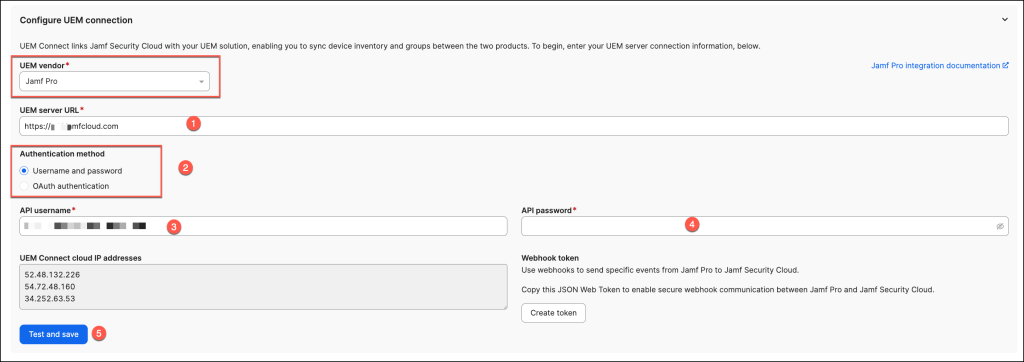
Press Continue after the successful test.
UEM Connect has been successfully configured for Jamf Pro, enabling seamless synchronization between Jamf Security Cloud and Jamf Pro.
This integration ensures that device inventory and security policies remain consistently updated through regular data synchronization.
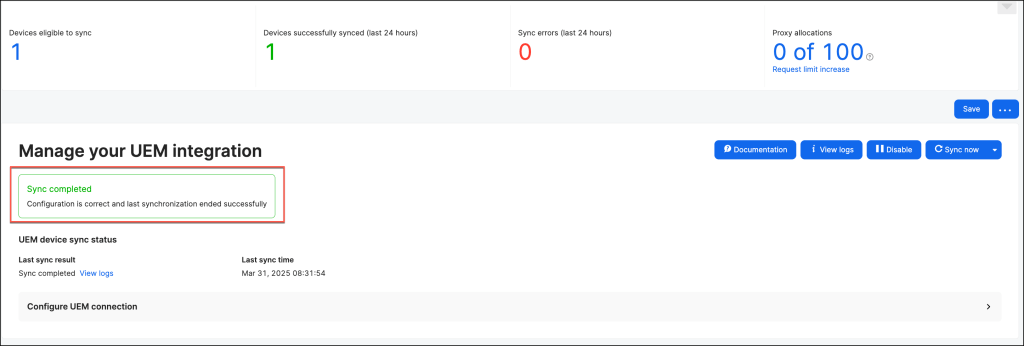
In the UEM integration settings, navigate to the Device Risk UEM Signaling section and activate the appropriate setting to enable this functionality.

Creating an Activation Profile using Jamf Security Cloud
Activation profiles play a crucial role in enrolling devices with the Jamf Security Cloud. These profiles are deployed alongside the Jamf Trust app and are responsible for configuring the security features and settings that will be applied to the devices during enrollment.
In Jamf Security Cloud, navigate to Devices > Activation profiles and click Create profile.

In the Capabilities and Routing section, you can choose the security features to activate through the activation profile.
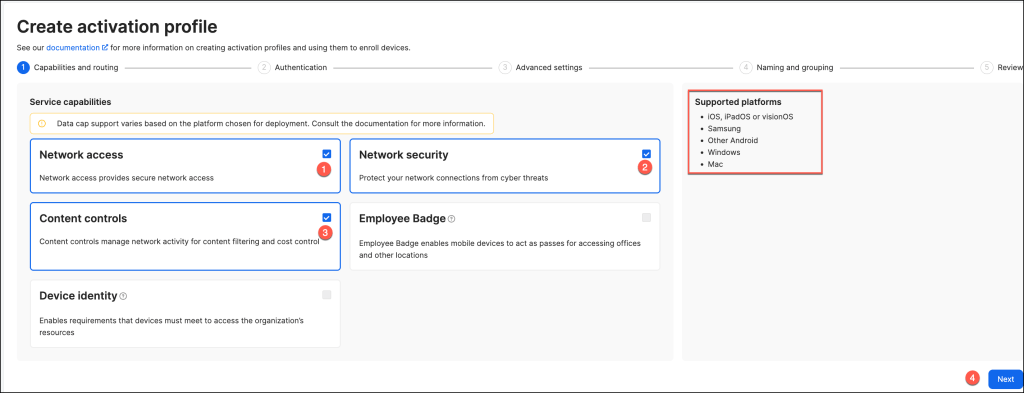
In the User Identification section, configure the requirement for users to sign in to Jamf Trust via your organization’s identity provider for device enrollment.
Once configured, click Next to proceed. Enabling Authenticated by Identity Provider is essential for leveraging Jamf Connect for Zero Trust Network Access or for utilizing identity-based provisioning.

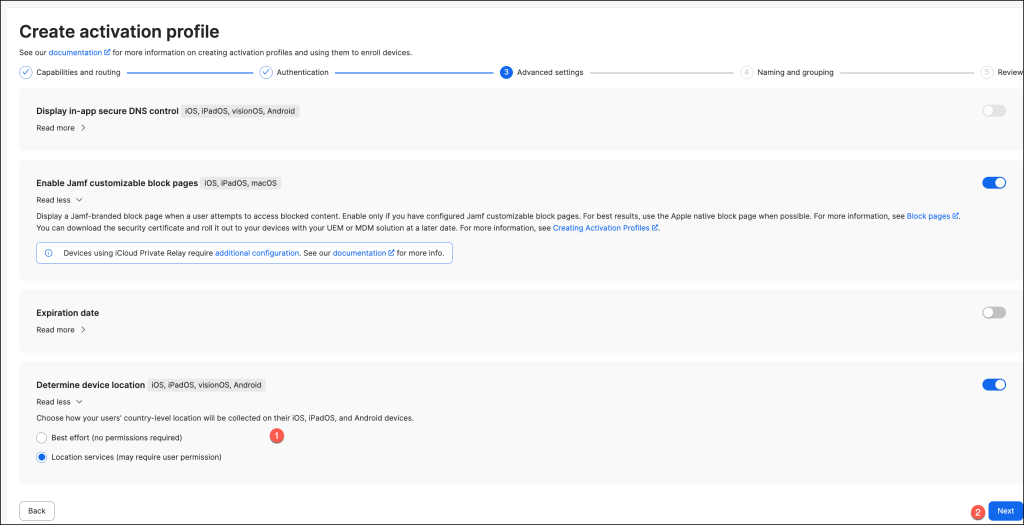
In the Advanced Settings section, configure additional parameters for the profile, including options like the profile’s expiration date. The available settings will vary based on the service capabilities you selected for the activation profile.
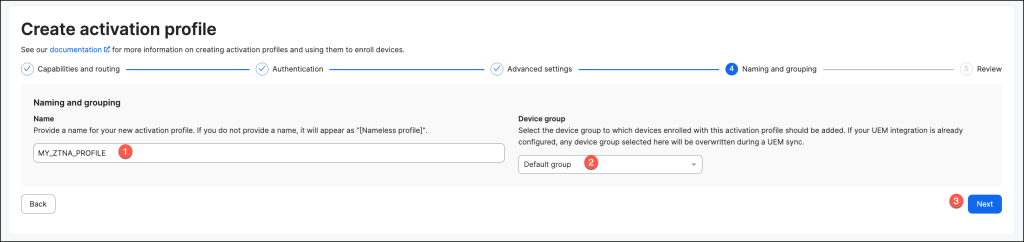
On the Naming and grouping page, enter general information about the profile.
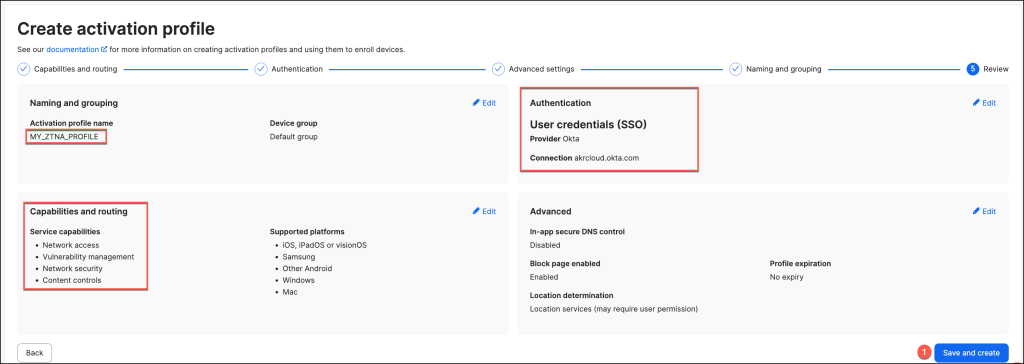
On the Review page, verify the details of the activation profile, ensuring all configurations are accurate. Once confirmed, click Save and Create to finalize the setup.
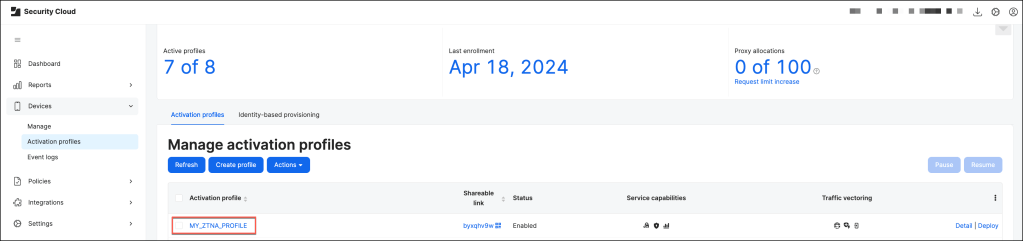
The new activation profile has been successfully created and is now ready for use.
Distribute the activation profile and Jamf Trust App using Jamf Pro
In this section, we will explore the process of distributing the activation profile and the
Jamf Trust App using Jamf Pro.
We will cover the necessary steps to ensure a smooth deployment, from configuring app settings in Jamf Pro to assigning and pushing the app to devices.
This integration streamlines the security process by ensuring that devices are properly enrolled and secured through the Jamf Trust app.
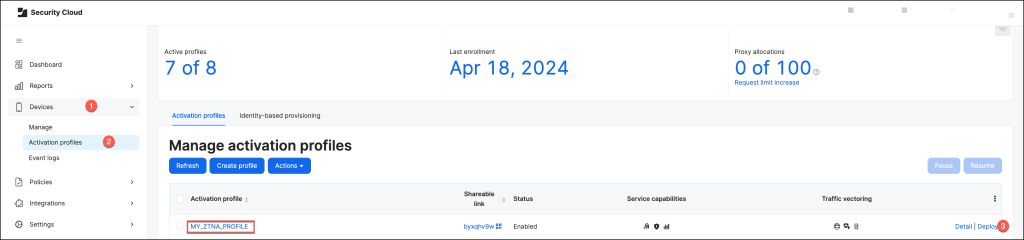
In Jamf Security Cloud, go to Devices > Activation Profiles, select an activation profile and click Deploy.
In the “Managed Deployment” section, choose “Jamf Pro” as the management solution and select the operating system you wish to deploy the app to.
For this example, I will be using macOS.
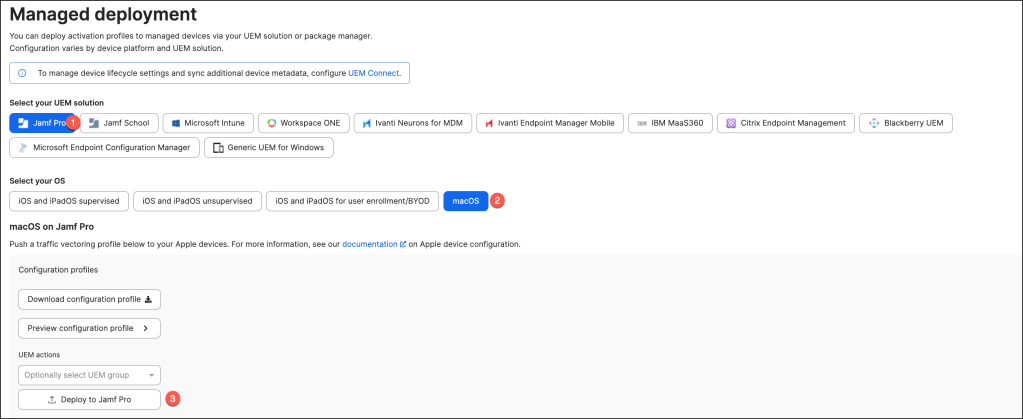
If the profile has been successfully created, the following message appears.

Next, navigate to your Jamf Pro dashboard, where you should see the newly created Configuration Profile.
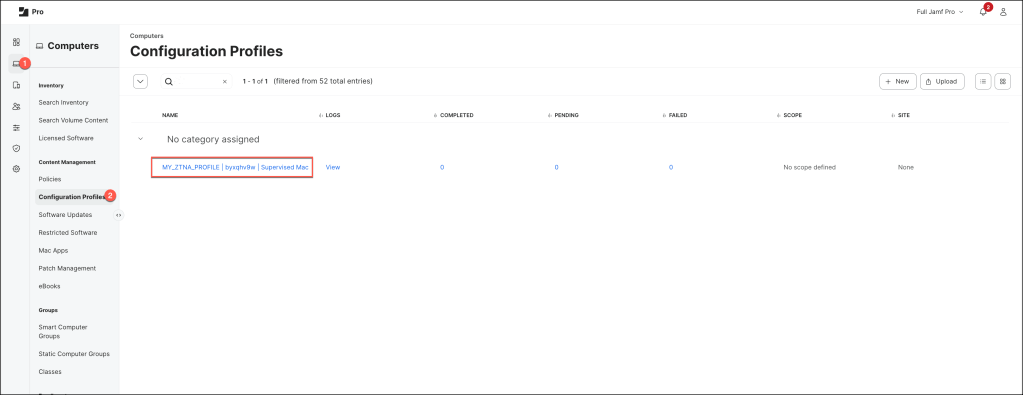
Open the Configuration Profile to review and verify the applied settings before deployment.
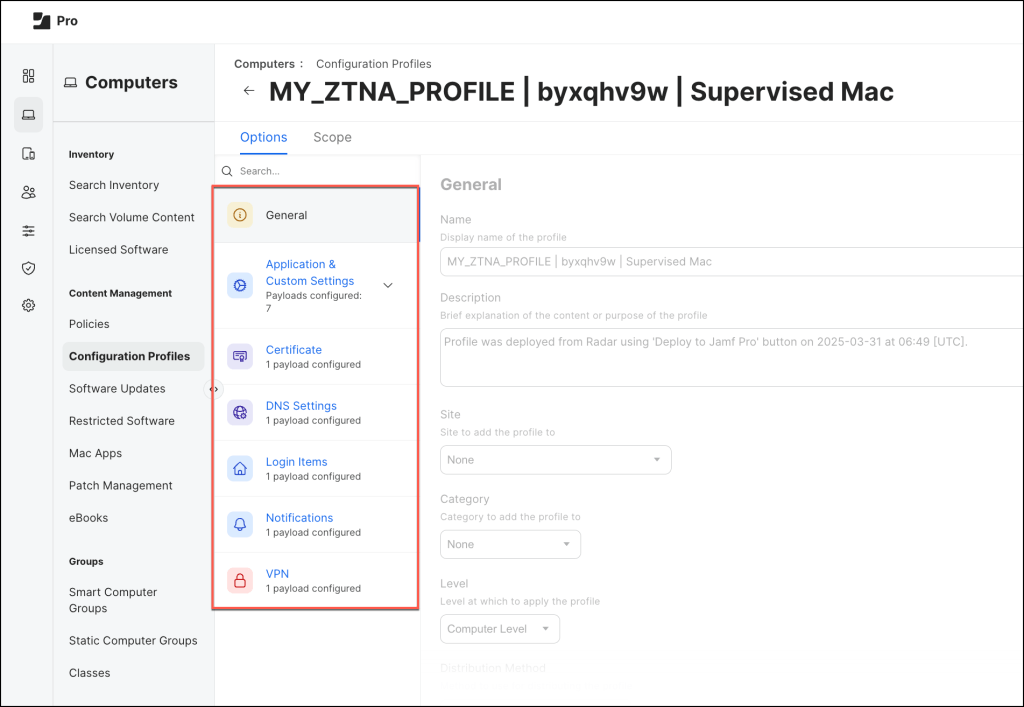
It’s now time to deploy the Jamf Trust app across your managed devices to ensure seamless security enforcement and policy application.
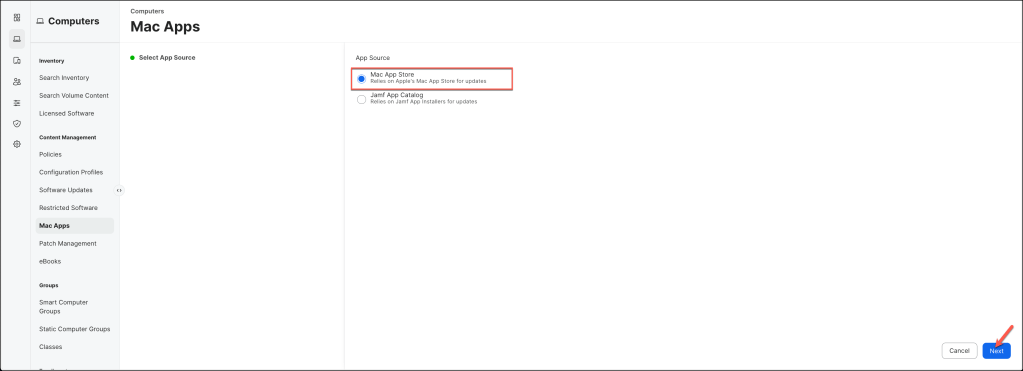
Navigate to Computers > Mac Apps, select Mac Apps, then click Next.
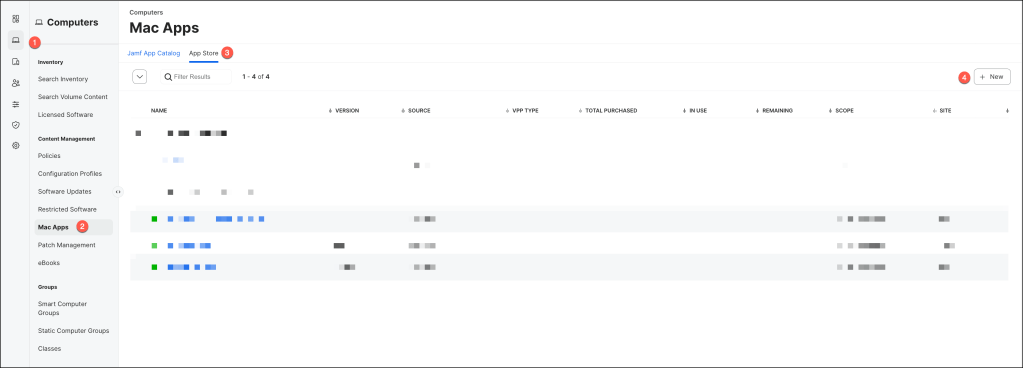
Select Mac App Store and click Next.
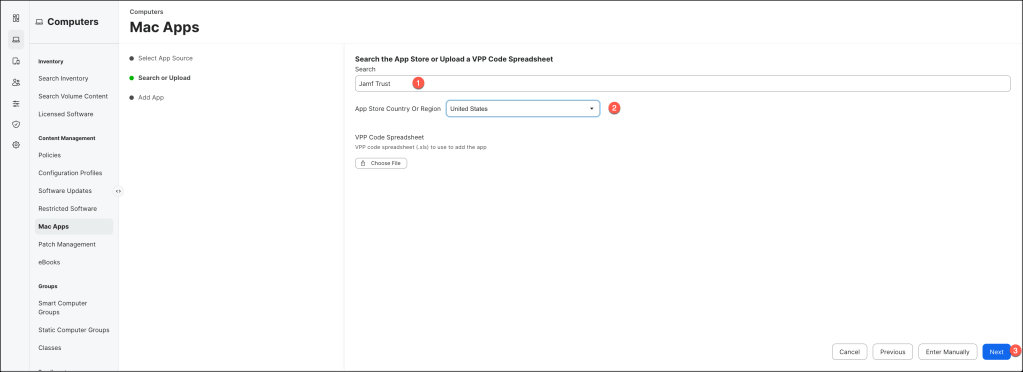
Search for Jamf Trust, select your desired App Store Country Or Region and click Next.
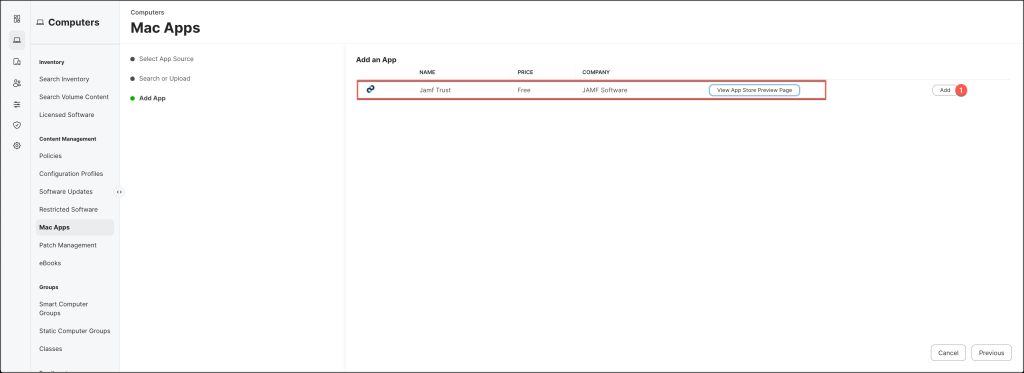
In the Add App section click the Add button.
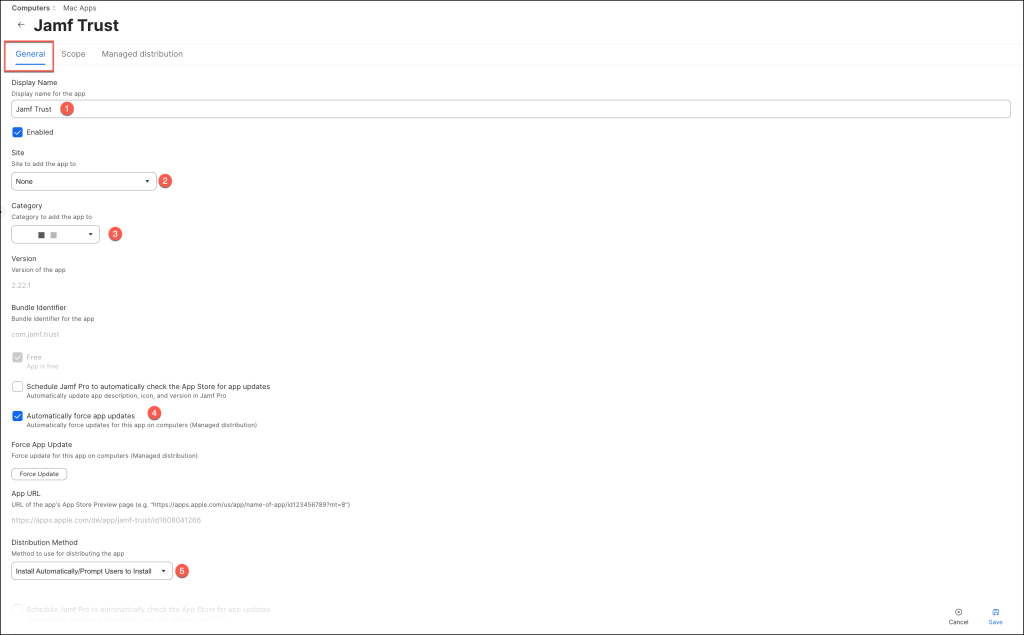
Set up the configuration with the following parameters:
- Enter a Display Name
- Select your desired Site
- Select a Category
- If desired opt in for app updates
- Set Distribution Method to “Install Automatically/Prompt Users to Install”.
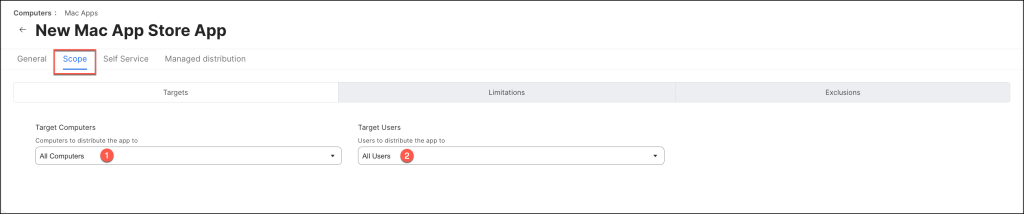
Configure the scope of the app.
Configuring your Threat Prevention Policy
The Jamf Protect threat prevention policy defines how identified threats are reported and remediated within your environment.
In this example, I am demonstrating a basic policy configuration.
For more in-depth details, please refer to the official Jamf documentation.
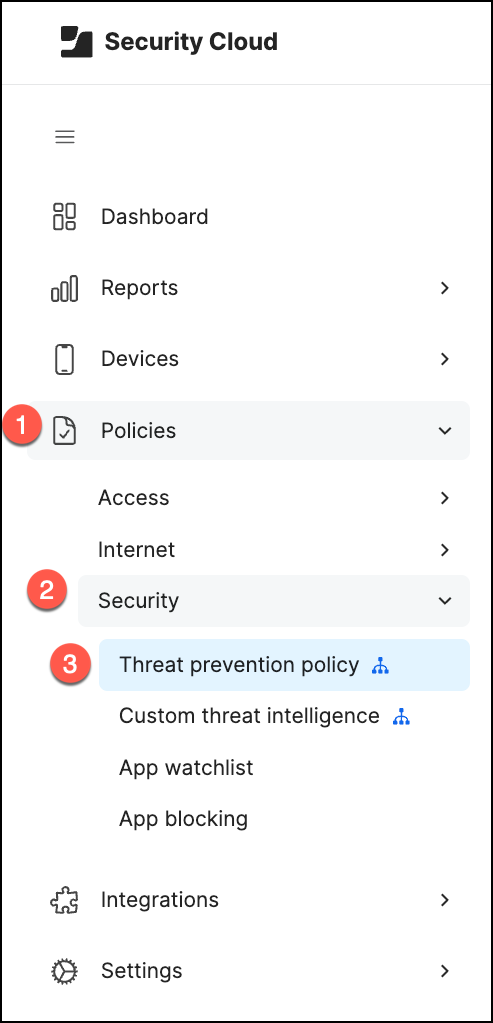
In Jamf Security Cloud, navigate to Policies > Security > Threat prevention policy
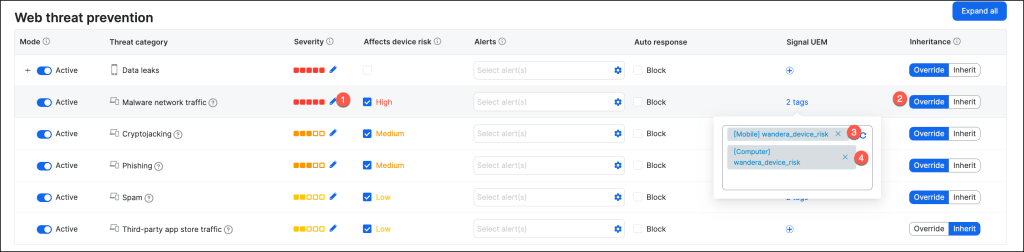
- Adjust the Severity meter to indicate how severe you consider each threat type to be to your organization
- Override the Root Level Configuration
- Click the + symbol in the Signal UEM column for the threat category
- Select the appropriate tags (Mobile and Computer)
and Save your settings.
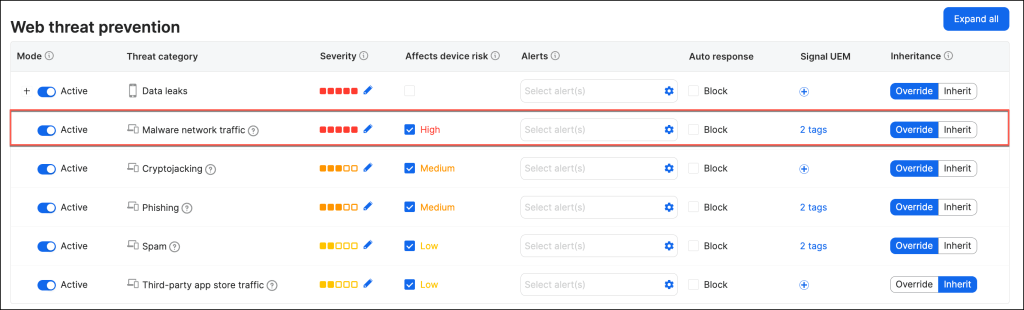
The sample Web Threat Prevention policy should be structured as follows.
Shared Signals Framework (SSF)
In this section
Configuring Jamf Security Cloud as Signal Transmitter in Shared Signals Framework (SSF) Integration
In Jamf Security Cloud, navigate to Integrations > SSF Streams, and click
Create new SSF stream.

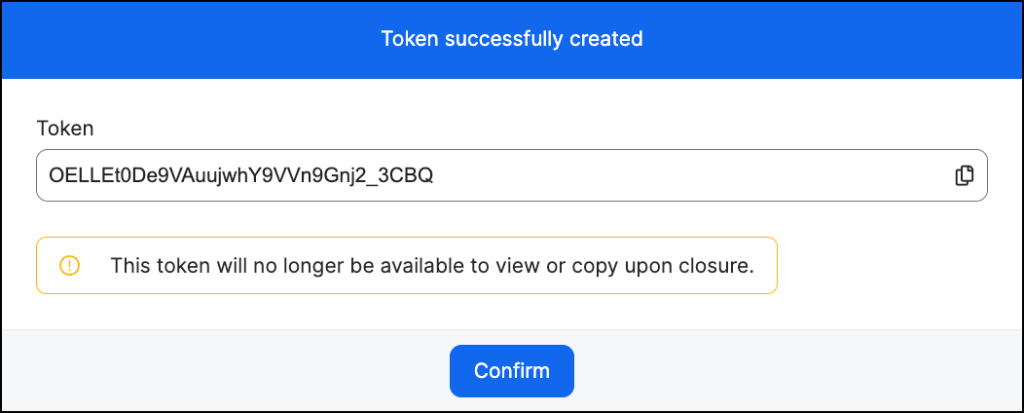
In the Create New SSF Stream panel, enter the Audience URL as https://YOUR_OKTA_URL

However, the generated Token is not required for this setup.
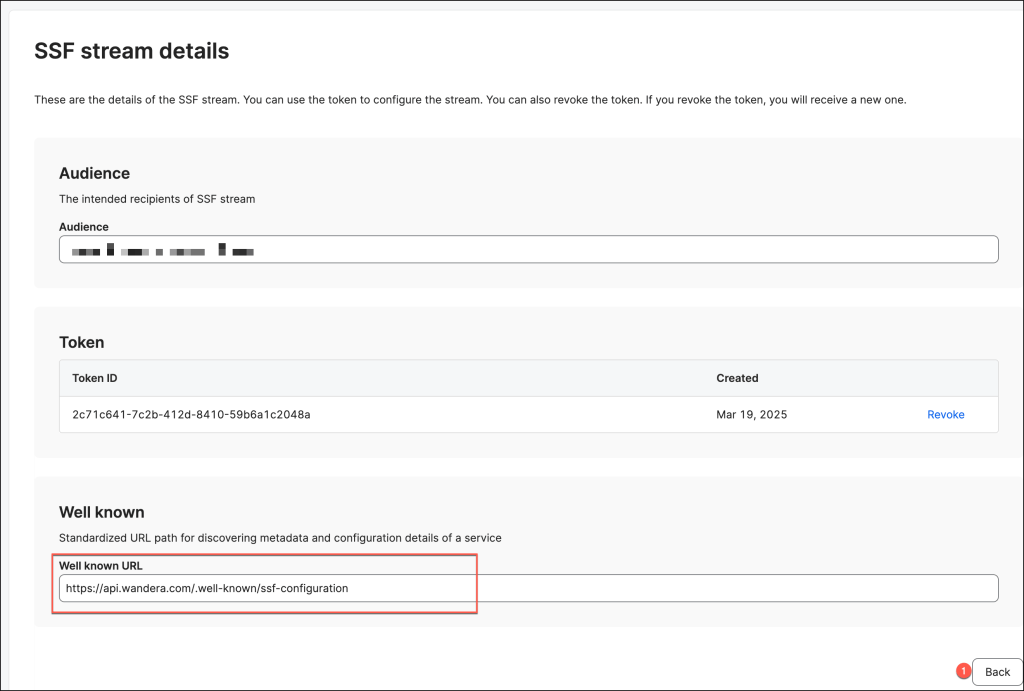
In the Okta tenant, the Well-Known URL field is mandatory to complete the integration between Jamf Security Cloudand Okta, make a note of the URL and click Back.
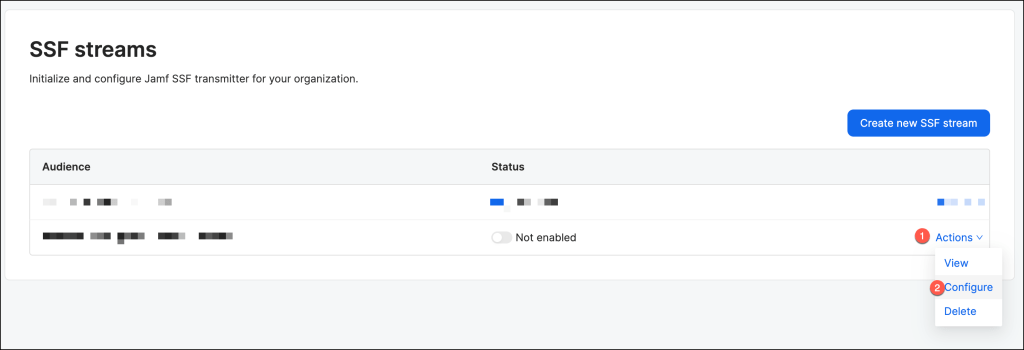
In the SSF stream section click Actions > Configure
Set up the stream configuration with the following parameters:
- Enter the value of the Endpoint URL appended with
/security/api/v1/security-events.https://YOUR_OKTA_URL/security/api/v1/security-events - Leave the Authorization header blank
- Select RISK_LEVEL_CHANGED in the Events option

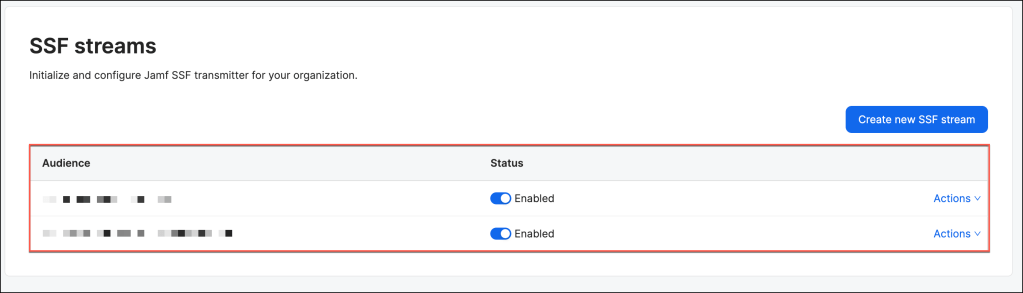
After successfully establishing the SSF stream between Jamf Security Cloud as the transmitter and Okta SSF as the receiver, Jamf Security Cloud will generate a “risk level changed” event through the SSF stream whenever a device’s risk status changes. The risk levels may include the following values:
- Secure
- Low
- Medium
- High
The event structure adheres to the Continuous Access Evaluation Profile (CAEP) protocol, providing a comprehensive snapshot of risk level changes. It includes both the previous and current risk levels, along with detailed metadata identifying the affected device and user.
Okta Identity Threat Protection Configuration
This section provides a walkthrough of the configuration process for Okta Identity Threat Protection (ITP), with a specific focus on setting up the Shared Signal Receiver and configuring the Entity Risk Policy.
These steps are essential for enabling seamless integration of threat intelligence and for defining dynamic responses to identity-based risks within your organization’s security ecosystem.
Configure the shared signal receiver
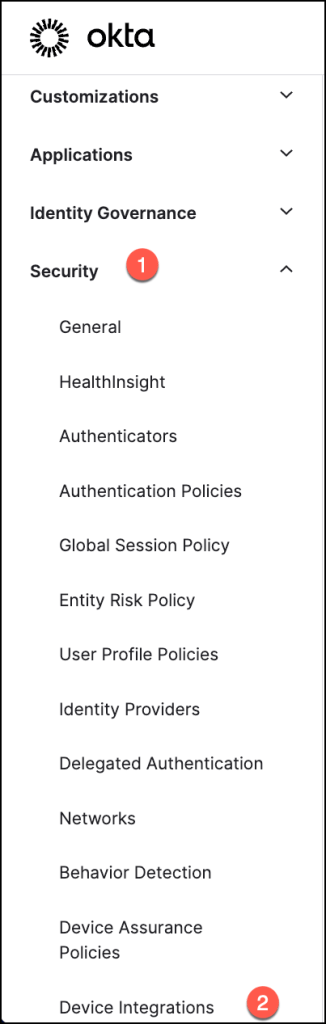
To access the necessary configuration settings in the Okta Admin Console, navigate to Security > Device Integrations.
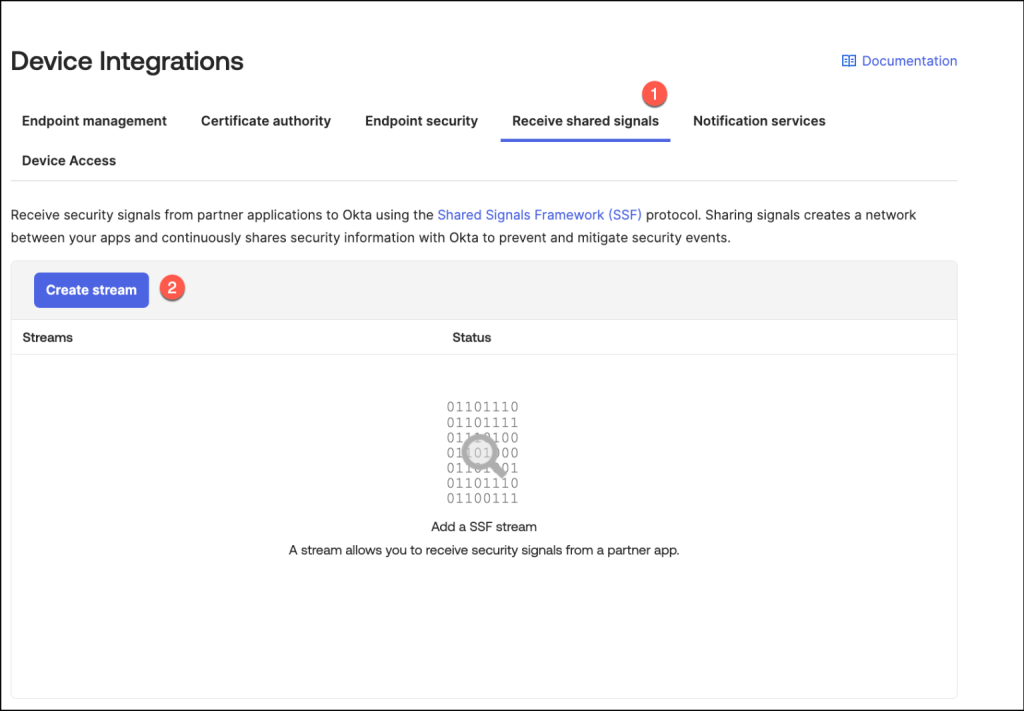
In the Receive Shared Signals tab, select Create Stream to begin setting up a new stream for shared threat intelligence.
This step initiates the process of integrating external security signals into your Okta environment for enhanced identity threat monitoring.
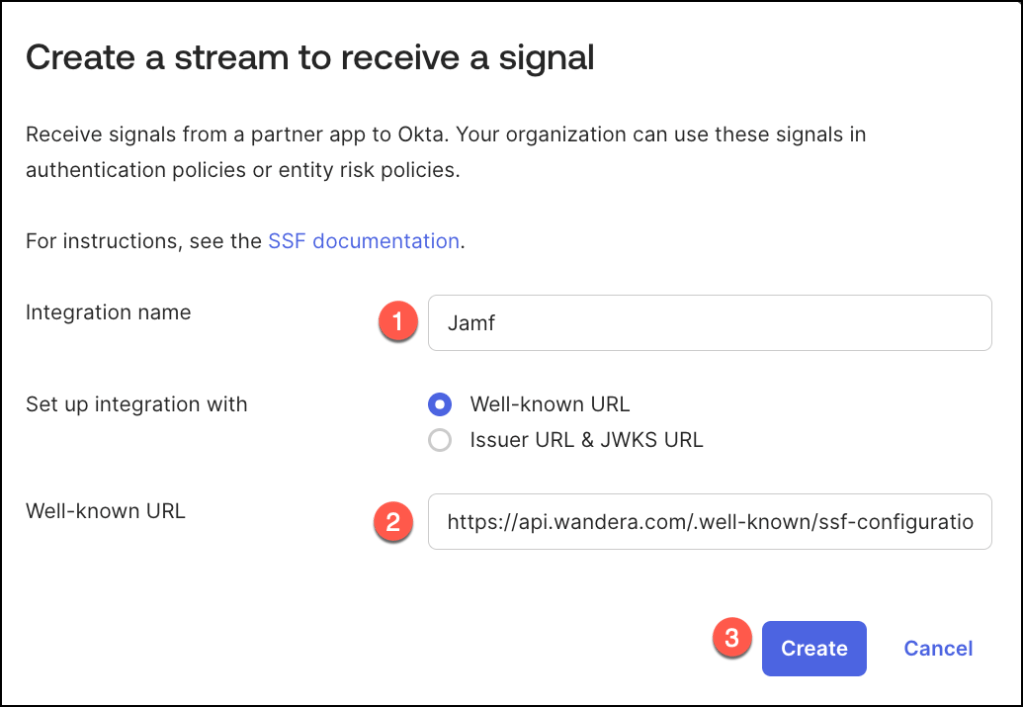
Provide a meaningful name for the integration in the Integration Name field, then paste the URL from the Jamf configuration into the Well-Known URL field.
Once all details are entered, click Create to finalize the setup.
This step establishes a secure connection for shared signal exchange between the systems.
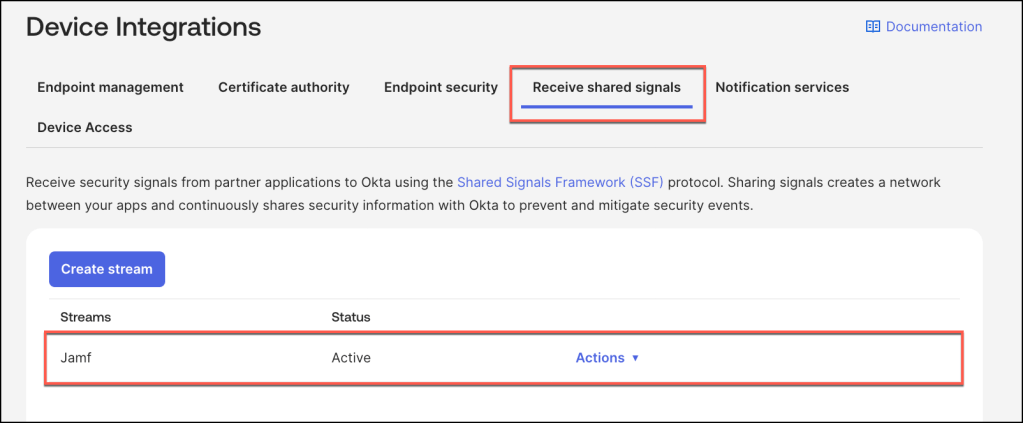
Upon successful creation, the stream is added to the Stream List in the Admin Console.
By default, its status is set to Active, indicating that the stream is ready to begin processing shared signals.
Entity Risk Policy
The Entity Risk Policy is a key feature introduced with Okta Identity Threat Protection (ITP), designed to proactively respond to identity-based threats. This policy dynamically evaluates and addresses risks whenever a user’s Entity Risk Level is updated, such as during a user.risk.change event.
Policy Structure and Evaluation
The Entity Risk Policy is comprised of one or more rules, each tailored to specific risk scenarios. These rules are evaluated sequentially, with the first matching rule determining the action taken.
The rules are defined based on:
- Group Membership: Specifies the user groups that the policy applies to. For example, policies might target high-risk users or specific organizational roles.
- Risk Detections: Identifies the specific triggers that evaluate user risk. Examples include signals from security providers or Okta’s internal risk analysis tools.
- New Risk Level: Indicates the updated risk level of the user (e.g., Low, Medium, High) that activates the rule.
Actions Based on Matching Rules
Once a rule matches, the corresponding action is executed.
The Entity Risk Policy supports multiple response options:
- Trigger Universal Logout:
Logs the user out from both Okta and all supported applications. This immediate action mitigates risks associated with compromised accounts. - Trigger Delegated Workflow:
Initiates a pre-configured Okta Workflow, enabling custom automation.
For instance, this can notify administrators, reset credentials, or perform additional security checks. - No Further Action:
Records the event in the System Log but takes no immediate action,
By leveraging the Entity Risk Policy, organizations can automate threat responses, minimize exposure, and maintain control over potential identity risks in real-time.
Add an entity risk policy rule for Universal Logout
To begin, navigate to Security > Entity Risk Policy.

Select Add Rule to create a new rule within the Entity Risk Policy.
This action allows you to define custom configurations tailored to your organization’s risk management requirements.

To configure a rule, follow these steps:
- Enter a Rule Name that reflects the purpose of the policy.
- Specify User Groups: Choose an option to define which user groups should be included or excluded from the rule. For instance, in my example, I selected Any Group to apply the rule universally.
- Set Detection Criteria: Choose Include at least one of the following detections and then select Security Events Provider Reported Risk as the detection type. This allows the system to trigger the rule based on security event risks.
- Define Entity Risk Level: Select High for the Entity Risk Level to capture the high risk levels.
- Select High as the Entity risk level
- Select Action: Choose the desired action.
In this example, I selected Logout and Revoke Tokens. - In my configuration, Universal Logout applies to Salesforce and Google Workspace, and Partial Universal Logout to Microsoft Office 365.
For more details on Universal Logout and how to configure it, refer to the official documentation

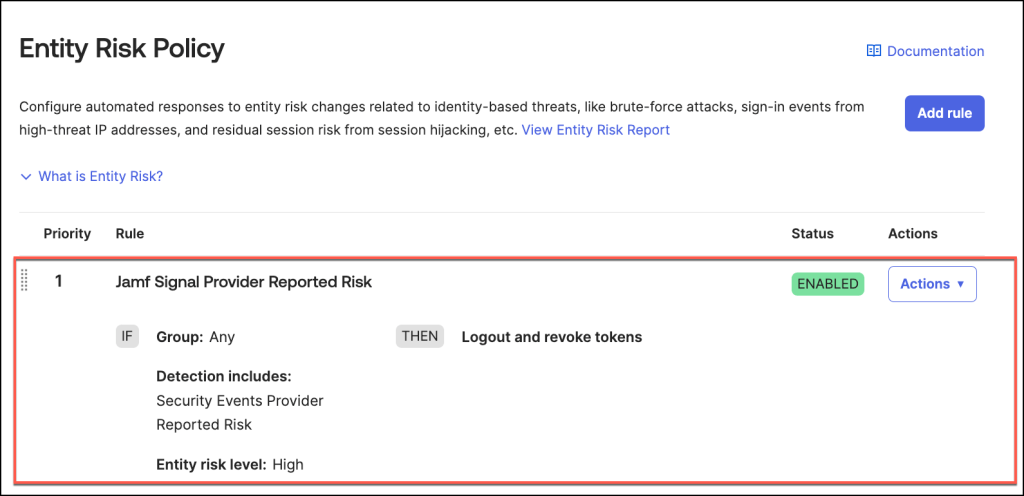
Once the Entity Risk Policy Rule is successfully configured, it will appear in the Entity Risk Policy section of the admin console.
By default, the rule’s status is set to Enabled, meaning it is active and ready to enforce the specified actions in response to detected identity risks.
Observability & Insights
Okta Identity Threat Protection (ITP) delivers a robust reporting and eventing framework designed to provide organizations a view of their identity threat landscape.
This framework enables security teams to gain a high-level overview of the organization’s overall identity risk and threat posture, offering insights into aggregated risk signals, user behavior patterns, and emerging threats.
When needed, administrators can dive deeper into the event data for granular threat investigations.
By leveraging detailed system logs and tailored reports, organizations can identify anomalies, trace the origins of risk events, and assess the effectiveness of security policies in real time.
This combination of comprehensive visibility and in-depth investigative tools empowers organizations to proactively mitigate risks and maintain a strong security posture across their identity infrastructure.
Review logs – Identity Threat Protection Universal Logout
Following the demonstration where Universal Logout was configured as the precise response to identity risks, the next step is to analyze the reporting tools and system logs to validate the effectiveness of this response.
- In this example, the user’s risk level is categorized as Low
- Accessing detailed insights is simple by navigating to the Risk tab
- The risk history table provides administrators with comprehensive visibility into a user’s historical risk data, offering a detailed view of all recorded risk events.
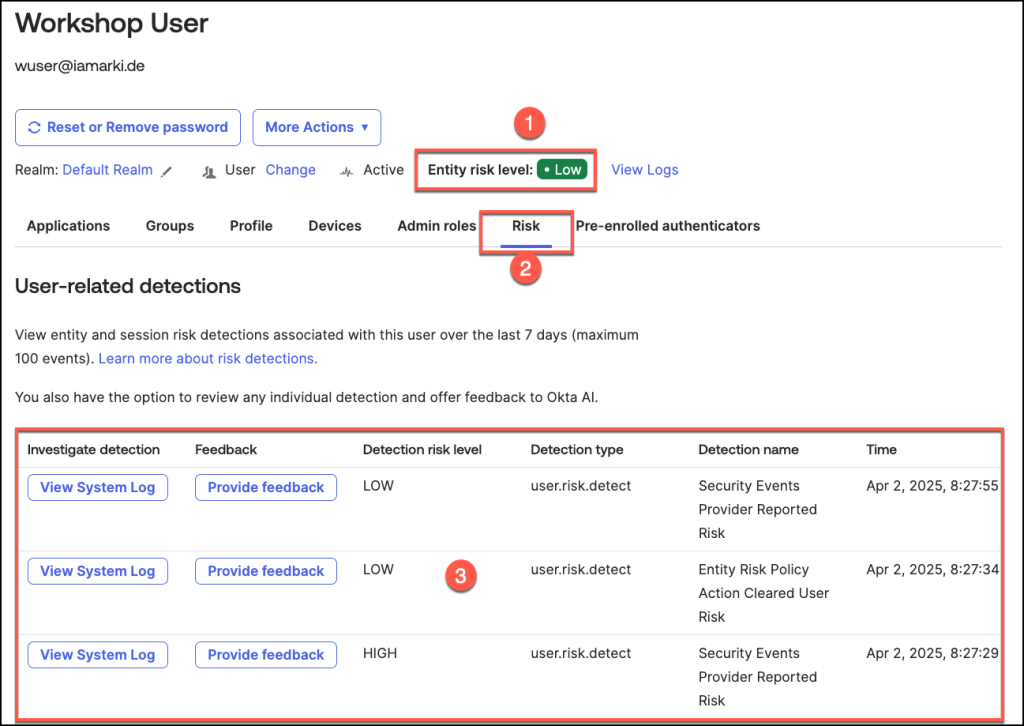
To access and review the System Logs associated with this specific detection type, simply click the View System Log button.
This action will direct you to a detailed log entry that provides in-depth information about the event, including timestamps, risk assessments, and any actions taken or recommended.

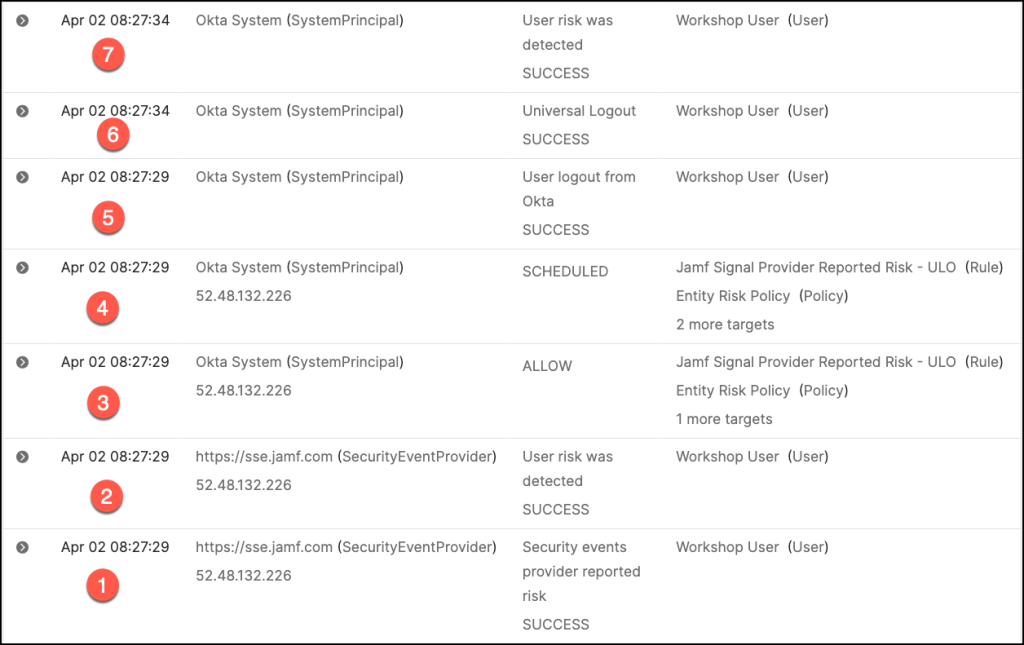
Let’s delve into the chronological sequence of events as captured in the system log. This examination provides a clear timeline of activities, helping administrators trace actions, understand triggers, and evaluate outcomes based on the configured policies.
- Risk signals are received from integrated security event provider Jamf, indicating a
high risk event. - Okta detects a risk associated with the user based on the received signals and assigns a corresponding risk level.
- The system evaluates the configured Entity Risk Policy against the user’s updated risk profile.
- As a result of the policy evaluation, Universal Logout is triggered to execute predefined actions.
Based on the policy evaluation, actions such as revoking tokens, forcing user logouts, or triggering workflows are implemented. - The policy enforces a logout from the Okta, ensuring immediate session termination to mitigate risk.
- Universal Logout, the user is logged out of all integrated and supported applications in our example Salesforce.
- Following policy execution, the system clears all active user sessions and resets the user’s risk profile.
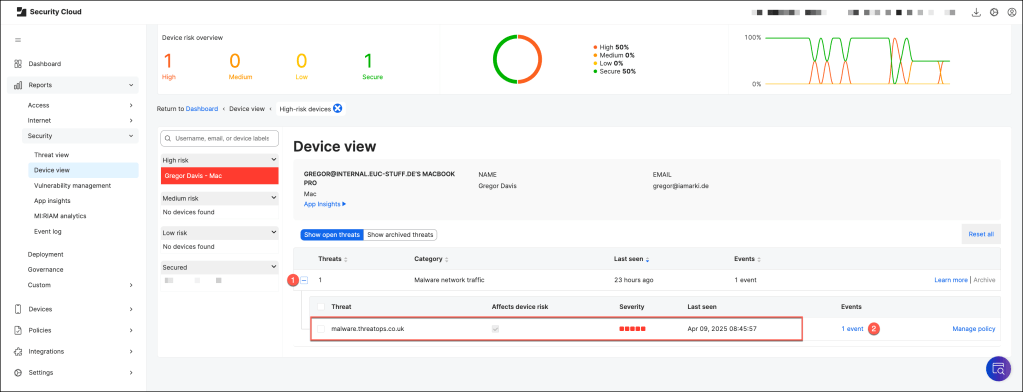
Overview of the Jamf Security Cloud Console:
Sign in with your administrator credentials and use the Dashboard to drill down into high-risk device activity.
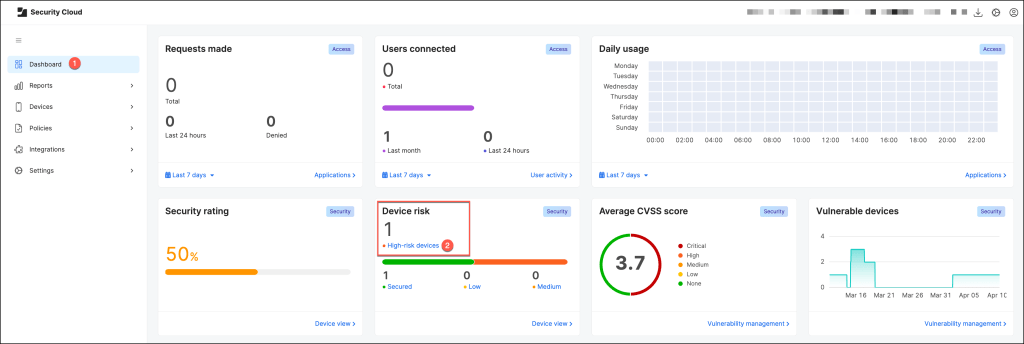
In the Device view, gain insights into which device is flagged as high risk and the specific threat that triggered the alert.
Conclusion
The integration of Okta Identity Threat Protection with Jamf Security Cloud via the Shared Signals Framework (SSF) marks a significant leap forward in enabling real-time, identity-aware security across your enterprise ecosystem.
By bridging endpoint telemetry and identity signals, organizations can now act on device risk dynamically—enforcing adaptive policies, triggering universal logout, and preventing compromise before it escalates.
This powerful, standards-based integration empowers security teams to:
- Gain continuous visibility into user and device risk,
- Automate real-time responses to threats across platforms,
- Close the gap between endpoint security and identity access control.
In a world where hybrid environments and evolving threats are the norm, this joint solution from Okta and Jamf not only enhances your Zero Trust architecture, but also delivers actionable intelligence for proactive, unified security.
The result? Faster detection. Smarter response. Stronger protection.