
Okta Device Access with Kandji a step-by step guide

Introduction
In this Blog Post, I’ll take you on a journey how to configure Okta Device Access Desktop MFA and Desktop Password Sync if you use Kandji as your Mobile Device Management (MDM) solution for your device fleet.
We start with the configuration on Okta and I show how to create the necessary configuration profiles on Kandji side,
Have fun reading the blog and then, of course, integrating and testing the solution
Requirements
- You have an Okta Identity Engine org available.
- Your OIE org has the Desktop Access SKU enabled.
- macOS version 14.X is the recommended for the best user experience.
- The Okta Verify authenticator is set up in your org.
- Okta Verify push notifications are enabled.
- You have a Kandji environment ready with the necessary permissions.
Okta Desktop MFA Configuration
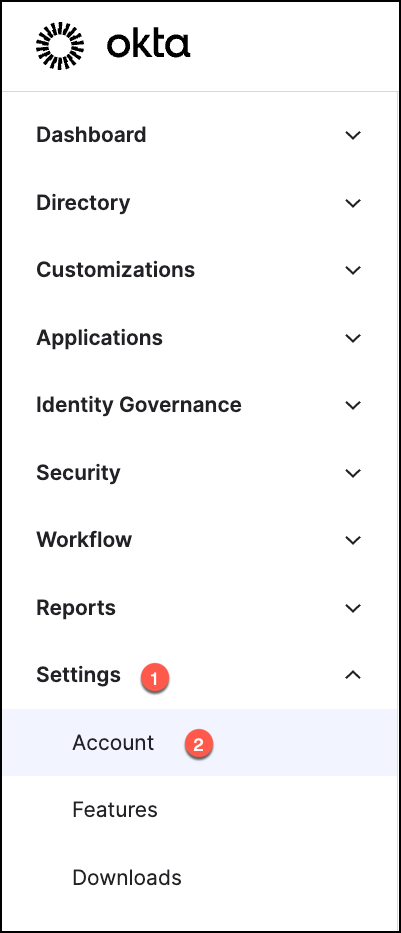
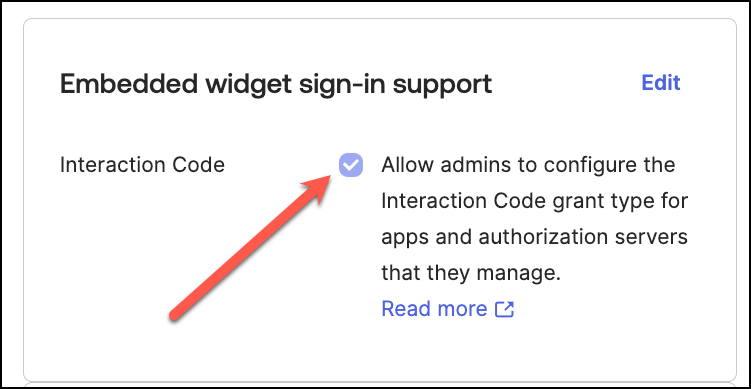
In the Admin Console, go to Settings, Account, Embedded widget sign-in support.
and ensure that the Interaction Code checkbox is selected.
In the Admin Console, navigate now to Applications –> Applications.

Click Browse App Catalog and search for Desktop MFA
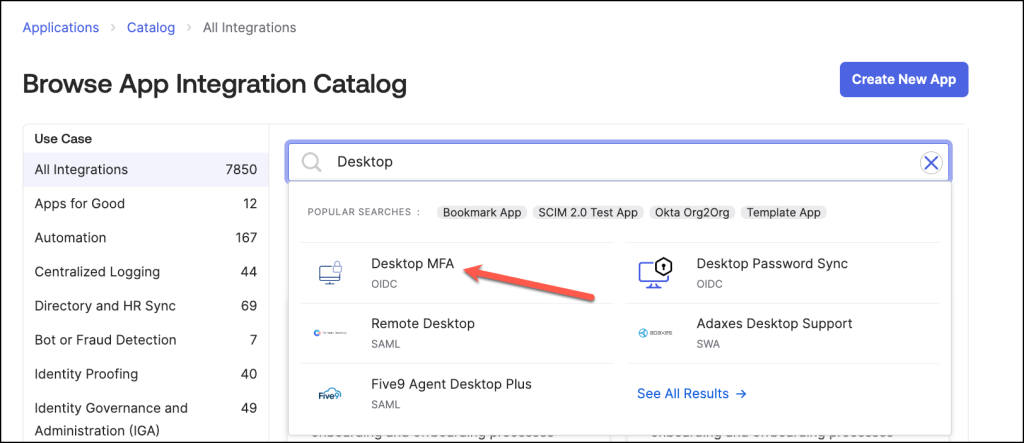
Click Add integration.

On the Authentication tab, go to the Sign-on settings section and click Edit
Click on the Application username format dropdown menu and select and select
Okta username prefix.

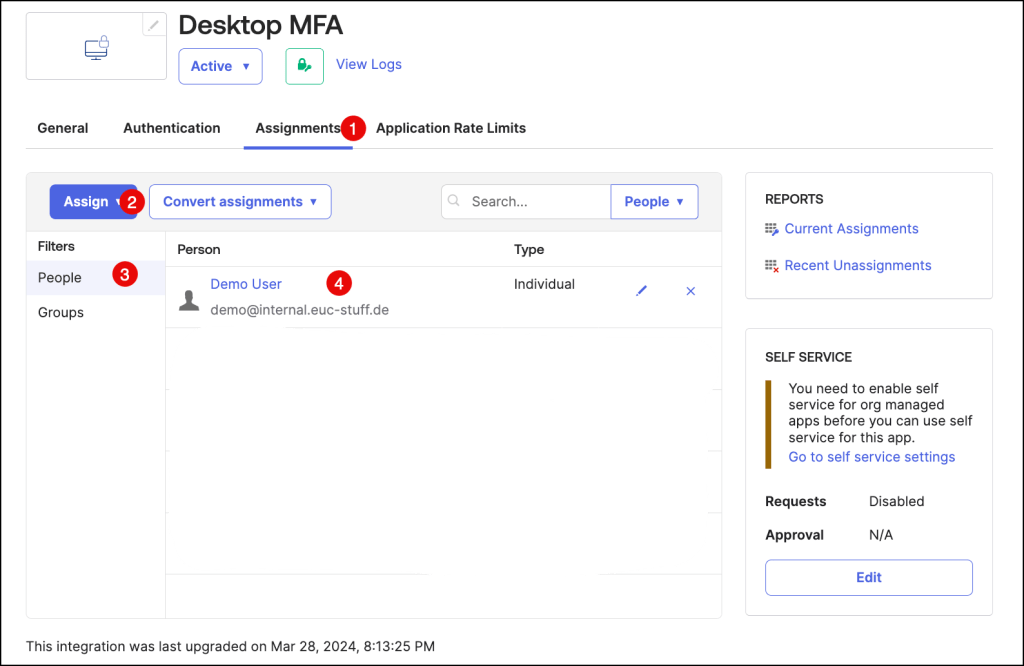
Assign the app to individual users or groups on the Assignments tab.
Users must be assigned the app to use Desktop MFA.
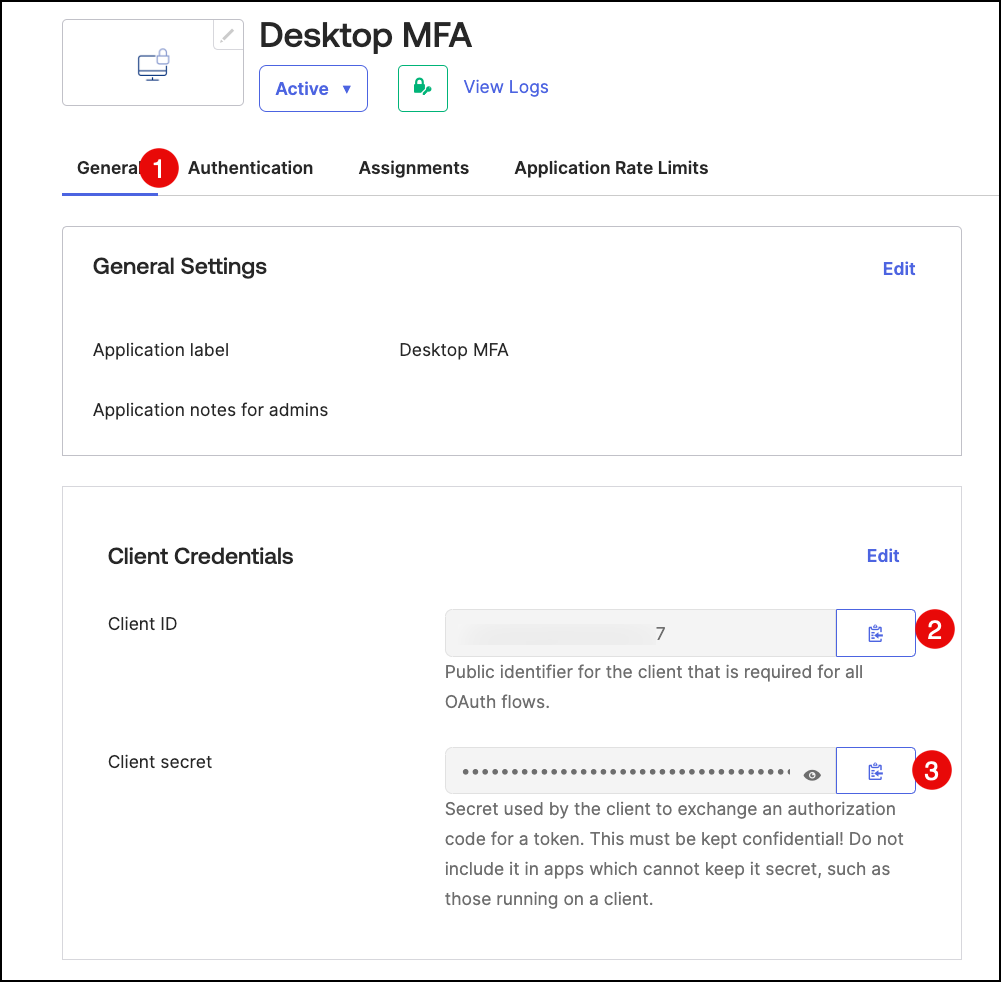
On the General tab, go to the Client Credentials section to find the Client ID and
Client secret. The identifier and secret are generated when you create the app integration.
Make note of these values, as you need them when you create the profiles in Kandji environment for Desktop MFA.
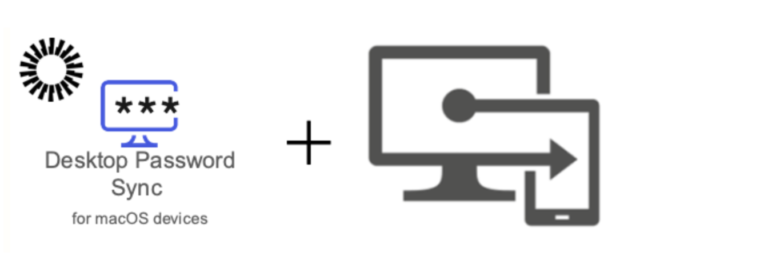
Okta Password Sync (Platform -SSO) configuration
In the Okta Admin Console, go to Applications > Applications > Catalog.
Starting with September 2024, the Okta application name from “Desktop Password Sync” to “Platform Single Sign-On for macOS”.
Search for Platform Single Sign-On for macOS and select the app.
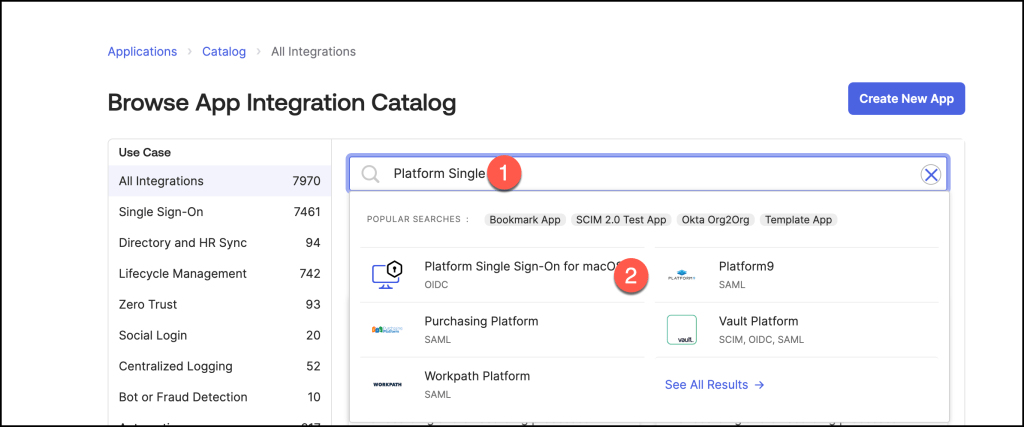
Click Add integration.
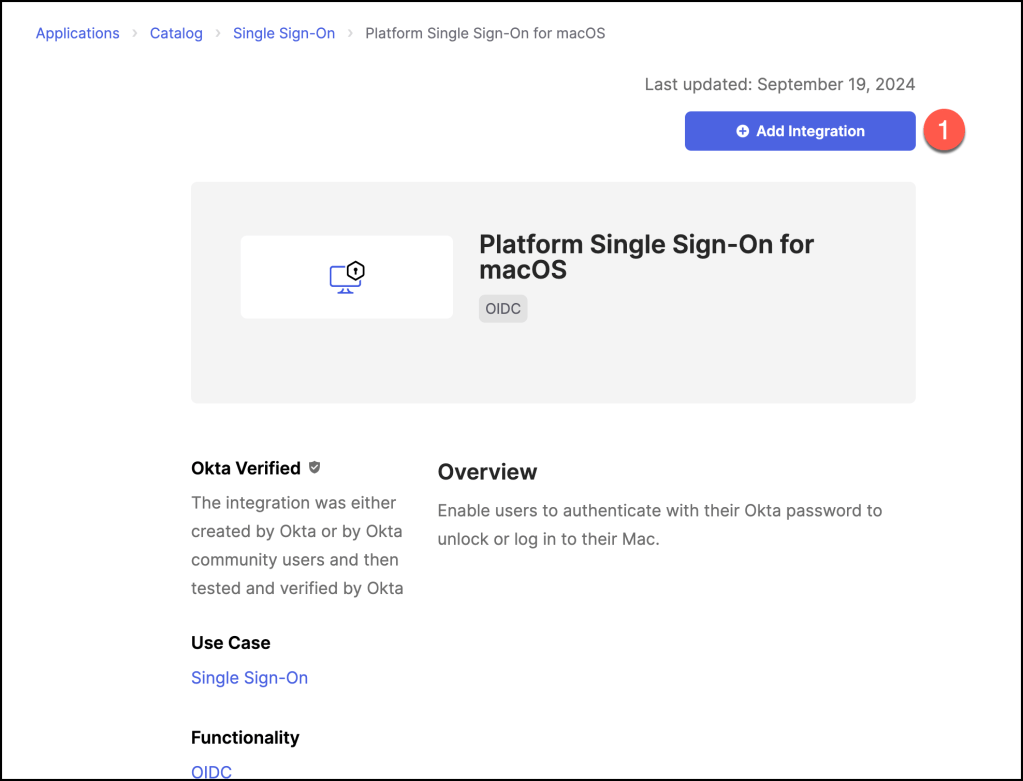
Search for Desktop Password Sync and select the app.

Click Add integration.

On the General tab, you can edit the application label or use the default one.

On the Authentication tab, make note of the Client ID.
You need this when creating the configuration profiles in your Kandji environment.

Assign the app to individual users or groups on the Assignments tab.
Users must be assigned the app to use Desktop Password Sync.

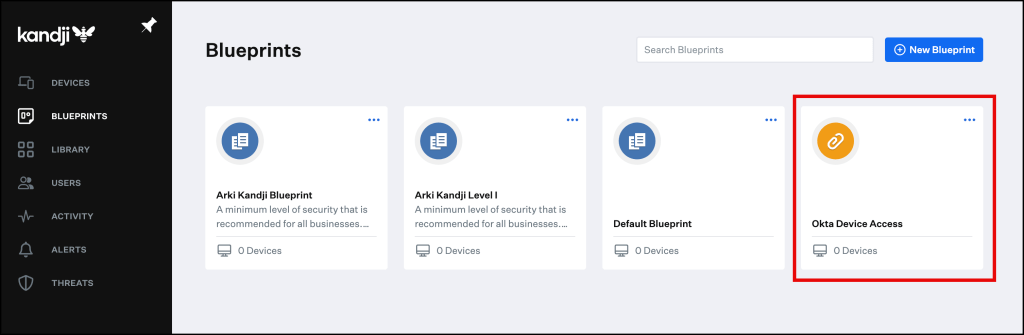
Prepare your Kandji environment
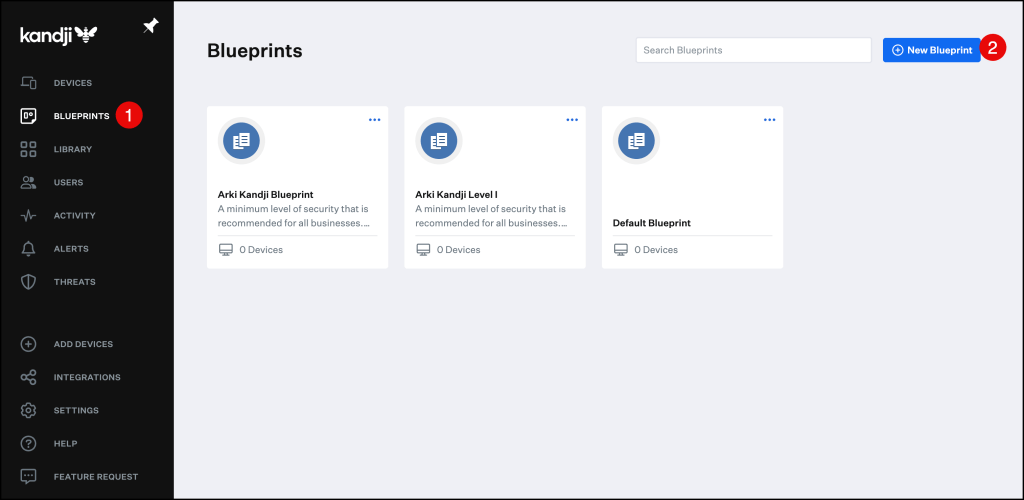
Kandji makes it easy to create, modify, delete, and duplicate Blueprints.
Creating a new Blueprint lets you specify a new set of behaviors and library items to be deployed to a group of devices.
In this blog post I will create a blank Blueprint for the Okta Device Access Configuration.
Log in to your Kandji account click on Blueprints in the navigation menu.
Click on start from scratch.

Enter a Blueprint name and click Create Blueprint.
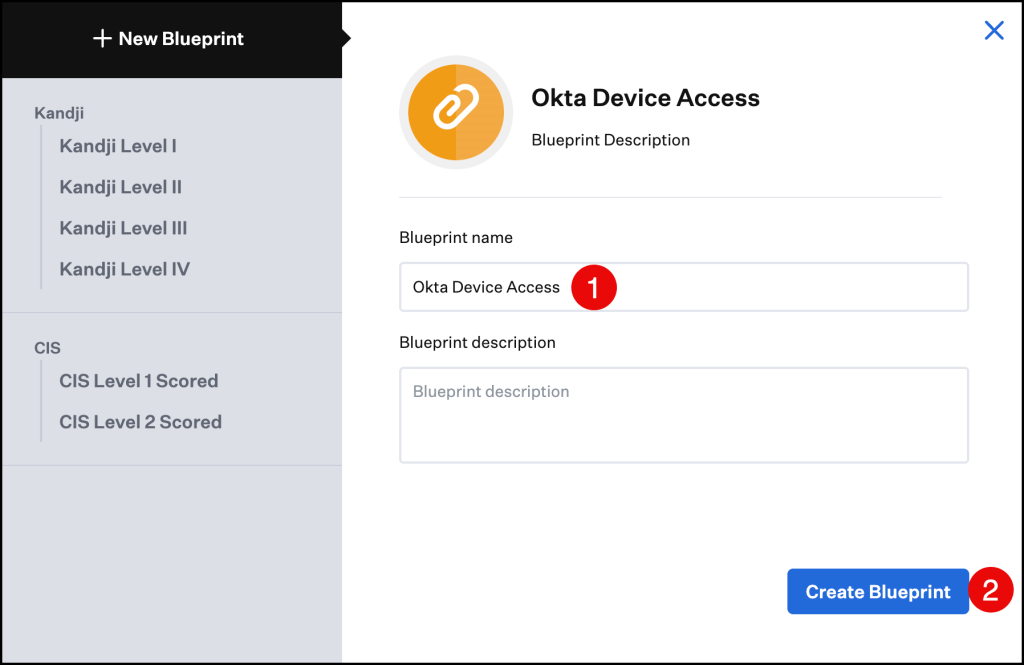
The new Blueprint (Okta Device Access) was successfully created.
Enroll your macOS into Kandji
In this blog i am covering enrolling devices via the Kandji Enrollment Portal, this is a great option for devices unavailable in Apple Business Manager.
- Login to Kandji and click Add Devices in the navigation bar.
- If not already enabled, click the toggle in the Status Row to enable the Enrollment Portal.
- Click the toggle next to the Okta Device Access Blueprint.
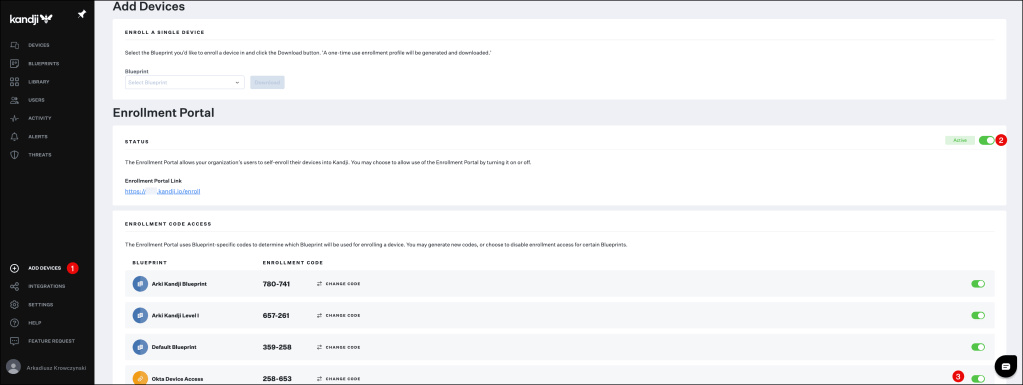
You can now provide your users the custom Enrollment Portal Link and the Enrollment Code for the Blueprint you wish to enroll their device in.
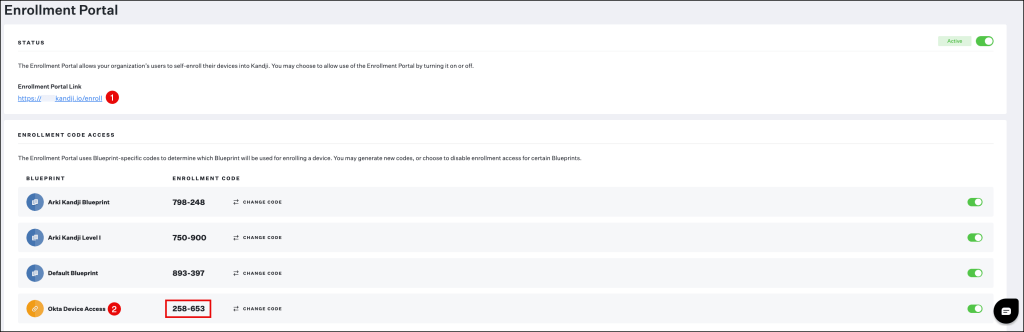
Let’s take a look at the enrollment in a short demo.
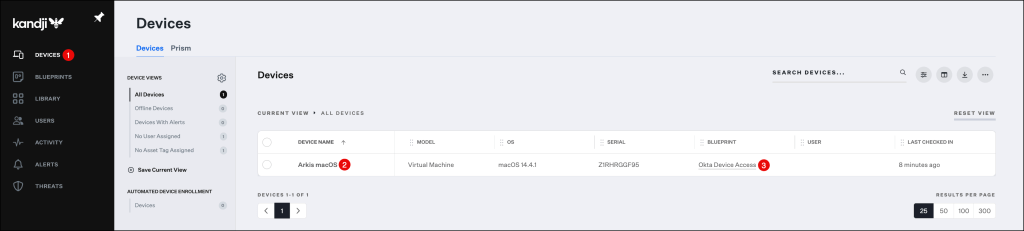
By navigating to the Devices section in the Kandji console you will see, that your device was successfully enrolled in the Okta Device Access Blueprint.
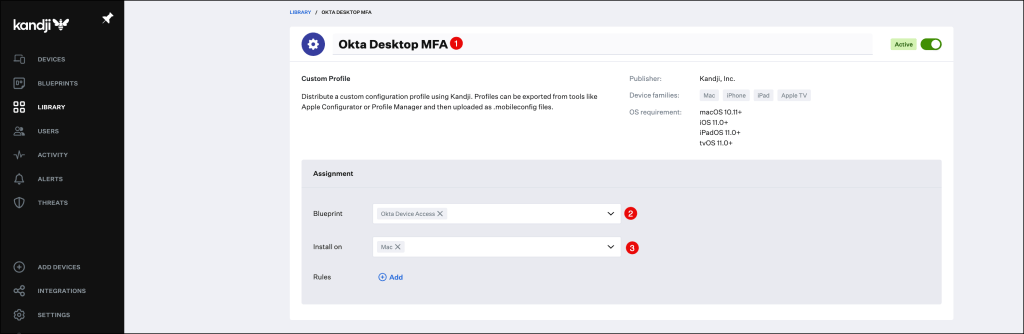
Create the profile for Desktop MFA
In the next step we will configure the Desktop MFA profile and assign it to our enrolled macOS device.
To do so navigate to Library and press the Add new button on the top right corner of the Kandji console.
Click on Custom Profile and click Add & Configure
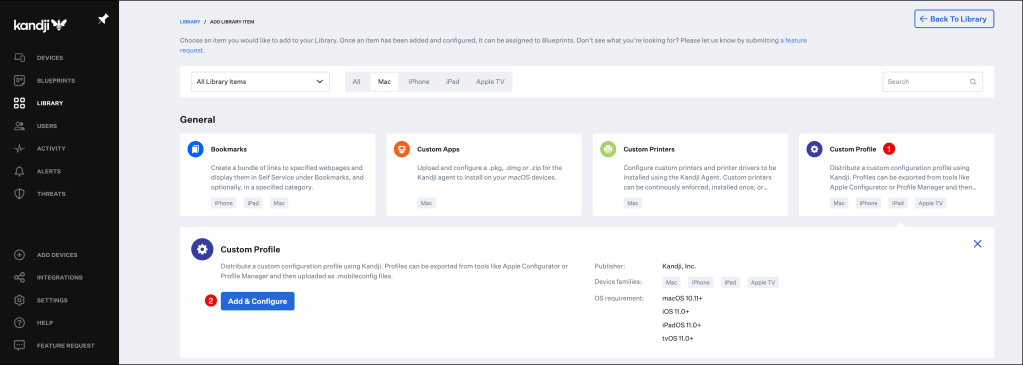
In the Custom Profile menu:
- Enter a Name for the configuration profile.
- Select your Blueprint, in my example I am using my Okta Device Access one.
- Select your device type
Scroll down to the Settings section and press click to upload

You can use the this mobileconfig template but;
Replace add-your-client-ID-here with the Client ID found in the Desktop MFA app > Authentication tab in your Okta Tenant.
Also replace add-your-client-secret-here with the Client secret found in the
Desktop MFA app > Authentication tab in your Okta Tenant.
And do not for forget to replace https://your-org.oktapreview.com with your Okta org URL.
<?xml version="1.0" encoding="UTF-8"?>
<!DOCTYPE plist PUBLIC "-//Apple//DTD PLIST 1.0//EN" "http://www.apple.com/DTDs/PropertyList-1.0.dtd">
<plist version="1">
    <dict>
        <key>PayloadUUID</key>
        <string>2F0FC0DC-953A-4247-A4E6-F64A0A3FA2DB</string>
        <key>PayloadType</key>
        <string>Configuration</string>
        <key>PayloadOrganization</key>
        <string>beste</string>
        <key>PayloadIdentifier</key>
        <string>2F0FC0DC-953A-4247-A4E6-F64A0A3FA2DB</string>
        <key>PayloadDisplayName</key>
        <string>Kandji payload</string>
        <key>PayloadDescription</key>
        <string/>
        <key>PayloadVersion</key>
        <integer>1</integer>
        <key>PayloadEnabled</key>
        <true/>
        <key>PayloadRemovalDisallowed</key>
        <true/>
        <key>PayloadScope</key>
        <string>System</string>
        <key>PayloadContent</key>
        <array>
            <dict>
                <key>PayloadDisplayName</key>
                <string>Custom Settings</string>
                <key>PayloadIdentifier</key>
                <string>3472DF62-D492-4211-9D59-748B2107CDE9</string>
                <key>PayloadOrganization</key>
                <string>Kandji Software</string>
                <key>PayloadType</key>
                <string>com.apple.ManagedClient.preferences</string>
                <key>PayloadUUID</key>
                <string>3472DF62-D492-4211-9D59-748B2107CDE9</string>
                <key>PayloadVersion</key>
                <integer>1</integer>
                <key>PayloadContent</key>
                <dict>
                    <key>com.okta.deviceaccess.servicedaemon</key>
                    <dict>
                        <key>Forced</key>
                        <array>
                            <dict>
                                <key>mcx_preference_settings</key>
                                <dict>
                                    <key>DMFAClientID</key>
                                    <string>add-your-client-ID-here</string>
                                    <key>DMFAClientSecret</key>
                                    <string>add-your-client-secret-here</string>
                                    <key>DMFAOrgURL</key>
                                    <string>https://your-org.oktapreview.com</string>
                                    <key>LoginPeriodWithOfflineFactor</key>
                                    <real>168</real>
                                    <key>LoginPeriodWithoutEnrolledFactor</key>
                                    <real>48.0</real>
                                    <key>MFARequiredList</key>
                                    <array>
                                        <string>*</string>
                                    </array>
                                </dict>
                            </dict>
                        </array>
                    </dict>
                </dict>
            </dict>
        </array>
    </dict>
</plist>
Select your mobileconfig file.
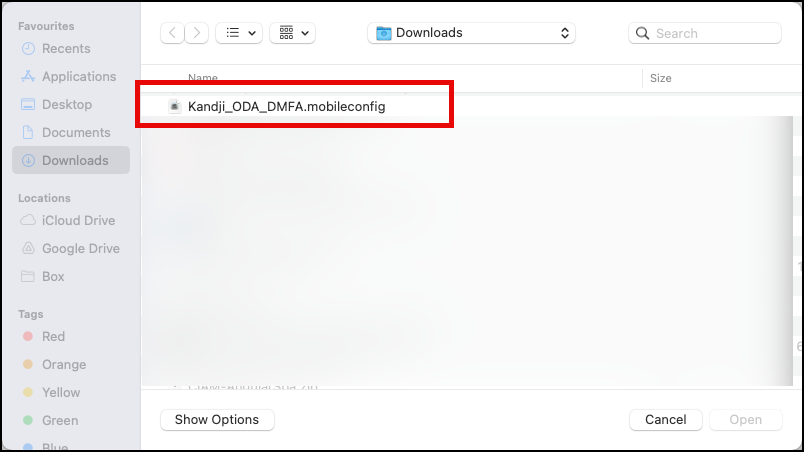
The file will be uploaded, click the Save button to finish your configuration.
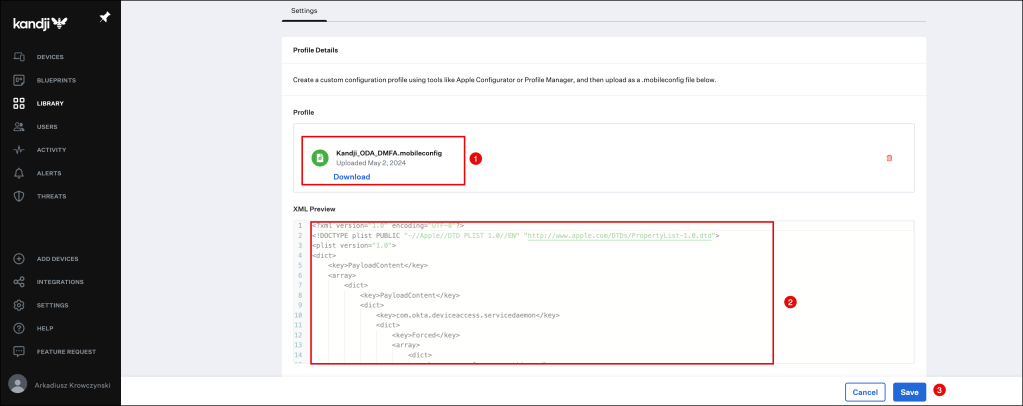
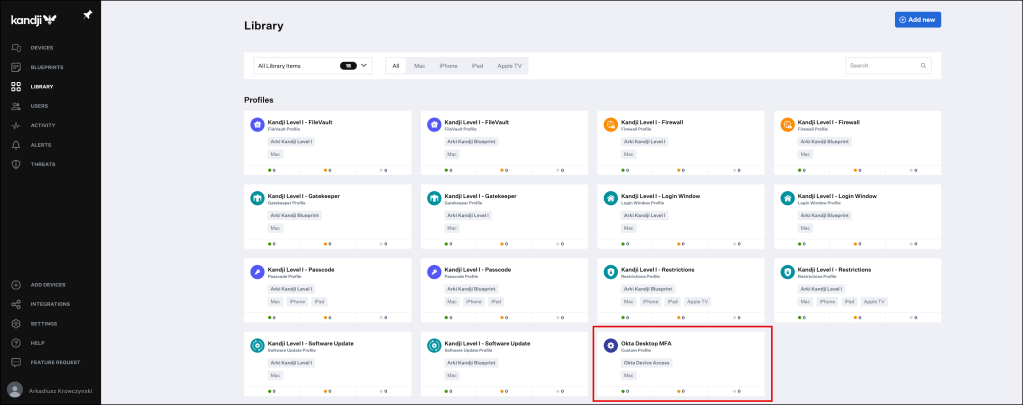
Your newly created Custom Profile will appear in the Library Overview.
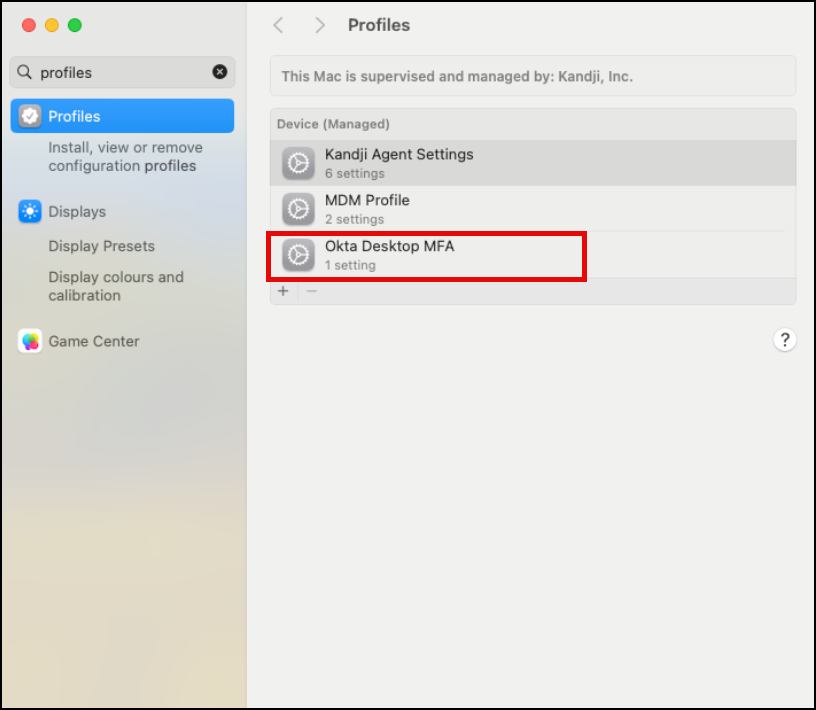
It’s important to deploy the Desktop MFA configuration profile to your macOS device before the Okta Verify application itself is deployed.
Okta Verify looks for the configuration profile during install to determine whether or not to enable the Desktop MFA integration components.
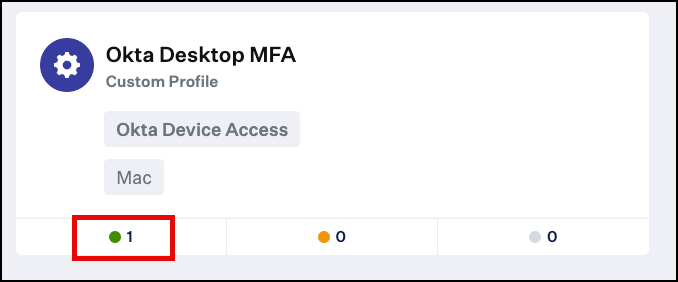
The configuration profile should have been installed on the device.
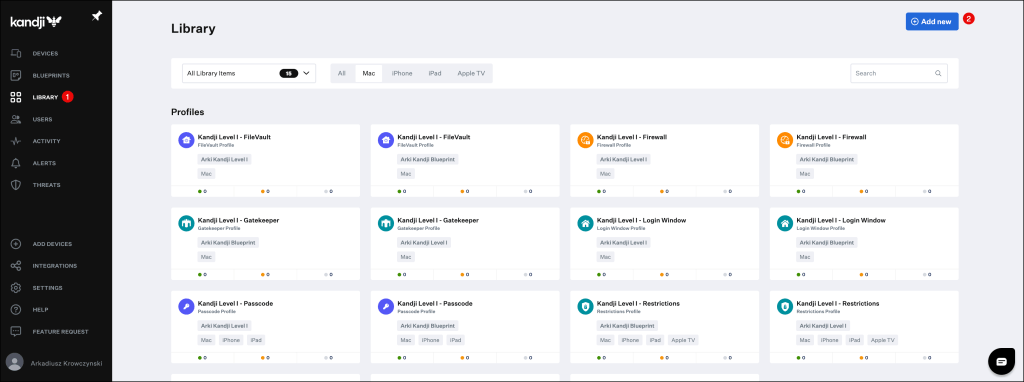
You can also verify the successful deployment in the Kandji console in the Library menu.
Deploy Okta Verify App to your Kandji enrolled device
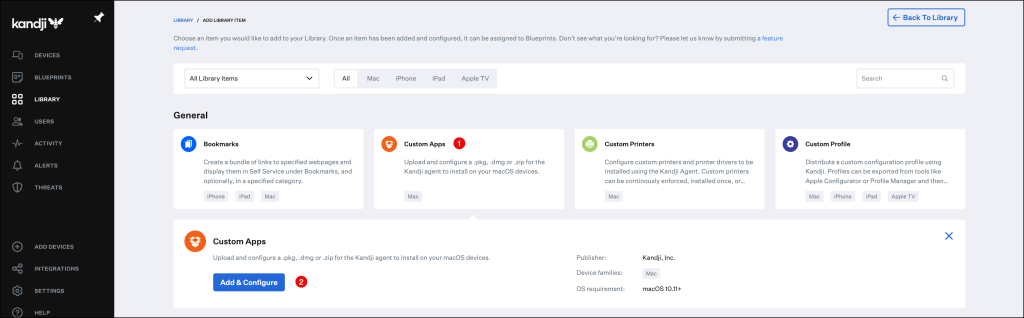
In this section I will cover how to add Okta Verify as Custom Application to your Library.
Select Custom Apps and click Add & Configure.
Select your Blueprint (Okta Device Access) and define how this item should be installed.
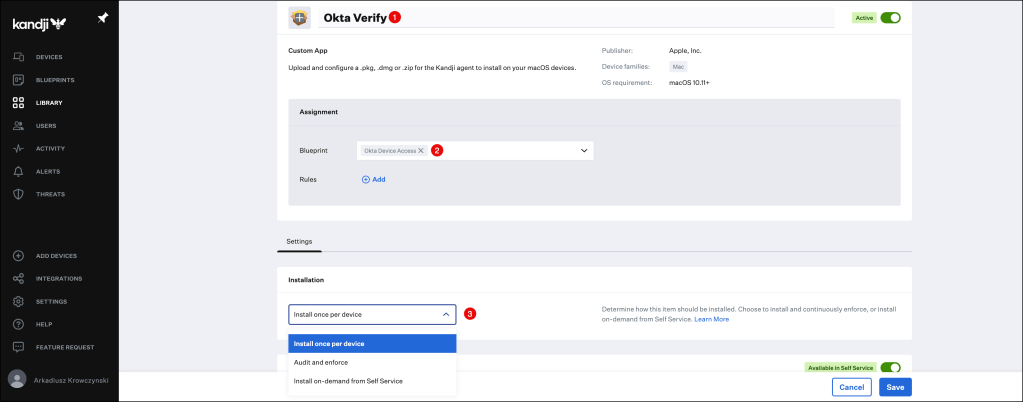
Scroll down to the Self Service section and select:
- If the Custom App should be available in Self Service.
- Select a Category if desired.
- *optional* Customize the look and feel

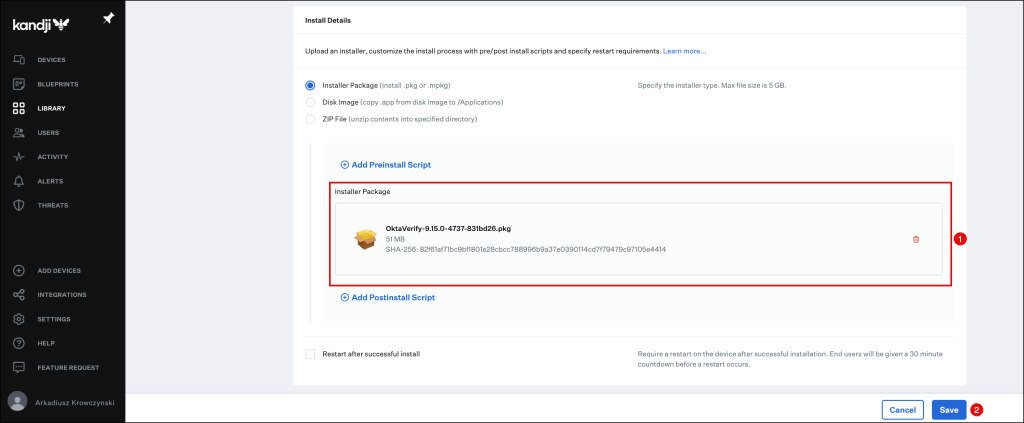
Scroll down to the Install Details section and click to upload.
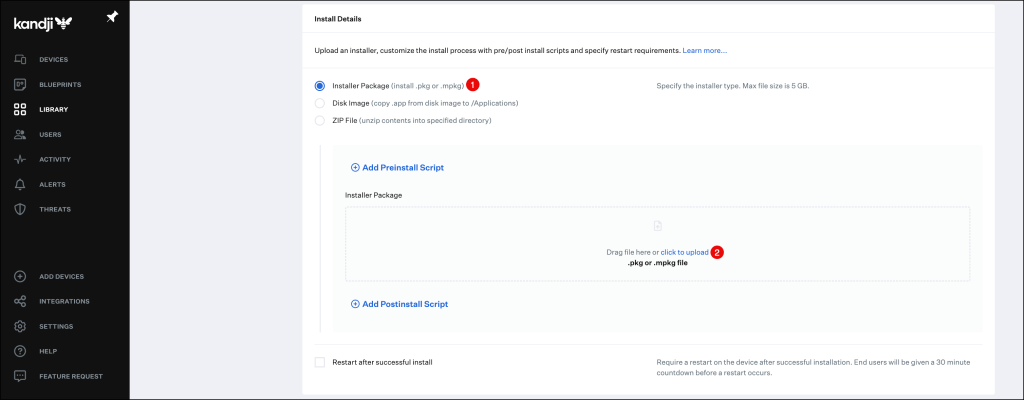
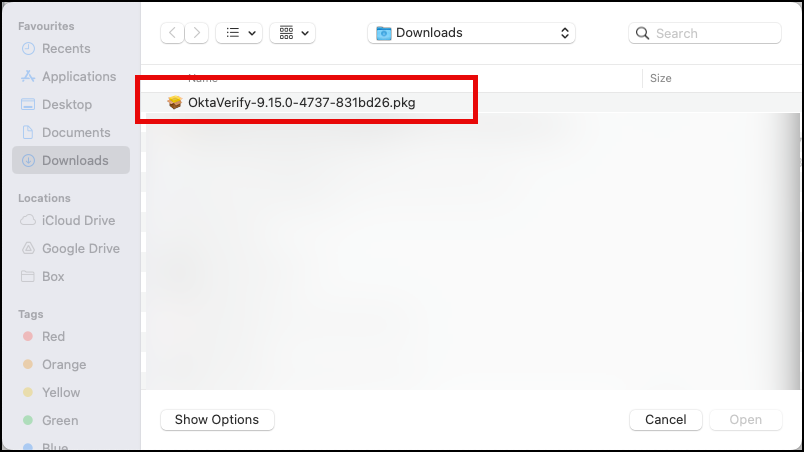
Navigate to the Okta Verify .PKG file and select it.
(You can download it from the Okta Admin Console in the Settings –> Downloads section)
Wait until it has been successfully uploaded to the Kandji console and click the Save button.
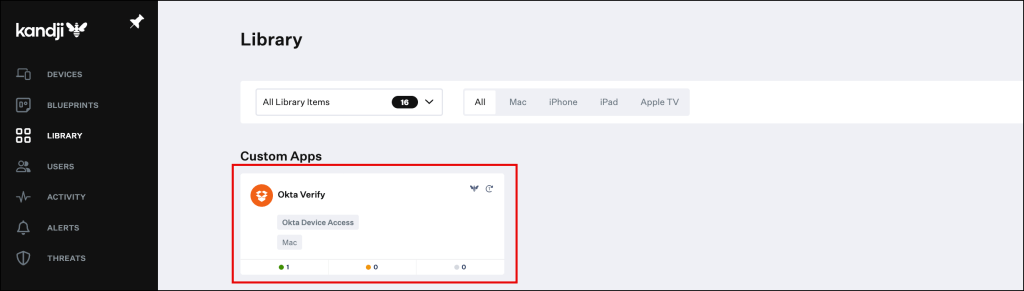
Your newly created Custom App will appear in the Library Overview.
Hover over to your macOS device and open the Kandji Self Service portal.
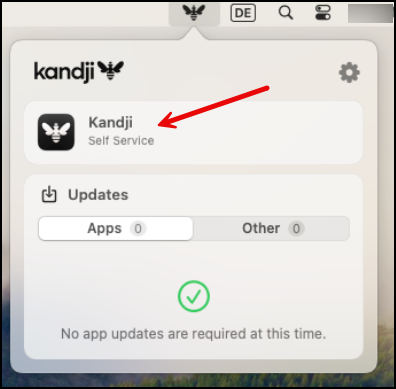
You will see in the Apps section, that the Okta Verify application was successfully installed.

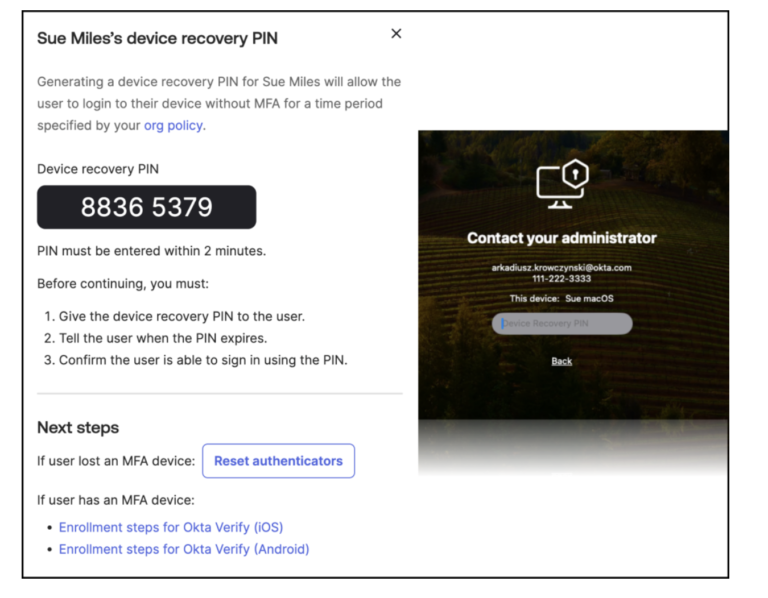
Demo Desktop MFA
Let’s have a look at Okta Device Access Desktop MFA demo on a Kandji enrolled macOS device.
Create the MDM profiles for macOS password sync
To enable Desktop Password Sync, you’ll require two mobileconfig files: one for the
Platform SSO configuration profile and another for the Okta Verify configuration profile.
Here are the steps to edit the provided templates and incorporate them as Custom Profile Library Items in Kandji.
Create the Platform SSO configuration profile
You can use the this mobileconfig template but:
Replace add-your-client-ID-here with the client ID found in the Desktop Password Sync app > Authentication tab in your Okta Tenant and also replace
https://your-org.oktapreview.com with your Okta org URL
<?xml version="1.0" encoding="UTF-8"?>
<!DOCTYPE plist PUBLIC "-//Apple//DTD PLIST 1.0//EN" "http://www.apple.com/DTDs/PropertyList-1.0.dtd">
<plist version="1.0">
<dict>
	<key>PayloadContent</key>
	<array>
		<dict>
			<key>OktaVerify.OrgUrl</key>
			<string>https://your-org.oktapreview.com</string>
			<key>OktaVerify.PasswordSyncClientID</key>
			<string>add-your-client-ID-here</string>
			<!-- optional keys-->
			<key>OktaVerify.EnrollmentOptions</key>
			<string>SilentEnrollmentEnabled</string>
			<key>OktaVerify.ReportDiagnostics</key>
			<true/>
			<!-- optional keys-->
			<key>PayloadDescription</key>
			<string>Configures Okta Verify settings</string>
			<key>PayloadDisplayName</key>
			<string>Okta Verify configuration</string>
			<key>PayloadIdentifier</key>
			<string>DEB5863A-E503-468C-A3DE-D90479F1E10A</string>
			<key>PayloadOrganization</key>
			<string>CUSTOMER NAME</string>
			<key>PayloadType</key>
			<string>com.okta.mobile</string>
			<key>PayloadUUID</key>
			<string>1D89FEA8-BAFE-42F5-9393-634BE23009D8</string>
			<key>PayloadVersion</key>
			<integer>1</integer>
		</dict>
		<dict>
			<key>OktaVerify.OrgUrl</key>
			<string>https://your-org.oktapreview.com</string>
			<key>OktaVerify.PasswordSyncClientID</key>
			<string>add-your-client-ID-here</string>
			<!-- optional keys-->
			<key>PayloadDescription</key>
			<string>Configures Okta Verify settings</string>
			<key>PayloadDisplayName</key>
			<string>Okta Verify (auth service) configuration</string>
			<key>PayloadIdentifier</key>
			<string>E5F1356E-3B04-43F7-8E8C-2213F7D74B13</string>
			<key>PayloadOrganization</key>
			<string>CUSTOMER NAME</string>
			<key>PayloadType</key>
			<string>com.okta.mobile.auth-service-extension</string>
			<key>PayloadUUID</key>
			<string>6764E8E4-0A37-4206-96E2-A73B2DFA5673</string>
			<key>PayloadVersion</key>
			<integer>1</integer>
		</dict>
	</array>
	<key>PayloadDescription</key>
	<string>Configures settings</string>
	<key>PayloadDisplayName</key>
	<string>Okta Verify Configuration</string>
	<key>PayloadIdentifier</key>
	<string>com.customer-name.profiles.oktaverify</string>
	<key>PayloadOrganization</key>
	<string>CUSTOMER NAME</string>
	<key>PayloadScope</key>
	<string>System</string>
	<key>PayloadType</key>
	<string>Configuration</string>
	<key>PayloadUUID</key>
	<string>9A641D93-471C-44D7-8B54-264E842A12C8</string>
	<key>PayloadVersion</key>
	<integer>1</integer>
</dict>
</plist>
Now navigate to the Library section and click the Add new button on the top right corner of the Kandji console.
Click on Custom Profile and press Add & Configure
In the Custom Profile menu:
- Enter a Name for the configuration profile.
- Select your Blueprint, in my example I am using my Okta Device Access one.
- Select your device type

Scroll down to the Settings section and press click to upload
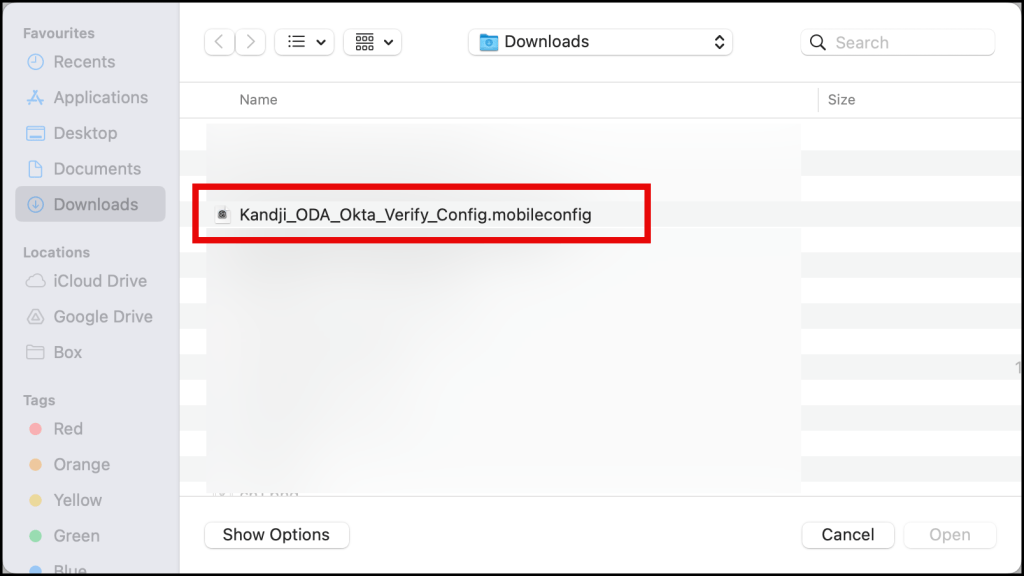
Select the mobileconfig file, you’ve created from the template.

The file will be uploaded, click the Save button to finish your configuration.
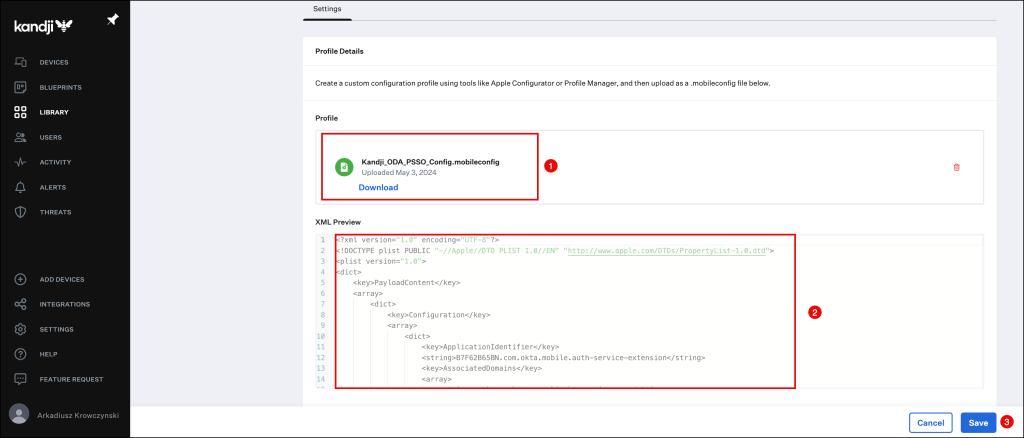
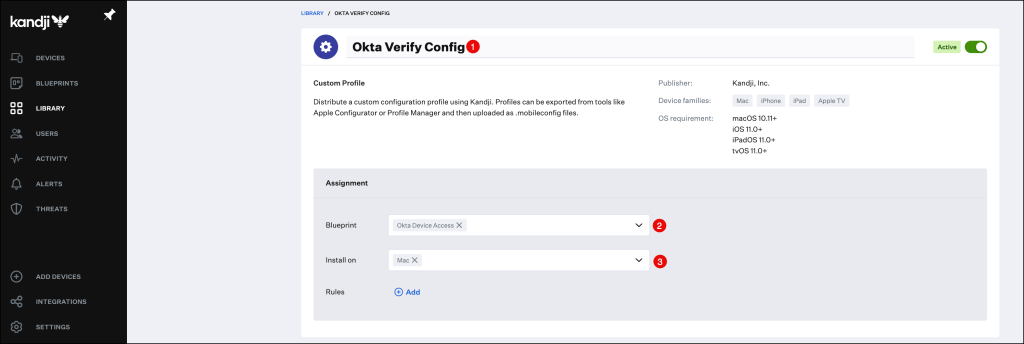
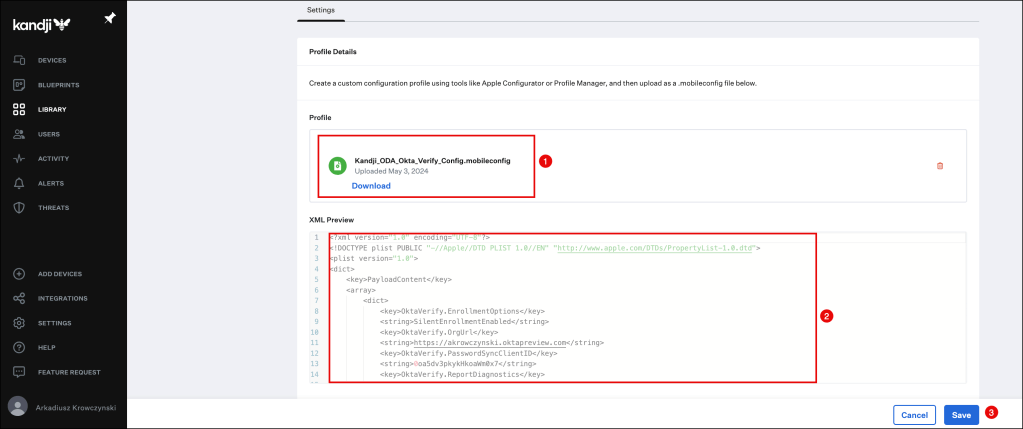
Create the Okta Verify configuration profile
You can use the this mobileconfig template, but replace
your-org.oktapreview.com with your Okta org URL.
<?xml version="1.0" encoding="UTF-8"?>
<!DOCTYPE plist PUBLIC "-//Apple//DTD PLIST 1.0//EN" "http://www.apple.com/DTDs/PropertyList-1.0.dtd">
<plist version="1.0">
<dict>
	<key>PayloadContent</key>
	<array>
		<dict>
			<key>Configuration</key>
			<array>
				<dict>
					<key>ApplicationIdentifier</key>
					<string>B7F62B65BN.com.okta.mobile.auth-service-extension</string>
					<key>AssociatedDomains</key>
					<array>
						<string>authsrv:your-org.oktapreview.com</string>
					</array>
				</dict>
                <dict>
					<key>ApplicationIdentifier</key>
					<string>B7F62B65BN.com.okta.mobile</string>
					<key>AssociatedDomains</key>
					<array>
						<string>authsrv:your-org.oktapreview.com</string>
					</array>
				</dict>
			</array>
			<key>PayloadDisplayName</key>
			<string>Associated Domains for Okta Verify</string>
			<key>PayloadIdentifier</key>
			<string>F65C9B21-13AD-4F46-86E5-C3352E7D97B6</string>
			<key>PayloadOrganization</key>
			<string>CUSTOMER NAME</string>
			<key>PayloadType</key>
			<string>com.apple.associated-domains</string>
			<key>PayloadUUID</key>
			<string>F65C9B21-13AD-4F46-86E5-C3352E7D97B6</string>
			<key>PayloadVersion</key>
			<integer>1</integer>
		</dict>
		<dict>
			<key>AuthenticationMethod</key>
			<string>Password</string>
			<key>ExtensionIdentifier</key>
			<string>com.okta.mobile.auth-service-extension</string>
			<key>Hosts</key>
			<array/>
			<key>TeamIdentifier</key>
			<string>B7F62B65BN</string>
			<key>Type</key>
			<string>Redirect</string>
			<key>URLs</key>
			<array>
				<string>https://your-org.oktapreview.com/device-access/api/v1/nonce</string>
				<string>https://your-org.oktapreview.com/oauth2/v1/token</string>
			</array>
			<key>PayloadDisplayName</key>
			<string>Okta Verify Sign-On Extensions Payload</string>
			<key>PayloadIdentifier</key>
			<string>77058B08-6943-4DEC-899A-721F55B4EEE8</string>
			<key>PayloadOrganization</key>
			<string>CUSTOMER NAME</string>
			<key>PayloadType</key>
			<string>com.apple.extensiblesso</string>
			<key>PayloadUUID</key>
			<string>77058B08-6943-4DEC-899A-721F55B4EEE8</string>
			<key>PayloadVersion</key>
			<integer>1</integer>
		</dict>
	</array>
	<key>PayloadDescription</key>
	<string>Okta PSSO extension configuration</string>
	<key>PayloadDisplayName</key>
	<string>Okta PSSO extension</string>
	<key>PayloadIdentifier</key>
	<string>com.customer-name.profiles.ssoextension</string>
	<key>PayloadOrganization</key>
	<string>CUSTOMER NAME</string>
	<key>PayloadScope</key>
	<string>System</string>
	<key>PayloadType</key>
	<string>Configuration</string>
	<key>PayloadUUID</key>
	<string>D78FE406-0C61-4007-8C51-FFA5FDE5F54B</string>
	<key>PayloadVersion</key>
	<integer>1</integer>
</dict>
</plist>
Repeat steps for the second configuration profile by clicking the Add new button on the top right corner of the Kandjiconsole.
Click on Custom Profile and press Add & Configure
In the Custom Profile menu:
- Enter a Name for the configuration profile.
- Select your Blueprint, in my example I am using my Okta Device Access one.
- Select your device type
Scroll down to the Settings section and press click to upload
Select the second mobileconfig file, you’ve created from the template.
The file will be uploaded, click the Save button to finish your configuration.
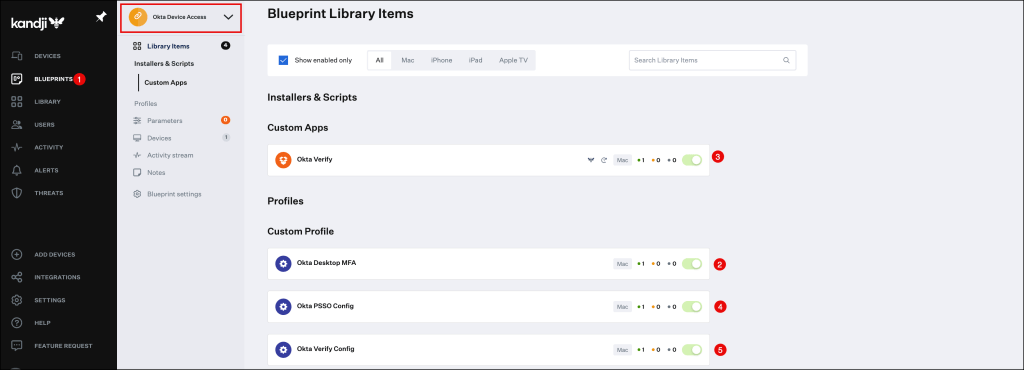
We should now have the following profiles successfully installed on our mac OS device.
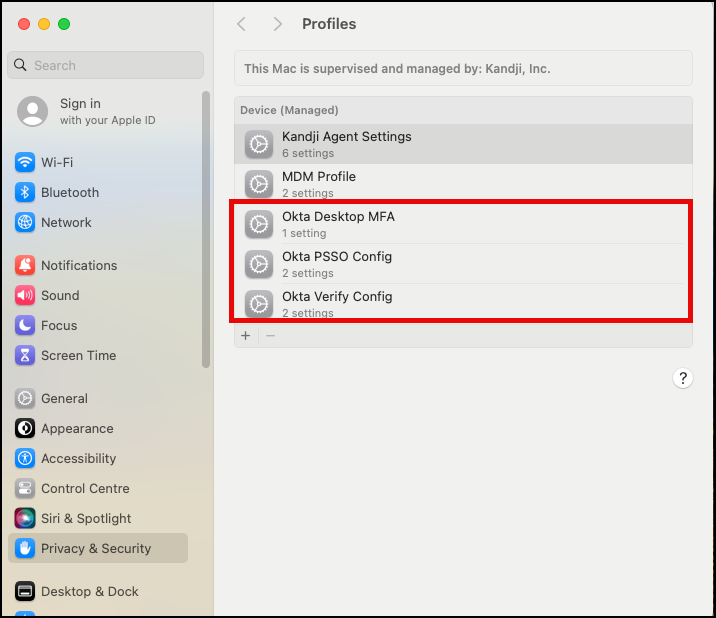
And our Kandji Blueprint should look this like.
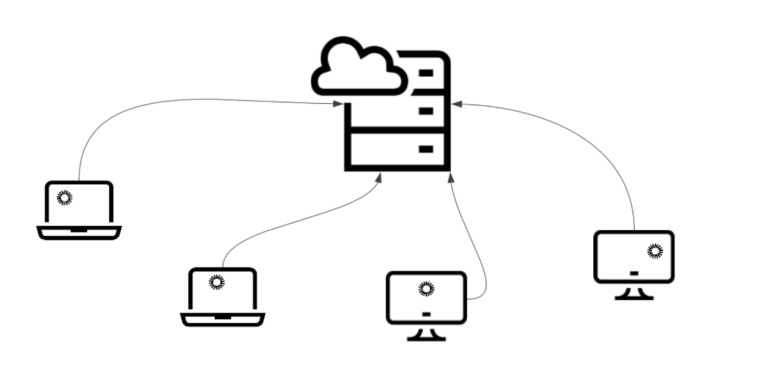
Demo Okta Desktop Password Sync
And here the demo of Okta Device Access Desktop Password Sync on an Kandji enrolled macOS device.