Okta Device Integration with Workspace ONE
Introduction
You can ensure that devices are managed by an endpoint management
(in my example Workspace ONE) tool before end users can access apps from the device.
Devices are managed if they meet these conditions:
- The device is registered (enrolled in Okta Verify).
- A user profile associated with the device is managed by a device management solution.
- The device is configured for device management in Security –> Device Integrations. Ensure that this is completed before the user authenticates with Okta FastPass.
- The user authenticated with Okta FastPass from the managed device at least once.
For desktop (Windows, macOS), management attestation certificates are deployed to the device with VMware Workspace ONE UEM.
Prerequisites
- Okta Tenant (OIE)
- VMware Workspace ONE environment
- Windows Device enrolled and Profiles assigned in Workspace ONE
Configure management attestation
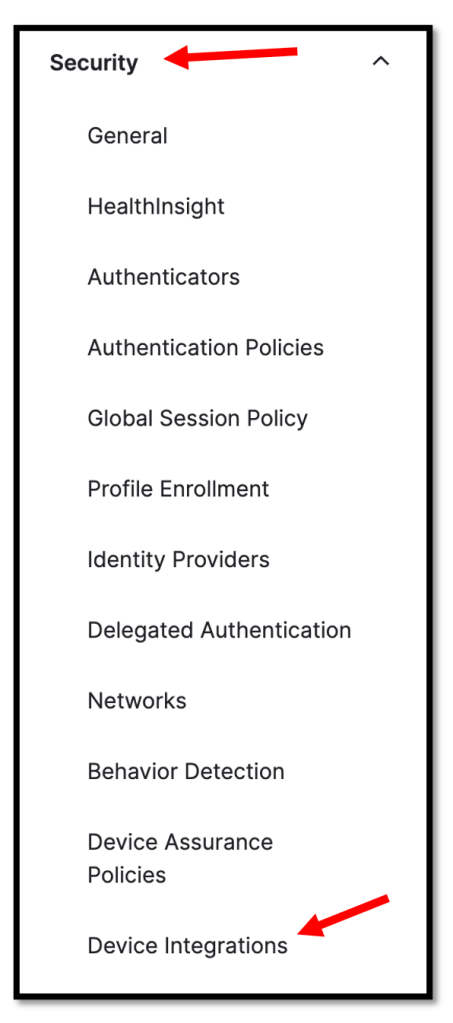
In the Okta Admin Console, go to Security –> Device integrations.
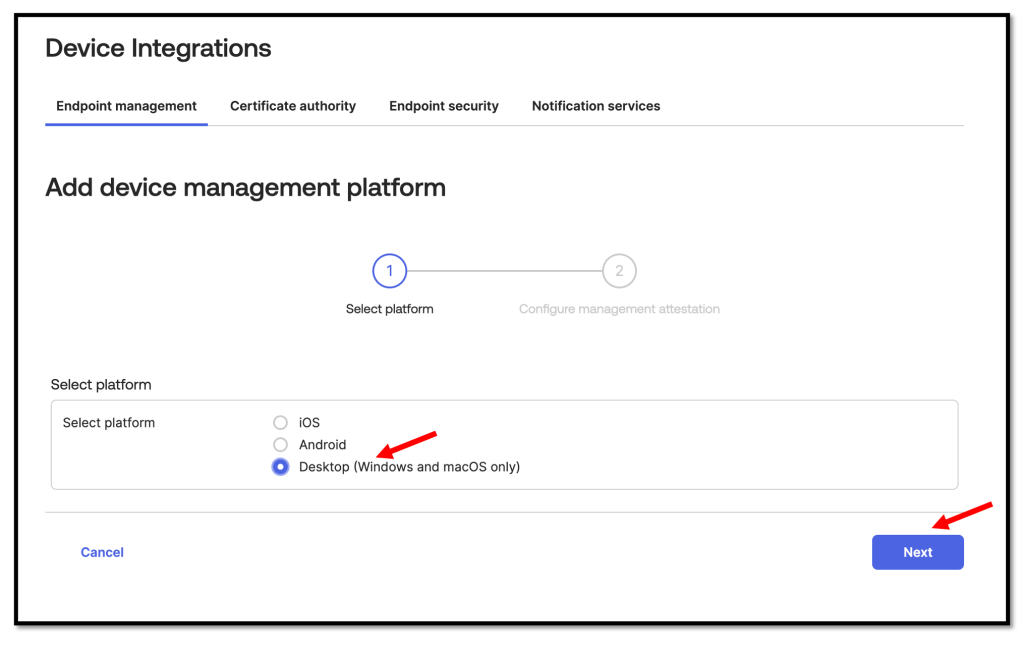
Click the Endpoint management tab and then click Add platform.

In our example we will focus on Desktop devices, so select Desktop
(Windows and macOS only) and click Next afterwards.
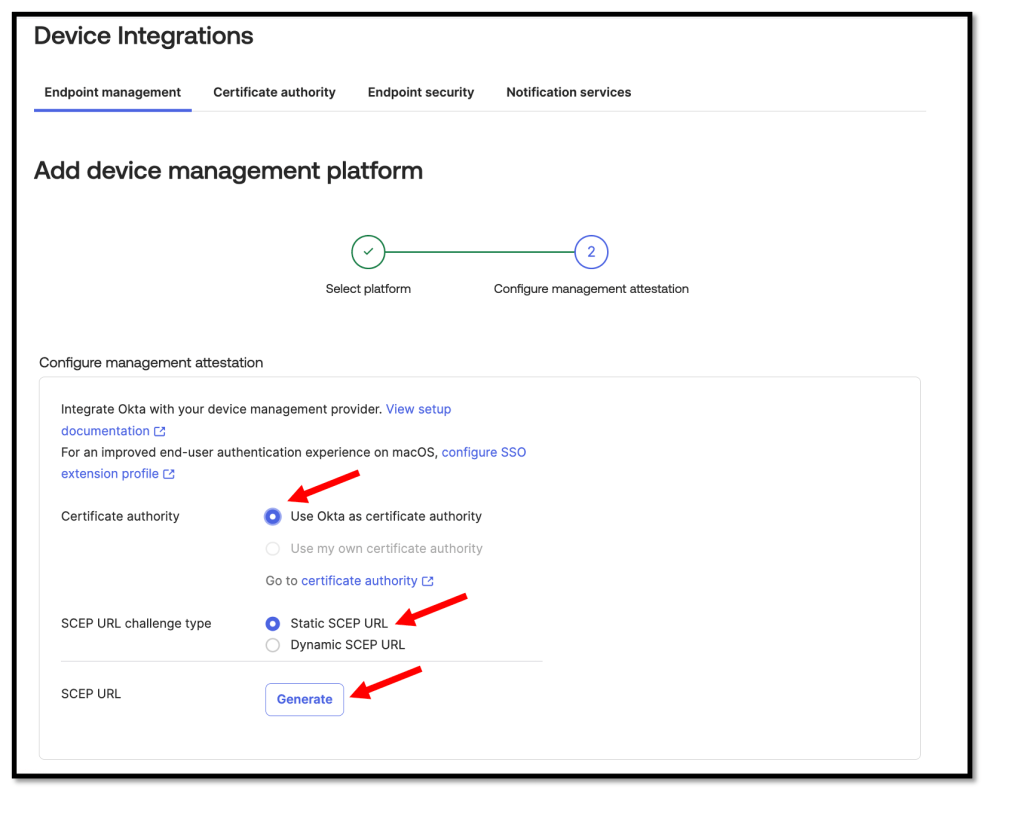
On the Add Device management platform page, enter the following:
- Select Use Okta as certificate authority as the Certificate authority.
- Select Static SCEP URL as the SCEP challenge type.
- Click Generate.
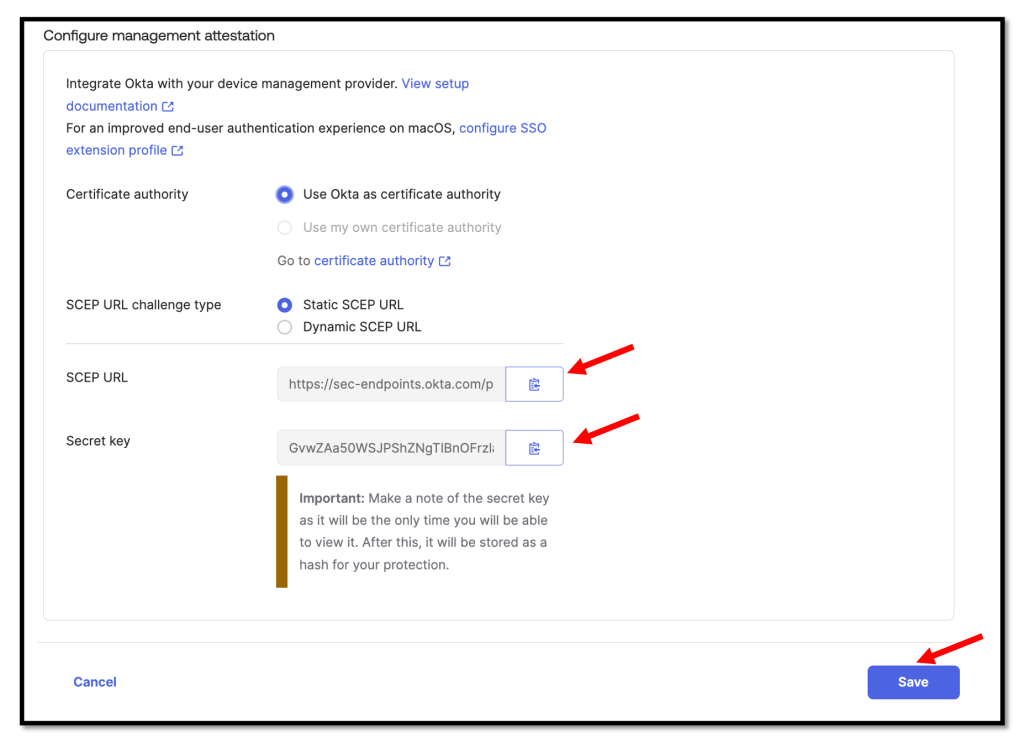
We need to copy and save the Okta SCEP URL and the Secret key.
These are required for the VMware Workspace ONE setup in a later step.
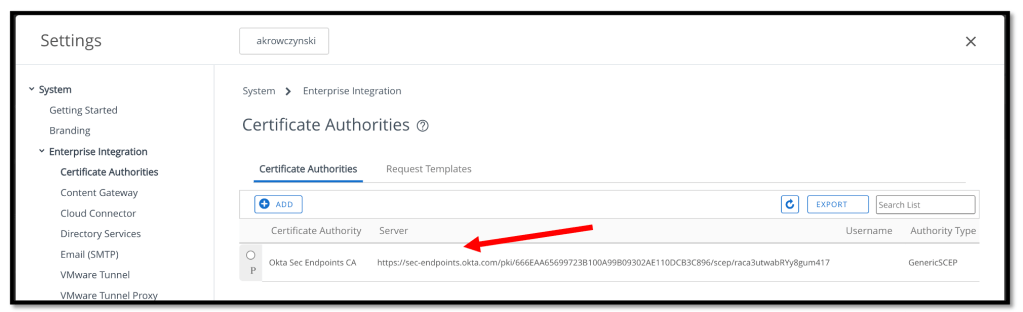
Download x509 certificate
Click the Certificate authority tab.
For the Okta CA certificate authority, click the Download x509 certificate icon in the Actions column.
We will upload the certificate to VMware Workspace ONE in a later step.

Create CA in Workspace ONE
Log in to your Workspace ONE Console, and navigate to DEVICES, click
Certificates –> Certificate Authorities.

Click CertificatesCertificate Authorities and Click ADD.

On the Certificate Authority – Add/Edit page, enter the following values and settings.
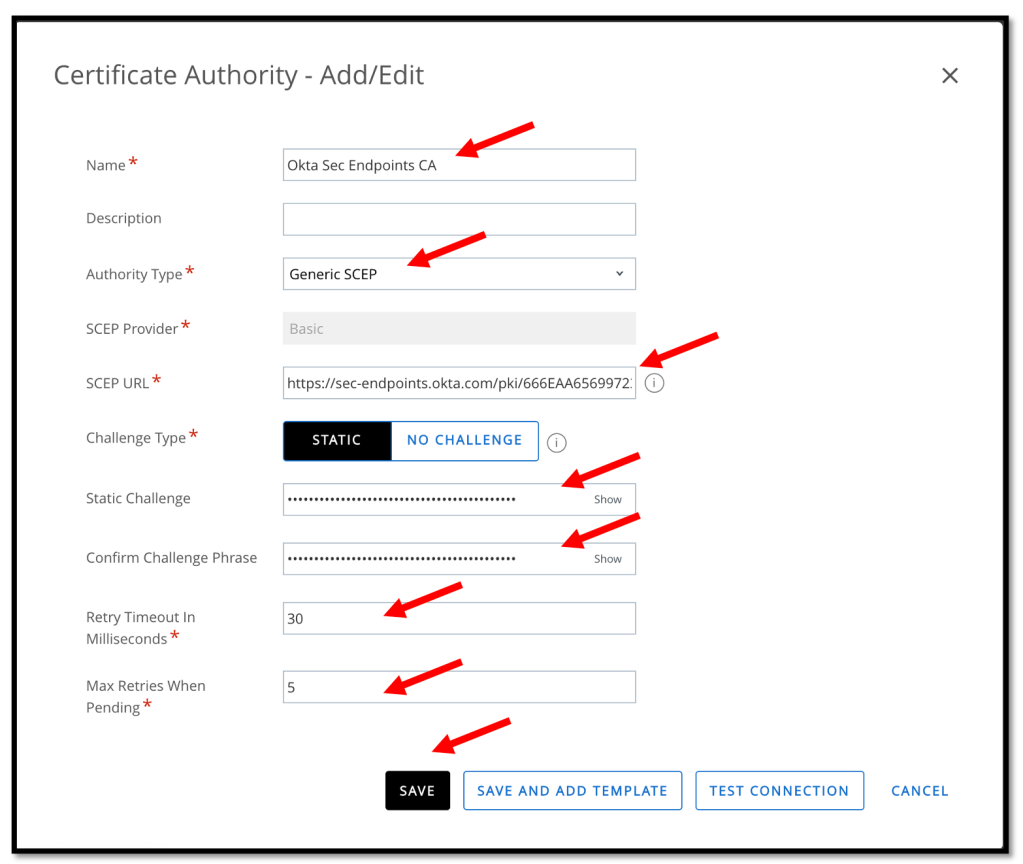
- Name: Enter a name for the CA.
- Description: Optional. Enter a description for the CA.
- Authority type: Select Generic SCEP.
- SCEP Provider: Basic is entered automatically and can’t be changed.
- SCEP URL: Copy and paste the SCEP URL from the previous steps.
- Challenge Type: Click STATIC.
- Static Challenge: Copy and paste the Secret Key from the previous steps
- Confirm Challenge Phrase: Copy and paste the Secret Key from the previous steps
- Retry Timeout: We can accept the default value of 30.
- Max Retries When Pending: Accept the default value of 5, or specify a different number of retries the system allows while the authority is pending.
Click TEST CONNECTION and then SAVE your settings.
If everything was configured well the Test is successful message appears.

We should now see the newly created Certificate Authority.
Add Certificate Template in Workspace ONE
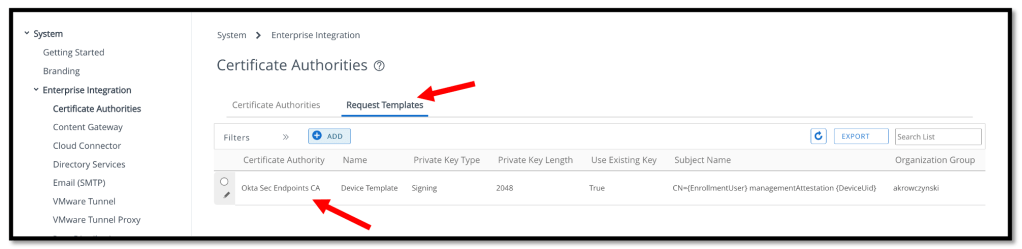
Now we will ad a CA Request Template, so we need to click the Request Templates tab and press the ADD button.

On the Certificate Template – Add/Edit page, we need to enter the following:

- Name: Enter a name for the template.
- Description: Optional. Enter a description for the template.
- Certificate Authority: Select the CA we’ve created in the previous task.
- Issuing Template: Leave blank or configure as appropriate for your implementation.
- Subject Name: Enter a subject name. For example, CN = {EmailAddress} managementAttestation {DeviceUid}.
For a list of supported variables, see Workspace ONE document
Workspace ONE Lookup Values. - Private Key Length: Select 2048.
- Private Key Type: Select Signing.
- SAN Type: N/A.
- Automatic Certificate Renewal: Click ENABLED.
- Publish Private Key: Click DISABLED.
Click Save and we should see the newly created Request Template.
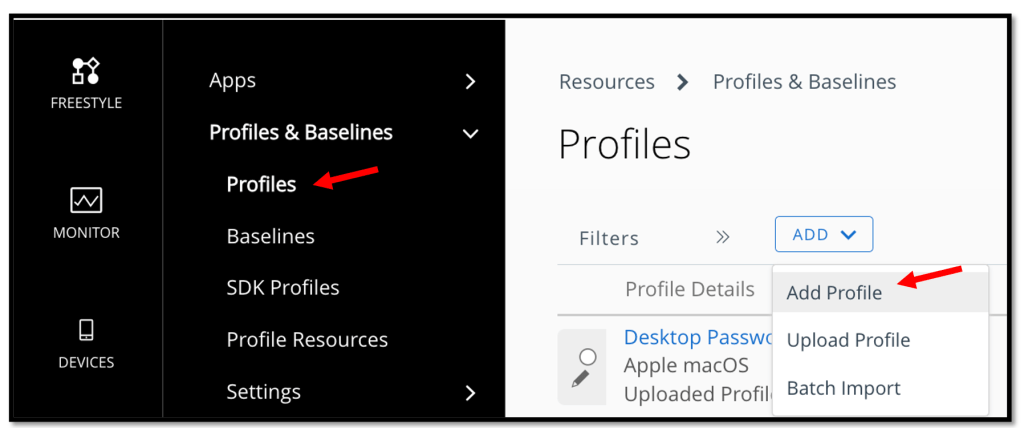
Create device profile for Okta Intermediate CA
After we’ve successfully created the Certificate Authority and the Request Template, now it’s time to create the device profile to deploy the Okta Intermediate CA to the
Intermediate Store on devices.
In Workspace ONE, click RESOURCES, click Profiles & Baselines, Profiles click ADD, and then select Add Profile.
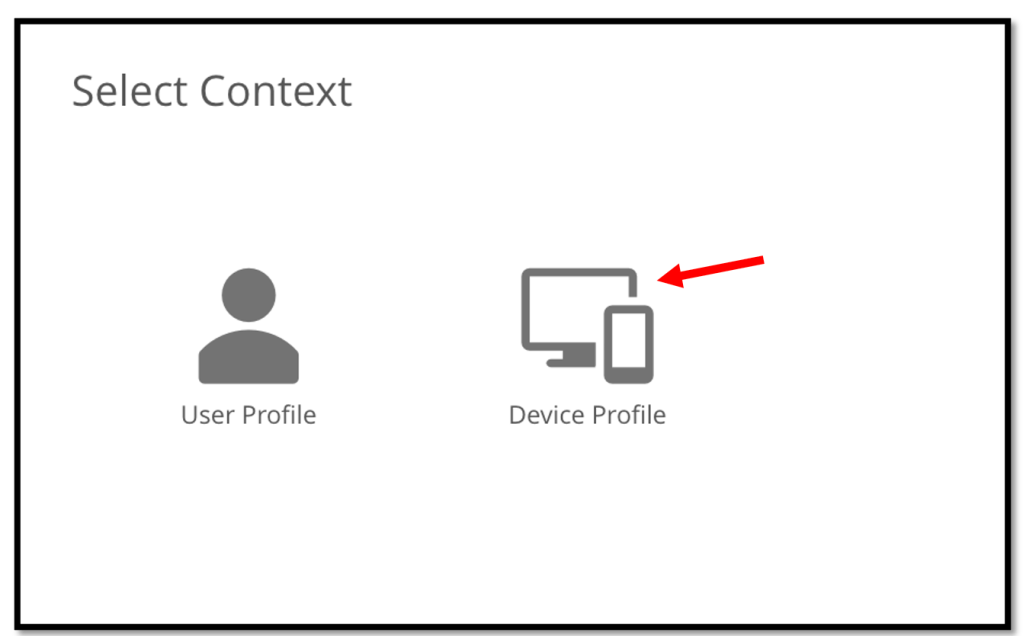
In my example I will configure a Windows device profile, so we need to click Windows here.
Select Device Profile.
On the General page, we need to enter the following
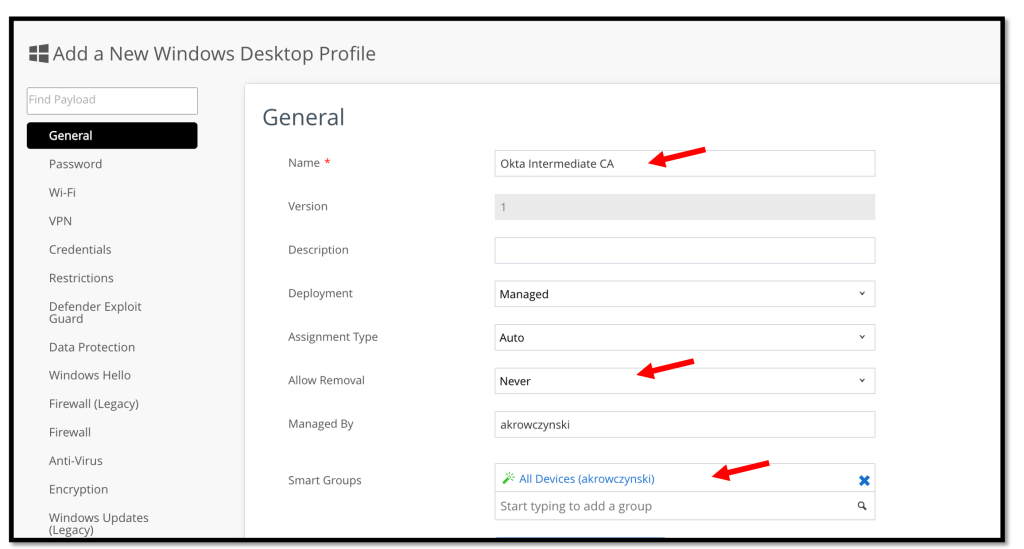
- Name: Enter a name for the user profile.
- Description: Optional. Enter a description for the user profile.
- Deployment: Select Managed.
- Assignment Type: Select Auto.
- Allow Removal: Select Always or Never, based on your requirements.
- Smart Groups: Select the desired Smart Group in your Workspace ONE environment.
Now we need to select the Credentials in the left pane and click CONFIGURE
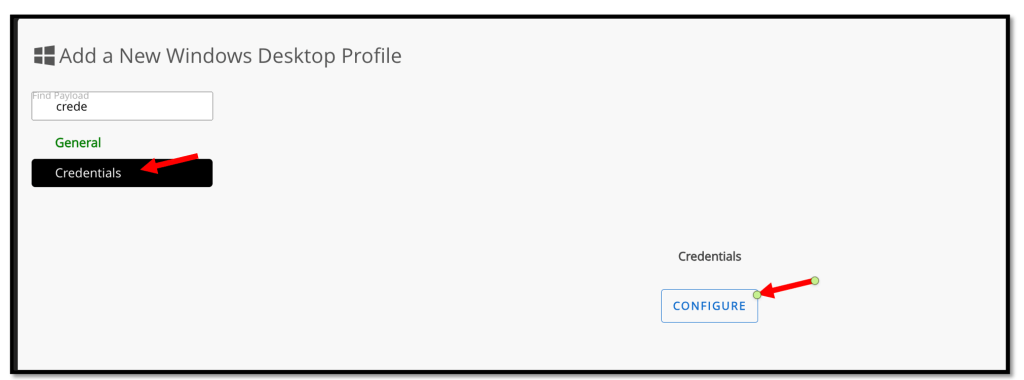
On the Credentials page, perform the following steps.

- Credential Source: Select Upload.
- Certificate: Click Upload and browse to the certificate you downloaded from the Okta Admin Console.
- Certificate Store: Select Intermediate.
Click SAVE AND PUBLISH.
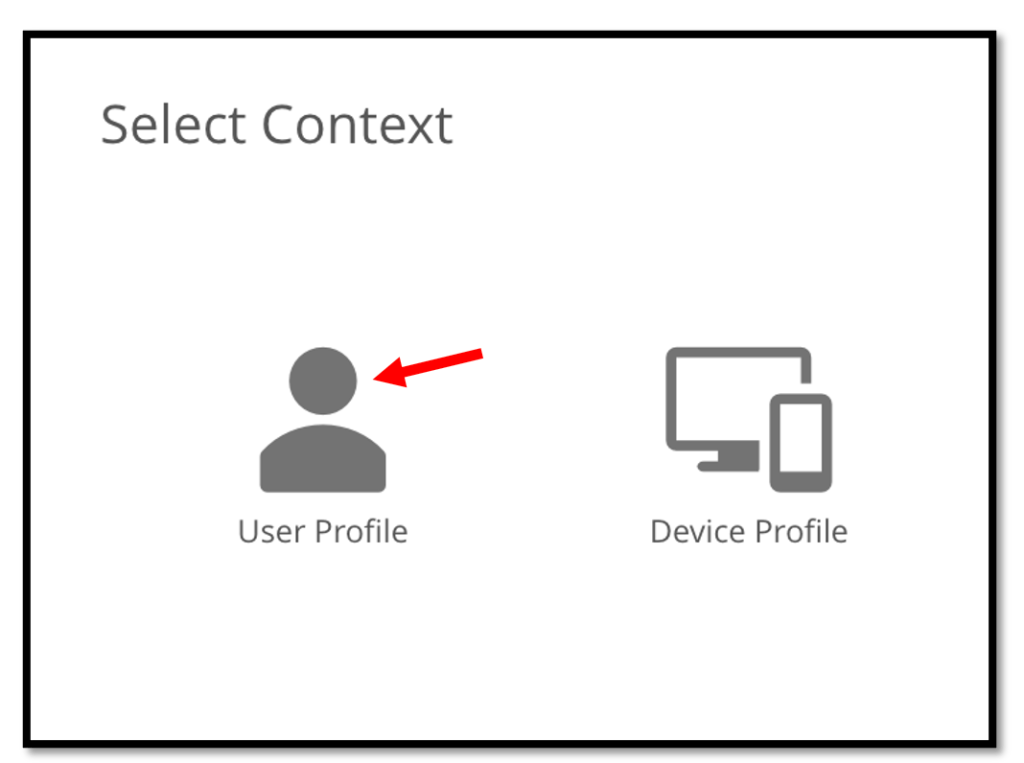
Create user profile to deploy the Okta CA-issued client certificate
Now we. will create a user profile to deploy the Okta CA-issued client certificate to the Personal Store on devices for management attestation.
In the VMware Workspace ONE Profile & Baseline section, select.
Windows –> Windows Desktop –> User Profile
On the General page, enter the following:
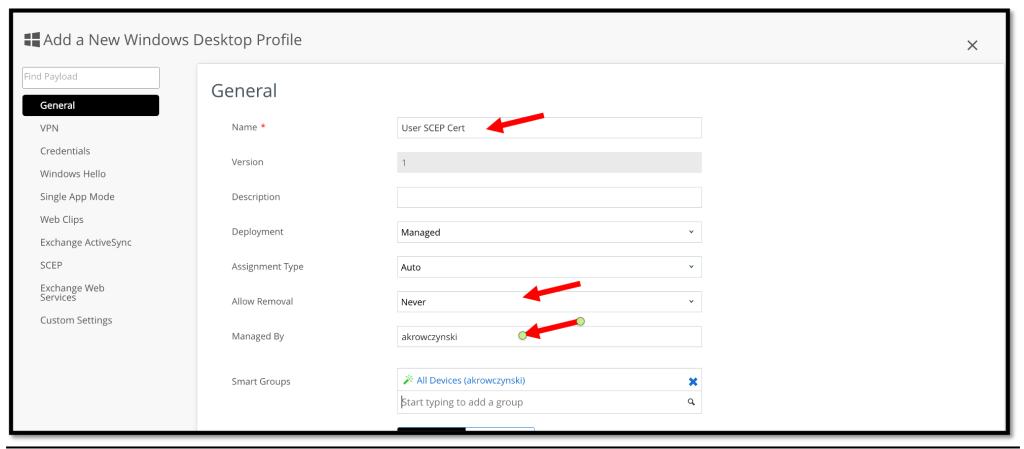
- Name: Enter a name for the user profile.
- Description: Optional. Enter a description for the user profile.
- Deployment: Select Managed.
- Assignment Type: Select Auto.
- Allow Removal: Select Always or Never, based on your requirements.
- Smart Groups: Select the desired Smart Group in your Workspace ONE environment.
On the Credentials page, enter the following:
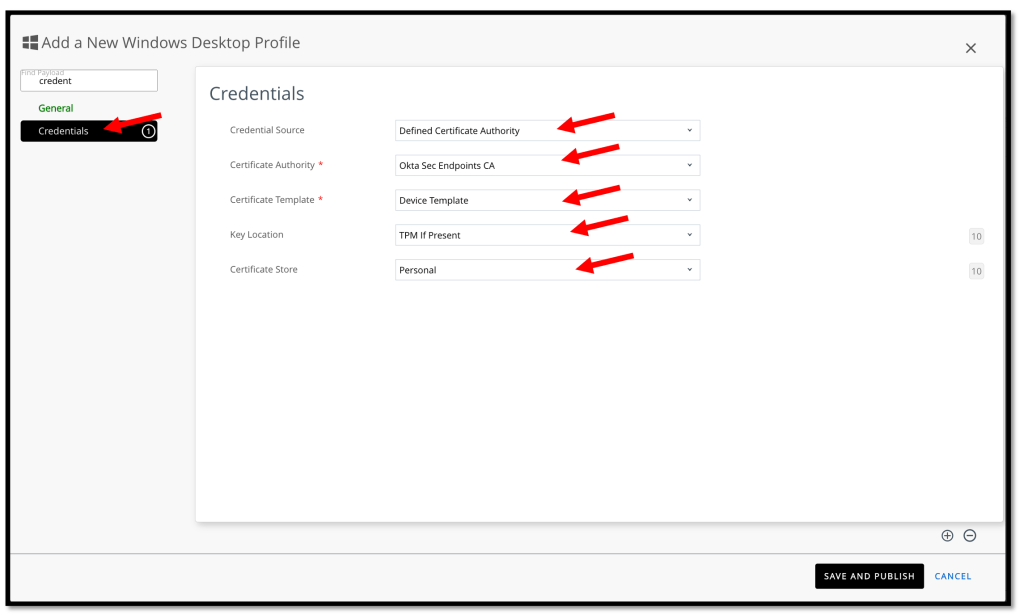
- Credential Source: Select Defined Certificate Authority.
- Certificate Authority: Select the same Certificate Authority that we’ve configured in the previous tasks.
- Key Location: Select TPM If Present to support devices with or without TPM.
- Certificate Store: Select Personal.
Click SAVE AND PUBLISH.
Verify the certificate installation (Windows)
On a Windows computer, verify that the client certificate was installed:
- In In Certificates – Current User, click Current User, click Personal –> Certificates.
- Make sure the client certificate exists.
Here is a sample from my Windows Client.

Verify the certificate authority (CA):
- In Certificates – Local Computer, click Intermediate Certificate AuthorityCertificates.
- In the Issued To column, find Organization Intermediate Authority.
- Make sure the Issued By column specifies Organization Root Authority for Organization Intermediate Authority.

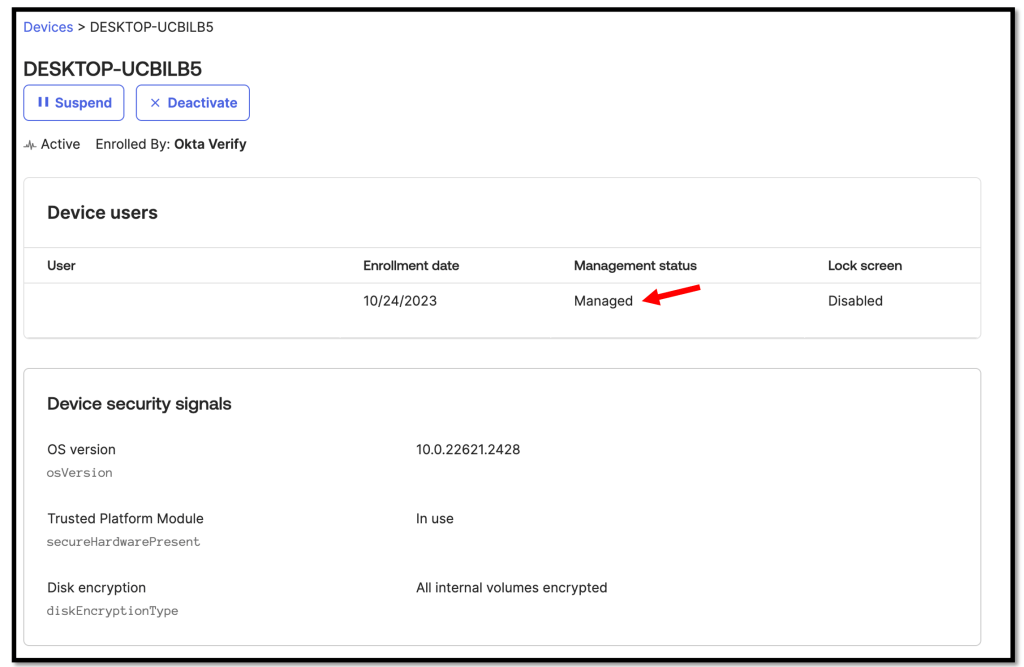
Verify the managed flag in Okta
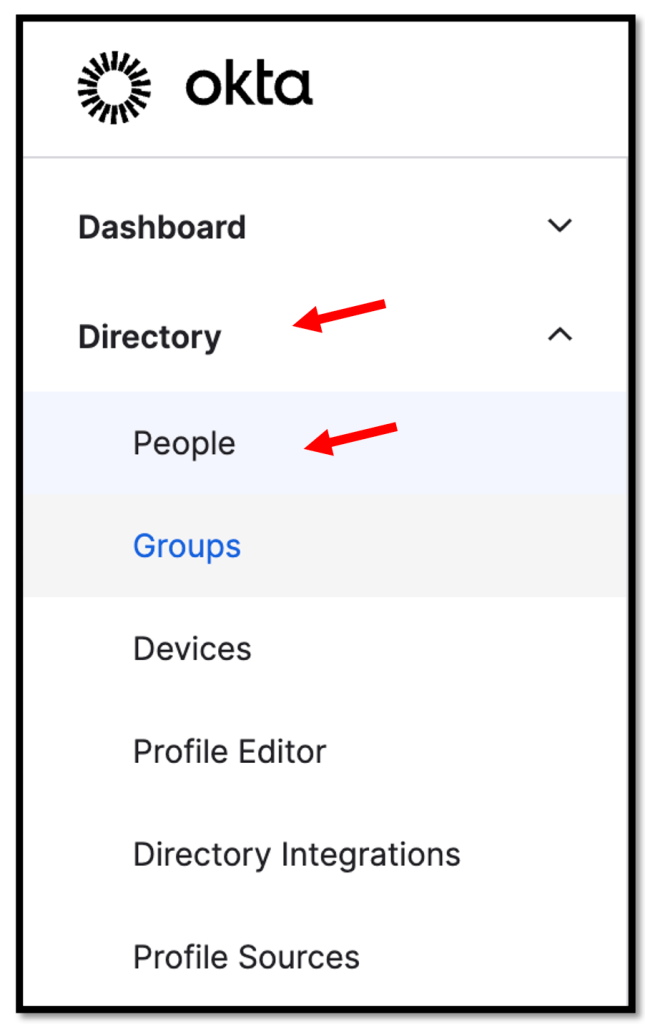
Navigate to Directory –> People
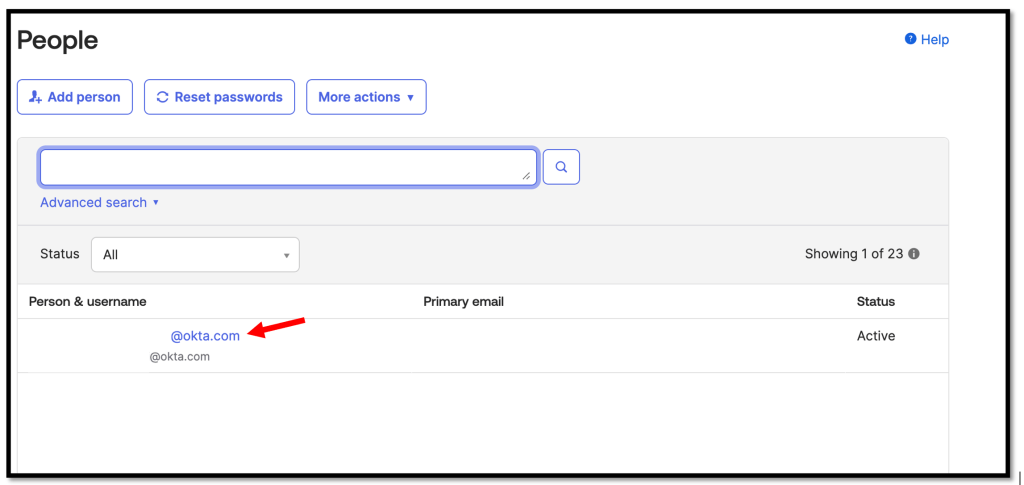
Select the desired user
Navigate to the Devices section and select your Device
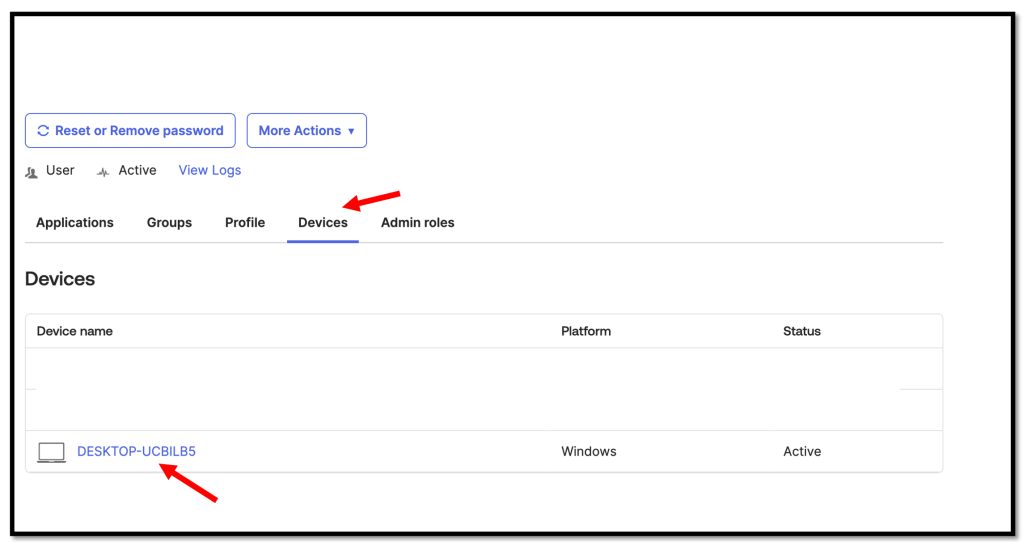
We should now see that our device has the Management status “Managed“
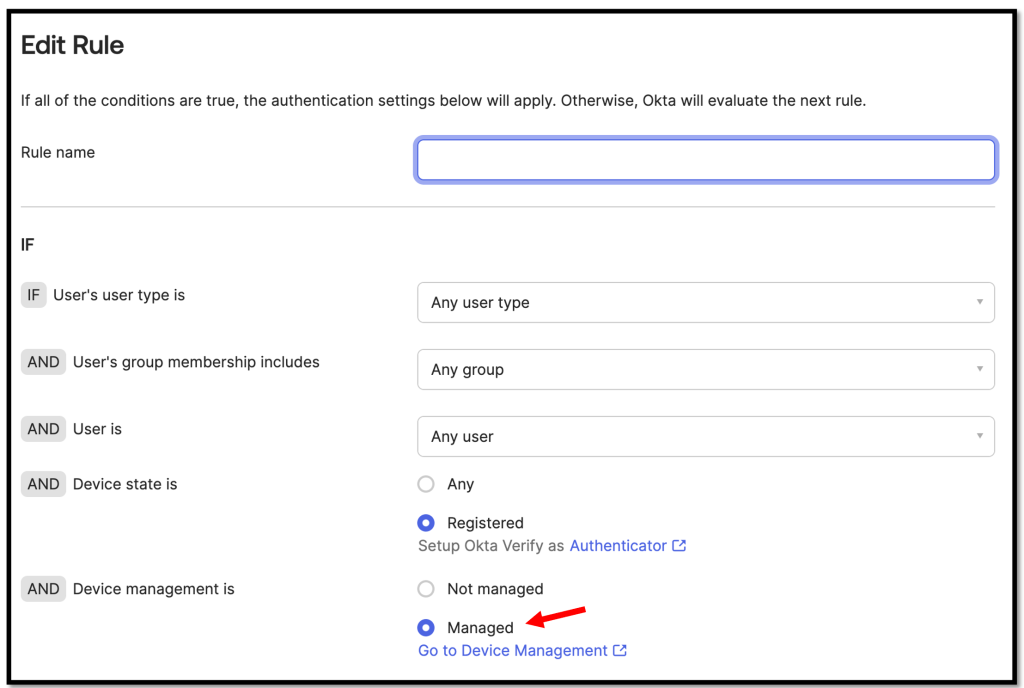
Now we can add a authentication policy rule and leverage the Device management flag.
More details and a guide can be found here.